Note
This page was generated from tut/1-Overview/1.3-Build-a-4-qubit-chip.ipynb.
1.3 Build a 4-qubit chip
In 1.1 Quick start you placed a transmon, wired two with a CPW, and got comfortable with the option → rebuild → view loop. Now we’ll scale up.
You’ll build a four-qubit chip with:
4
TransmonPocketqubits arranged in a ring at the cardinal directions.4
RouteMeanderCPWs connecting neighbouring qubits via their pins.Shared
design.variablesfor CPW width and gap so a single change updates every component.An overlap-check pass before exporting.
By the end you’ll have a full design ready to save with to_python_script() (covered next in 1.4 Saving & exporting).
![]()
![]()
💡 Running in Colab or Binder? Skip the desktop GUI install — the cell below grabs the lite (no-Qt) wheel, and
qm.gui(design)auto-picks an inline matplotlib viewer with the same API as the desktopMetalGUI.
[ ]:
# In Colab / Binder, uncomment to install Quantum Metal (lite, no Qt).
# Locally you should already have it via `pip install quantum-metal` or
# `pip install 'quantum-metal[gui]'` for the desktop GUI.
# !pip install -q quantum-metal
[ ]:
import qiskit_metal as metal
import qiskit_metal as qm
from qiskit_metal import Dict, designs, draw
from qiskit_metal.qlibrary.qubits.transmon_pocket import TransmonPocket
from qiskit_metal.qlibrary.tlines.meandered import RouteMeander

design = designs.DesignPlanar()
design.overwrite_enabled = True  # we'll re-run cells freely
gui = qm.gui(design)
[4]:
%metal_heading My first quantum chip
My first quantum chip
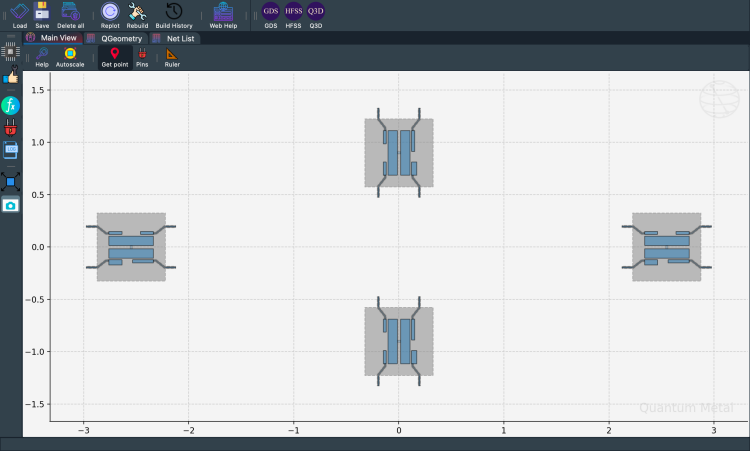
A whole chip — four qubits + couplers
Now scale up: drop four TransmonPocket qubits, then connect them with RouteMeander CPWs. First, clear the design.
[7]:
design.delete_all_components()
gui.rebuild()  # refresh
[8]:
from qiskit_metal.qlibrary.qubits.transmon_pocket import TransmonPocket

# Allow running the same cell here multiple times to overwrite changes
design.overwrite_enabled = True

## Custom options for all the transmons
options = dict(
    # Some options we want to modify from the defaults
    # (see below for defaults)
    pad_width="425 um",
    pocket_height="650um",
    # Use FakeJunction_01 from resources/Fake_Junctions.GDS for all qubits.
    gds_cell_name="FakeJunction_01",
    # Adding 4 connectors (see below for defaults)
    connection_pads=dict(
        a=dict(loc_W=+1, loc_H=+1),
        b=dict(loc_W=-1, loc_H=+1, pad_height="30um"),
        c=dict(loc_W=+1, loc_H=-1, pad_width="200um"),
        d=dict(loc_W=-1, loc_H=-1, pad_height="50um"),
    ),
)

## Create 4 transmons

q1 = TransmonPocket(
    design, "Q1", options=dict(pos_x="+2.55mm", pos_y="+0.0mm", **options)
)
q2 = TransmonPocket(
    design,
    "Q2",
    options=dict(pos_x="+0.0mm", pos_y="-0.9mm", orientation="90", **options),
)
q3 = TransmonPocket(
    design, "Q3", options=dict(pos_x="-2.55mm", pos_y="+0.0mm", **options)
)
q4 = TransmonPocket(
    design,
    "Q4",
    options=dict(pos_x="+0.0mm", pos_y="+0.9mm", orientation="90", **options),
)

## Rebuild the design
gui.rebuild()
gui.autoscale()
[9]:
gui.toggle_docks(True)
gui.screenshot()
[10]:
%metal_heading Connecting QPins with coplanar waveguides (CPWs)
Connecting QPins with coplanar waveguides (CPWs)
Connecting QPins with coplanar waveguides
RouteMeander is the meandered CPW component. Inspect its template options:
[11]:
from qiskit_metal.qlibrary.tlines.meandered import RouteMeander

RouteMeander.get_template_options(design)
[11]:
{'chip': 'main',
 'layer': '1',
 'pin_inputs': {'start_pin': {'component': '', 'pin': ''},
  'end_pin': {'component': '', 'pin': ''}},
 'fillet': '0',
 'lead': {'start_straight': '0mm',
  'end_straight': '0mm',
  'start_jogged_extension': '',
  'end_jogged_extension': ''},
 'total_length': '7mm',
 'trace_width': 'cpw_width',
 'meander': {'spacing': '200um', 'asymmetry': '0um'},
 'snap': 'true',
 'prevent_short_edges': 'true',
 'hfss_wire_bonds': False,
 'q3d_wire_bonds': False,
 'aedt_q3d_wire_bonds': False,
 'aedt_hfss_wire_bonds': False}
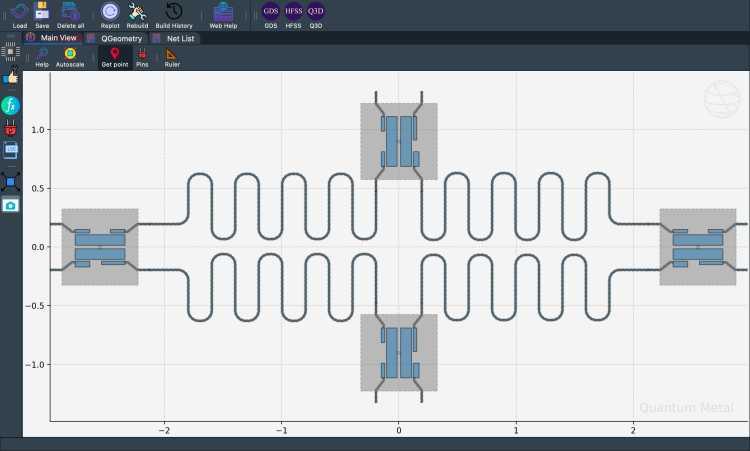
Now wire all four qubits in a ring. The repetition is wrapped in a small helper for clarity.
[12]:
options = Dict(meander=Dict(lead_start="0.1mm", lead_end="0.1mm", asymmetry="0 um"))


def connect(
    component_name: str,
    component1: str,
    pin1: str,
    component2: str,
    pin2: str,
    length: str,
    asymmetry="0 um",
    flip=False,
):
    """Connect two pins with a CPW."""
    myoptions = Dict(
        pin_inputs=Dict(
            start_pin=Dict(component=component1, pin=pin1),
            end_pin=Dict(component=component2, pin=pin2),
        ),
        lead=Dict(start_straight="0.13mm"),
        total_length=length,
        fillet="90um",
    )
    myoptions.update(options)
    myoptions.meander.asymmetry = asymmetry
    myoptions.meander.lead_direction_inverted = "true" if flip else "false"
    return RouteMeander(design, component_name, myoptions)


asym = 150
cpw1 = connect("cpw1", "Q1", "d", "Q2", "c", "6.0 mm", f"+{asym}um")
cpw2 = connect("cpw2", "Q3", "c", "Q2", "a", "6.1 mm", f"-{asym}um", flip=True)
cpw3 = connect("cpw3", "Q3", "a", "Q4", "b", "6.0 mm", f"+{asym}um")
cpw4 = connect("cpw4", "Q1", "b", "Q4", "d", "6.1 mm", f"-{asym}um", flip=True)

gui.rebuild()
gui.autoscale()
[13]:
gui.toggle_docks(True)
gui.screenshot()
[14]:
design.components.keys()
[14]:
['Q1', 'Q2', 'Q3', 'Q4', 'cpw1', 'cpw2', 'cpw3', 'cpw4']
Access the resulting CPW from the design:
[15]:
design.components.cpw2
[15]:
name:    cpw2
class:   RouteMeander
options:
  'chip'              : 'main',
  'layer'             : '1',
  'pin_inputs'        : {
       'start_pin'         : {
            'component'         : 'Q3',
            'pin'               : 'c',
                             },
       'end_pin'           : {
            'component'         : 'Q2',
            'pin'               : 'a',
                             },
                        },
  'fillet'            : '90um',
  'lead'              : {
       'start_straight'    : '0.13mm',
       'end_straight'      : '0mm',
       'start_jogged_extension': '',
       'end_jogged_extension': '',
                        },
  'total_length'      : '6.1 mm',
  'trace_width'       : 'cpw_width',
  'meander'           : {
       'spacing'           : '200um',
       'asymmetry'         : '-150um',
       'lead_start'        : '0.1mm',
       'lead_end'          : '0.1mm',
       'lead_direction_inverted': 'true',
                        },
  'snap'              : 'true',
  'prevent_short_edges': 'true',
  'hfss_wire_bonds'   : False,
  'q3d_wire_bonds'    : False,
  'aedt_q3d_wire_bonds': False,
  'aedt_hfss_wire_bonds': False,
  'trace_gap'         : 'cpw_gap',
  '_actual_length'    : '6.100000000000002 mm',
module:  qiskit_metal.qlibrary.tlines.meandered
id:      7
Inspect every pin in the design:
[16]:
%metal_heading Variables in options
Variables in options
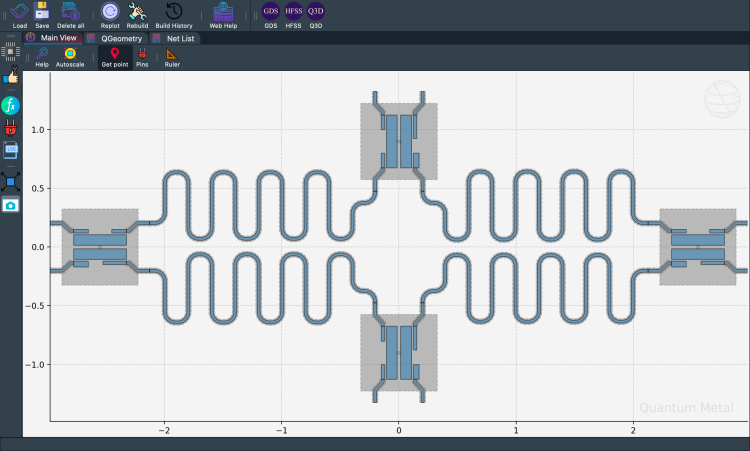
Design variables
Designs carry a variables dict. Components can reference these by name in their option strings — change a variable, every dependent component updates on the next rebuild().
[17]:
design.variables.cpw_width = "10um"
design.variables.cpw_gap = "6um"
gui.rebuild()
Use variables to share values across components:
[18]:
cpw1.options.lead.end_straight = "100um"
cpw2.options.lead.end_straight = "100um"
cpw3.options.lead.end_straight = "100um"
cpw4.options.lead.end_straight = "100um"
[19]:
# Set variables in the design
design.variables.pad_width = "450 um"
design.variables.cpw_width = "25 um"
design.variables.cpw_gap = "12 um"

# Assign variables to component options
q1.options.pad_width = "pad_width"
q2.options.pad_width = "pad_width"
q3.options.pad_width = "pad_width"
q4.options.pad_width = "pad_width"

# Rebuild all components and refresh the gui
gui.rebuild()
gui.autoscale()
[20]:
gui.screenshot()
Before you export — check for overlaps
On complex chips with many components, accidental geometry overlaps can cause DRC errors at the fab. Metal ships a built-in checker:
See the quick-topic notebook Testing QComponents for overlap and collisions for a one-cell overlap check you can run right now.
[ ]:
# Uncomment to run the overlap check on the current design.
# Returns a DataFrame of overlapping component pairs (empty = all clear).
# from qiskit_metal.analyses.quantization import OverlapChecker
# OverlapChecker(design).check()
[76]:
%metal_heading Qiskit Metal Version
Qiskit Metal Version
[77]:
metal.about();
Qiskit Metal        0.6.1

Basic
____________________________________
 Python              3.11.14 (main, Dec  5 2025, 21:28:33) [Clang 21.1.4 ]
 Platform            Darwin arm64
 Installation path   /Users/zlatkominev/CODE_REPOS/quantum_hardware/qiskit-metal/src/qiskit_metal

Packages
____________________________________
 Numpy               1.26.4
 Qutip               5.2.2

Rendering
____________________________________
 Matplotlib          3.10.8

GUI
____________________________________
 PySide6 version     6.10.1
 Qt version          6.10.1
 SIP version         Not installed

IBM Quantum Team
Close the GUI window:
[ ]:
# gui.main_window.close()
What’s next?
Save your design: 1.4 Saving & exporting —
to_python_script()for reproducibility + GDS export for fabrication.Sweep parameters: 1.5 Parametric design — compare design variants side by side.
Custom components: 2.31 Create a QComponent — Basic.
Routing options: 2.11 Routing 101 for routing techniques beyond
RouteMeander.
For more information, review the Introduction to Quantum Computing and Quantum Hardware lectures below
|
Lecture Video | Lecture Notes | Lab |
|
Lecture Video | Lecture Notes | Lab |
|
Lecture Video | Lecture Notes | Lab |
|
Lecture Video | Lecture Notes | Lab |
|
Lecture Video | Lecture Notes | Lab |
|
Lecture Video | Lecture Notes | Lab |