注釈
このページは docs/tutorials/08_quantum_kernel_trainer.ipynb から生成されました。
機械学習アプリケーション向けの量子カーネルトレーニング#
このチュートリアルでは、機械学習アプリケーション用のラベル付きデータセットで量子カーネルをトレーニングします。基本的な手順を説明するために、二値分類タスクに Quantum Kernel Alignment(QKA)を使用します。QKAは、最大SVMマージンに収束しながら、パラメーター化された量子カーネルをデータセットに繰り返し適応させる手法です。QKAの詳細については、プレプリントの “Covariant quantum kernels for data with group structure” を参照してください。
量子カーネルをトレーニングするためのエントリポイントは、 QuantumKernelTrainer クラスです。基本的な手順は次のとおりです。
データセットを準備する
量子特徴マップを定義する
TrainableKernelインスタンスとQuantumKernelTrainerオブジェクトを設定するQuantumKernelTrainer.fitメソッドを使用して、データセットのカーネルパラメーターをトレーニングするトレーニングされた量子カーネルを機械学習モデルに渡す
ローカル、外部、Qiskitパッケージをインポートし、オプティマイザーのコールバッククラスを定義する#
[1]:
# External imports
from pylab import cm
from sklearn import metrics
import numpy as np
import matplotlib
import matplotlib.pyplot as plt

# Qiskit imports
from qiskit import QuantumCircuit
from qiskit.circuit import ParameterVector
from qiskit.visualization import circuit_drawer
from qiskit.circuit.library import ZZFeatureMap
from qiskit_algorithms.optimizers import SPSA
from qiskit_machine_learning.kernels import TrainableFidelityQuantumKernel
from qiskit_machine_learning.kernels.algorithms import QuantumKernelTrainer
from qiskit_machine_learning.algorithms import QSVC
from qiskit_machine_learning.datasets import ad_hoc_data


class QKTCallback:
    """Callback wrapper class."""

    def __init__(self) -> None:
        self._data = [[] for i in range(5)]

    def callback(self, x0, x1=None, x2=None, x3=None, x4=None):
        """
        Args:
            x0: number of function evaluations
            x1: the parameters
            x2: the function value
            x3: the stepsize
            x4: whether the step was accepted
        """
        self._data[0].append(x0)
        self._data[1].append(x1)
        self._data[2].append(x2)
        self._data[3].append(x3)
        self._data[4].append(x4)

    def get_callback_data(self):
        return self._data

    def clear_callback_data(self):
        self._data = [[] for i in range(5)]
データセットを準備する#
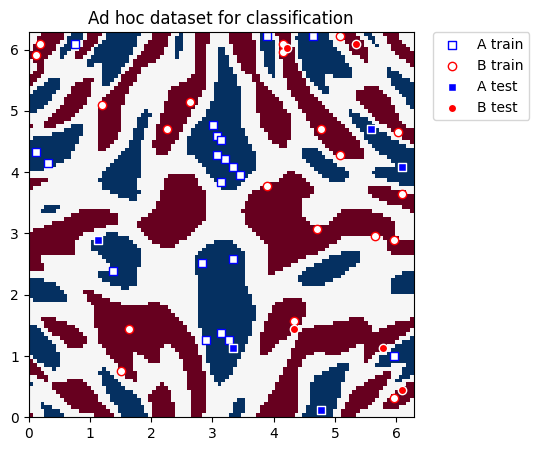
このガイドでは、Qiskit Machine Learning の ad_hoc.py データセットを使用して、カーネルトレーニングプロセスを示します。 こちら のドキュメントを参照してください。
[2]:
adhoc_dimension = 2
X_train, y_train, X_test, y_test, adhoc_total = ad_hoc_data(
    training_size=20,
    test_size=5,
    n=adhoc_dimension,
    gap=0.3,
    plot_data=False,
    one_hot=False,
    include_sample_total=True,
)

plt.figure(figsize=(5, 5))
plt.ylim(0, 2 * np.pi)
plt.xlim(0, 2 * np.pi)
plt.imshow(
    np.asmatrix(adhoc_total).T,
    interpolation="nearest",
    origin="lower",
    cmap="RdBu",
    extent=[0, 2 * np.pi, 0, 2 * np.pi],
)

plt.scatter(
    X_train[np.where(y_train[:] == 0), 0],
    X_train[np.where(y_train[:] == 0), 1],
    marker="s",
    facecolors="w",
    edgecolors="b",
    label="A train",
)
plt.scatter(
    X_train[np.where(y_train[:] == 1), 0],
    X_train[np.where(y_train[:] == 1), 1],
    marker="o",
    facecolors="w",
    edgecolors="r",
    label="B train",
)
plt.scatter(
    X_test[np.where(y_test[:] == 0), 0],
    X_test[np.where(y_test[:] == 0), 1],
    marker="s",
    facecolors="b",
    edgecolors="w",
    label="A test",
)
plt.scatter(
    X_test[np.where(y_test[:] == 1), 0],
    X_test[np.where(y_test[:] == 1), 1],
    marker="o",
    facecolors="r",
    edgecolors="w",
    label="B test",
)

plt.legend(bbox_to_anchor=(1.05, 1), loc="upper left", borderaxespad=0.0)
plt.title("Ad hoc dataset for classification")

plt.show()

量子特徴マップを定義する#
次に、古典的なデータを量子状態空間にエンコードする量子特徴マップを設定します。ここでは、 QuantumCircuit を使用してトレーニング可能な回転レイヤーを設定し、 Qiskit の ZZFeatureMap を使用して入力データを表します。
[3]:
# Create a rotational layer to train. We will rotate each qubit the same amount.
training_params = ParameterVector("θ", 1)
fm0 = QuantumCircuit(2)
fm0.ry(training_params[0], 0)
fm0.ry(training_params[0], 1)

# Use ZZFeatureMap to represent input data
fm1 = ZZFeatureMap(2)

# Create the feature map, composed of our two circuits
fm = fm0.compose(fm1)

print(circuit_drawer(fm))
print(f"Trainable parameters: {training_params}")
     ┌──────────┐┌──────────────────────────┐
q_0: ┤ Ry(θ[0]) ├┤0                         ├
     ├──────────┤│  ZZFeatureMap(x[0],x[1]) │
q_1: ┤ Ry(θ[0]) ├┤1                         ├
     └──────────┘└──────────────────────────┘
Trainable parameters: θ, ['θ[0]']
量子カーネルと量子カーネルトレーナーを設定する#
量子カーネルをトレーニングするには、 TrainableFidelityQuantumKernel (特徴マップとそのパラメーターを保持)と QuantumKernelTrainer (トレーニングプロセスを管理)が必要です。
QuantumKernelTrainer への入力としてカーネル損失関数 SVCLoss を選択することにより、Quantum Kernel Alignment 手法を使用してトレーニングします。これはQiskitでサポートされている損失であるため、文字列 svc_loss を使用できます。ただし、損失を文字列として渡す場合は、デフォルト設定が使用されることに注意してください。カスタム設定の場合は、必要なオプションを使用して明示的にインスタンス化し、 KernelLoss オブジェクトを QuantumKernelTrainer に渡します。
オプティマイザーとして SPSA を選択し、 initial_point 引数を使用してトレーニング可能なパラメーターを初期化します。注: initial_point 引数として渡されるリストの長さは、特徴量マップ内のトレーニング可能なパラメーターの数と等しくなければなりません。
[4]:
# Instantiate quantum kernel
quant_kernel = TrainableFidelityQuantumKernel(feature_map=fm, training_parameters=training_params)

# Set up the optimizer
cb_qkt = QKTCallback()
spsa_opt = SPSA(maxiter=10, callback=cb_qkt.callback, learning_rate=0.05, perturbation=0.05)

# Instantiate a quantum kernel trainer.
qkt = QuantumKernelTrainer(
    quantum_kernel=quant_kernel, loss="svc_loss", optimizer=spsa_opt, initial_point=[np.pi / 2]
)
量子カーネルをトレーニングする#
データセット(サンプルとラベル)で量子カーネルをトレーニングするために、 QuantumKernelTrainer の fit メソッドを呼び出します。
QuantumKernelTrainer.fit の出力は QuantumKernelTrainerResult オブジェクトです。結果オブジェクトには次のクラスフィールドが含まれています。
optimal_parameters: {parameter: optimal value} のペアを含む辞書optimal_point: 学習により見つけた最適なパラメーター値optimal_value: 最適な点での損失関数の値optimizer_evals: オプティマイザーによって実行される評価の数optimizer_time: 最適化を実行するのにかかった時間quantum_kernel: フィーチャーマップにバインドされた最適な値を持つTrainableKernelオブジェクト
[5]:
# Train the kernel using QKT directly
qka_results = qkt.fit(X_train, y_train)
optimized_kernel = qka_results.quantum_kernel
print(qka_results)
{   'optimal_circuit': None,
    'optimal_parameters': {ParameterVectorElement(θ[0]): 2.4745458584261386},
    'optimal_point': array([2.47454586]),
    'optimal_value': 7.399057680986741,
    'optimizer_evals': 30,
    'optimizer_result': None,
    'optimizer_time': None,
    'quantum_kernel': <qiskit_machine_learning.kernels.trainable_fidelity_quantum_kernel.TrainableFidelityQuantumKernel object at 0x7f84c120feb0>}
モデルの適合とテスト#
トレーニングされた量子カーネルを機械学習モデルに渡し、モデルを適合させて新しいデータでテストすることができます。ここでは、分類に Qiskit Machine Learning の QSVC を使用します。
[6]:
# Use QSVC for classification
qsvc = QSVC(quantum_kernel=optimized_kernel)

# Fit the QSVC
qsvc.fit(X_train, y_train)

# Predict the labels
labels_test = qsvc.predict(X_test)

# Evalaute the test accuracy
accuracy_test = metrics.balanced_accuracy_score(y_true=y_test, y_pred=labels_test)
print(f"accuracy test: {accuracy_test}")
accuracy test: 0.9
カーネルトレーニングプロセスを視覚化する#
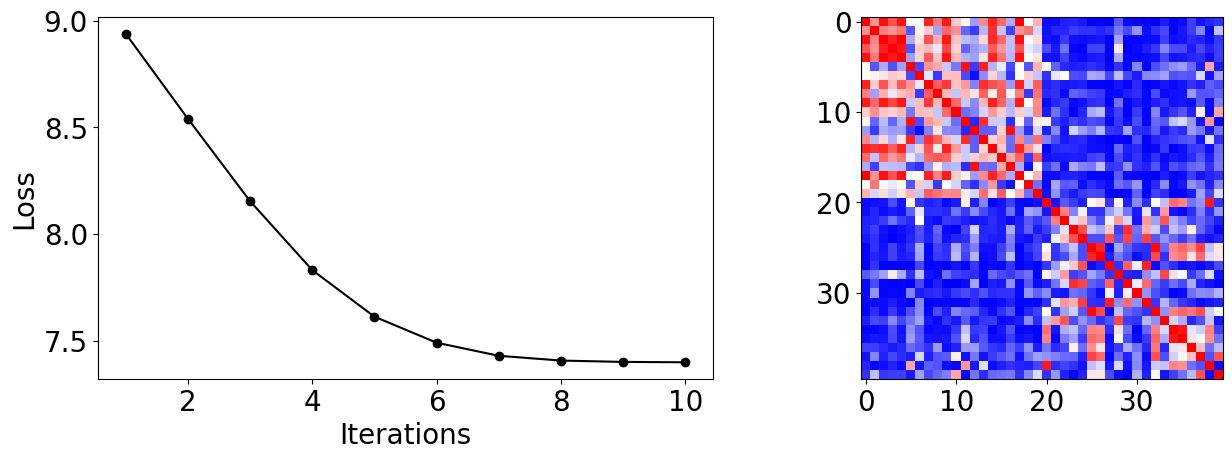
コールバックデータから、トレーニングプロセス中に損失がどのように変化するかをプロットできます。入力を選択すると、急速に収束し、このデータセットで高いテスト精度に達することがわかります。
トレーニングサンプル間の類似性の尺度である最終的なカーネル行列を表示することもできます。
[7]:
plot_data = cb_qkt.get_callback_data()  # callback data
K = optimized_kernel.evaluate(X_train)  # kernel matrix evaluated on the training samples

plt.rcParams["font.size"] = 20
fig, ax = plt.subplots(1, 2, figsize=(14, 5))
ax[0].plot([i + 1 for i in range(len(plot_data[0]))], np.array(plot_data[2]), c="k", marker="o")
ax[0].set_xlabel("Iterations")
ax[0].set_ylabel("Loss")
ax[1].imshow(K, cmap=matplotlib.colormaps["bwr"])
fig.tight_layout()
plt.show()

[8]:
import qiskit.tools.jupyter

%qiskit_version_table
%qiskit_copyright
Version Information
| Qiskit Software | Version |
|---|---|
qiskit-terra | 0.25.0 |
qiskit-aer | 0.13.0 |
qiskit-machine-learning | 0.7.0 |
| System information | |
| Python version | 3.8.13 |
| Python compiler | Clang 12.0.0 |
| Python build | default, Oct 19 2022 17:54:22 |
| OS | Darwin |
| CPUs | 10 |
| Memory (Gb) | 64.0 |
| Mon May 29 12:50:08 2023 IST | |
This code is a part of Qiskit
© Copyright IBM 2017, 2023.
This code is licensed under the Apache License, Version 2.0. You may
obtain a copy of this license in the LICENSE.txt file in the root directory
of this source tree or at http://www.apache.org/licenses/LICENSE-2.0.
Any modifications or derivative works of this code must retain this
copyright notice, and modified files need to carry a notice indicating
that they have been altered from the originals.