注釈
このページは docs/tutorials/07_pegasos_qsvc.ipynb から生成されました。
ペガソス量子サポートベクター分類器サポート#
量子カーネル法の恩恵を受けたSVMベースのアルゴリズムがもう一つあります。これはQiskit Machine Learningで利用できる QSVC の代替バージョンで、 「量子カーネル法機械学習」 tutorial で紹介されているものとは別の分類アルゴリズムの実装を紹介します。この分類アルゴリズムは、Shalev-Shwartz et al. による論文「Pegasos: Primal Estimated sub-GrAdient SOlver for SVM」のペガソスアルゴリズムを実装しています。https://home.ttic.edu/~nati/Publications/PegasosMPB.pdf を参照してください。
このアルゴリズムは、 scikit-learn パッケージの二重最適化に代わるものであり、カーネルトリックの恩恵を受け、トレーニングセットのサイズに依存しないトレーニングの複雑さをもたらします。したがって、 PegasosQSVC は、十分に大きなトレーニングセットに対して、QSVC よりも高速なトレーニングが期待されます。
このアルゴリズムは、 QSVC をハイパーパラメーターに直接置き換わるものとして使用できます。
次のデータを生成します。
[1]:
from sklearn.datasets import make_blobs

# example dataset
features, labels = make_blobs(n_samples=20, n_features=2, centers=2, random_state=3, shuffle=True)
ローテーション・エンコーディングとの互換性を確保するためにデータを前処理し、トレーニングデータセットとテストデータセットに分割します。
[2]:
import numpy as np

from sklearn.model_selection import train_test_split
from sklearn.preprocessing import MinMaxScaler

features = MinMaxScaler(feature_range=(0, np.pi)).fit_transform(features)

train_features, test_features, train_labels, test_labels = train_test_split(
    features, labels, train_size=15, shuffle=False
)
データセットには2つの特徴があるため、データセット内の特徴の数を量子ビットの数に設定します。
次に、 \(\tau\) をトレーニング手順中に実行されるステップ数に設定します。アルゴリズムにはアーリーストッピングの基準がないことに注意してください。アルゴリズムはすべての \(\tau\) ステップを繰り返します。
そして最後のひとつはハイパーパラメータ \(C\) です。これは正の正則化パラメータです。正則化の強さは \(C\) に反比例します。 \(C\) が小さいほど重みが小さくなり、一般的にオーバーフィッティングを防ぐのに役立ちます。ただし、このアルゴリズムの性質上、 \(C\) が大きいほど、計算ステップの一部が軽薄なものになります。したがって、 \(C\) が大きいほど、アルゴリズムのパフォーマンスが大幅に向上します。データが特徴空間で線形分離可能である場合は、 \(C\) を大きく選択する必要があります。分離が完全でない場合は、過剰適合を防ぐためにCを小さく選択する必要があります。
[3]:
# number of qubits is equal to the number of features
num_qubits = 2

# number of steps performed during the training procedure
tau = 100

# regularization parameter
C = 1000
アルゴリズムは以下を使用して実行されます。
FidelityQuantumKernelでインスタンス化されたデフォルトのフィデリティZFeatureMapから作成された量子カーネル
[4]:
from qiskit import BasicAer
from qiskit.circuit.library import ZFeatureMap
from qiskit_algorithms.utils import algorithm_globals

from qiskit_machine_learning.kernels import FidelityQuantumKernel

algorithm_globals.random_seed = 12345

feature_map = ZFeatureMap(feature_dimension=num_qubits, reps=1)

qkernel = FidelityQuantumKernel(feature_map=feature_map)
PegasosQSVC の実装は、 scikit-learn インターフェースと互換性があり、モデルをトレーニングするためのごく標準的な方法があります。コンストラクターでは、アルゴリズムのパラメーターを渡します。この場合、正則化ハイパーパラメーター \(C\) といくつパラメーターかのステップがあります。
次に、トレーニングする特徴量とラベルを fit メソッドに渡し、学習済みの分類器を返します。
その後、テスト機能とラベルを使用してモデルにスコアを付けます。
[5]:
from qiskit_machine_learning.algorithms import PegasosQSVC

pegasos_qsvc = PegasosQSVC(quantum_kernel=qkernel, C=C, num_steps=tau)

# training
pegasos_qsvc.fit(train_features, train_labels)

# testing
pegasos_score = pegasos_qsvc.score(test_features, test_labels)
print(f"PegasosQSVC classification test score: {pegasos_score}")
PegasosQSVC classification test score: 1.0
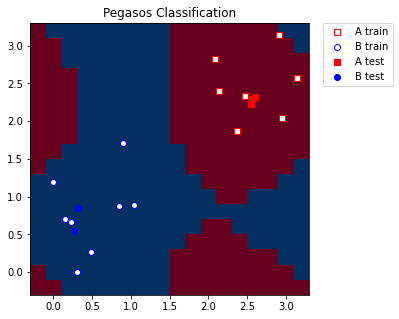
可視化を目的として、MinMaxScaler で適用した最小値と最大値にまたがる定義済みのステップのメッシュグリッドを作成します。また、トレーニングとテストのサンプルをより適切に表現するため、グリッドにマージンを追加します。
[6]:
grid_step = 0.2
margin = 0.2
grid_x, grid_y = np.meshgrid(
    np.arange(-margin, np.pi + margin, grid_step), np.arange(-margin, np.pi + margin, grid_step)
)
グリッドをモデルと互換性のある形状に変換します。形状は (n_samples, n_features) である必要があります。次に、グリッドポイントごとのラベルを予測します。この場合、予測ラベルはグリッドの色付けに使用されます。
[7]:
meshgrid_features = np.column_stack((grid_x.ravel(), grid_y.ravel()))
meshgrid_colors = pegasos_qsvc.predict(meshgrid_features)
最後に、モデルから取得したラベル/色に従ってグリッドをプロットします。 また、トレーニングとテストのサンプルもプロットします。
[8]:
import matplotlib.pyplot as plt

plt.figure(figsize=(5, 5))
meshgrid_colors = meshgrid_colors.reshape(grid_x.shape)
plt.pcolormesh(grid_x, grid_y, meshgrid_colors, cmap="RdBu", shading="auto")

plt.scatter(
    train_features[:, 0][train_labels == 0],
    train_features[:, 1][train_labels == 0],
    marker="s",
    facecolors="w",
    edgecolors="r",
    label="A train",
)
plt.scatter(
    train_features[:, 0][train_labels == 1],
    train_features[:, 1][train_labels == 1],
    marker="o",
    facecolors="w",
    edgecolors="b",
    label="B train",
)

plt.scatter(
    test_features[:, 0][test_labels == 0],
    test_features[:, 1][test_labels == 0],
    marker="s",
    facecolors="r",
    edgecolors="r",
    label="A test",
)
plt.scatter(
    test_features[:, 0][test_labels == 1],
    test_features[:, 1][test_labels == 1],
    marker="o",
    facecolors="b",
    edgecolors="b",
    label="B test",
)

plt.legend(bbox_to_anchor=(1.05, 1), loc="upper left", borderaxespad=0.0)
plt.title("Pegasos Classification")
plt.show()

[9]:
import qiskit.tools.jupyter

%qiskit_version_table
%qiskit_copyright
Version Information
| Qiskit Software | Version |
|---|---|
qiskit-terra | 0.22.0 |
qiskit-aer | 0.11.0 |
qiskit-ignis | 0.7.0 |
qiskit | 0.33.0 |
qiskit-machine-learning | 0.5.0 |
| System information | |
| Python version | 3.7.9 |
| Python compiler | MSC v.1916 64 bit (AMD64) |
| Python build | default, Aug 31 2020 17:10:11 |
| OS | Windows |
| CPUs | 4 |
| Memory (Gb) | 31.837730407714844 |
| Thu Oct 13 10:42:49 2022 GMT Daylight Time | |
This code is a part of Qiskit
© Copyright IBM 2017, 2022.
This code is licensed under the Apache License, Version 2.0. You may
obtain a copy of this license in the LICENSE.txt file in the root directory
of this source tree or at http://www.apache.org/licenses/LICENSE-2.0.
Any modifications or derivative works of this code must retain this
copyright notice, and modified files need to carry a notice indicating
that they have been altered from the originals.