Run SBD Closed-loop Workflow on Fugaku (qcsc-prefect)
This tutorial walks us through reproducing a Sample-based Quantum Diagonalization (SQD) experiment using the qcsc-prefect architecture.
We will run a hybrid quantum-classical workflow using the SBD solver to diagonalize a sparse chemistry Hamiltonian on Fugaku, orchestrated via Prefect.
The goal is to compute the ground state energy of N2-MO state.
Prerequisites
Before starting, make sure:
- You have completed Step1 : How to Set Up Python Environment on Fugaku Pre/Post Node.
- You have completed Step2 : How to Set Up IBM Quantum Access Credentials for Prefect.
[!IMPORTANT] Replace
ra00000,u12345andvol0000xwith your actual group, account name and mount volume.
0. What changes from BitCounts?
What you did in BitCounts (quick recap)
- (HPC side) Compile C++ and produce an executable.
- (Prefect side) Create blocks and variables.
- (Flow side) A Flow loads Blocks and Variables and runs tasks (quantum → HPC → post-process).
What SBD closed-loop adds
- HPC execution expands from a single binary to full SBD solver (
diag) + closed-loop logic. - Additional Blocks are required (solver job block, etc.).
- Deployment (Deploy) becomes important so that participants can run from the Prefect UI reliably.
- Block creation is automated via script instead of manual UI editing.
What is SBDSolverJob and why it appears here
SBDSolverJob is a workflow-facing facade block for the SBD domain. It is used so users can select one solver preset from the UI (for example CPU/GPU variants) with:
sbd_solver_job/<block_name>
Important: this does not replace the 3-block architecture.
CommandBlock= WHAT executable to runExecutionProfileBlock= HOW to run (MPI/walltime/modules)HPCProfileBlock= WHERE to run (queue/group/target)SBDSolverJob= SBD-specific wrapper that stores:- references to the three blocks above
- SBD-specific runtime arguments (
task_comm_size,block,iteration, etc.) - job file conventions (
root_dir,script_filename)
At runtime, SBDSolverJob.run(...) eventually calls run_job_from_blocks(...) and delegates actual submission to those three base blocks.
1. Big picture: Flow / Task / Block / Variable / Deployment
1.1 Minimal "where it runs" model
- Workflow host: where the Prefect process runs the Flow (runner/worker side)
- Fugaku: where
diagruns via PJM/MPI - IBM Quantum: where quantum sampling runs via Qiskit Runtime
1.2 Mapping to Prefect core concepts
Flow (end-to-end experiment procedure)
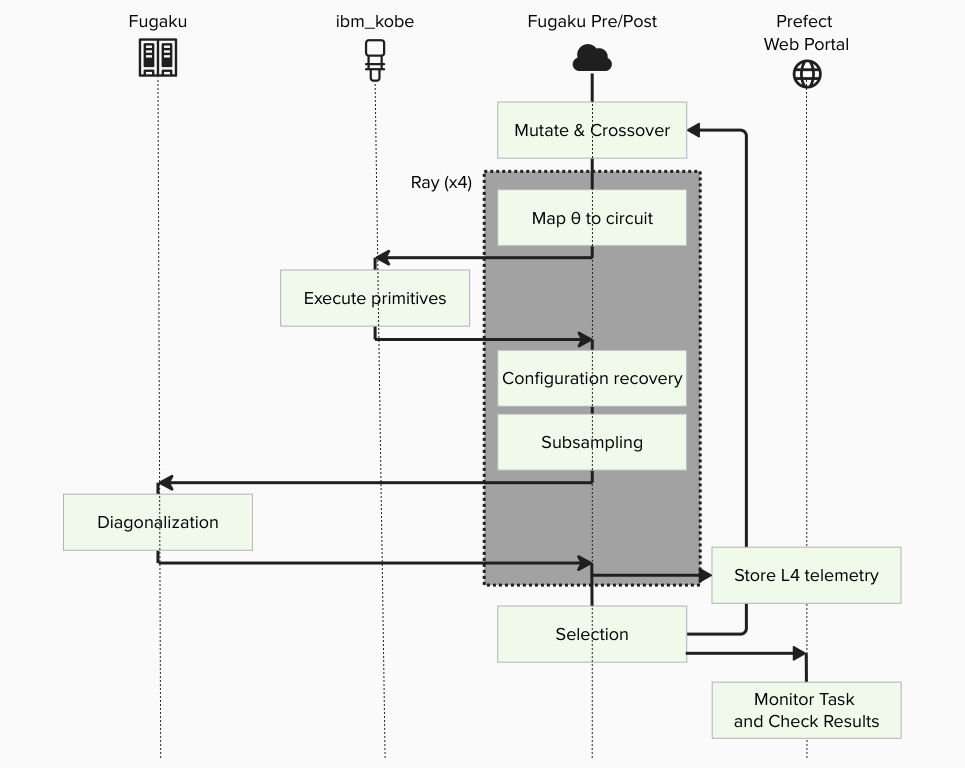
The entire closed-loop SQD experiment is implemented as a single Flow, including iterations, branching, and convergence checks.
Tasks (individual steps)
- Execute quantum sampling (IBM Quantum / Qiskit Runtime)
- Subsampling / configuration recovery (Python)
- Davidson diagonalization (PJM job on Fugaku)
- Collect results and store artifacts (Prefect)
Blocks (reusable "configuration + credentials")
- Quantum: IBM Quantum credentials / runtime configuration
- HPC: SBD solver job settings (rscgrp, nodes, executable path, modules, etc.)
- Command: command execution settings
- Execution Profile: MPI execution settings
Variables (runtime parameters)
- Quantum sampler options (shots, etc.) and other run-time knobs are stored as Prefect Variables.
Deployment (how the Flow becomes runnable from the UI)
Deployment is the launch entry that tells Prefect: - which Flow to run, - under which deployment name, - and how it should be executed by a serving process.
2. Tutorial steps
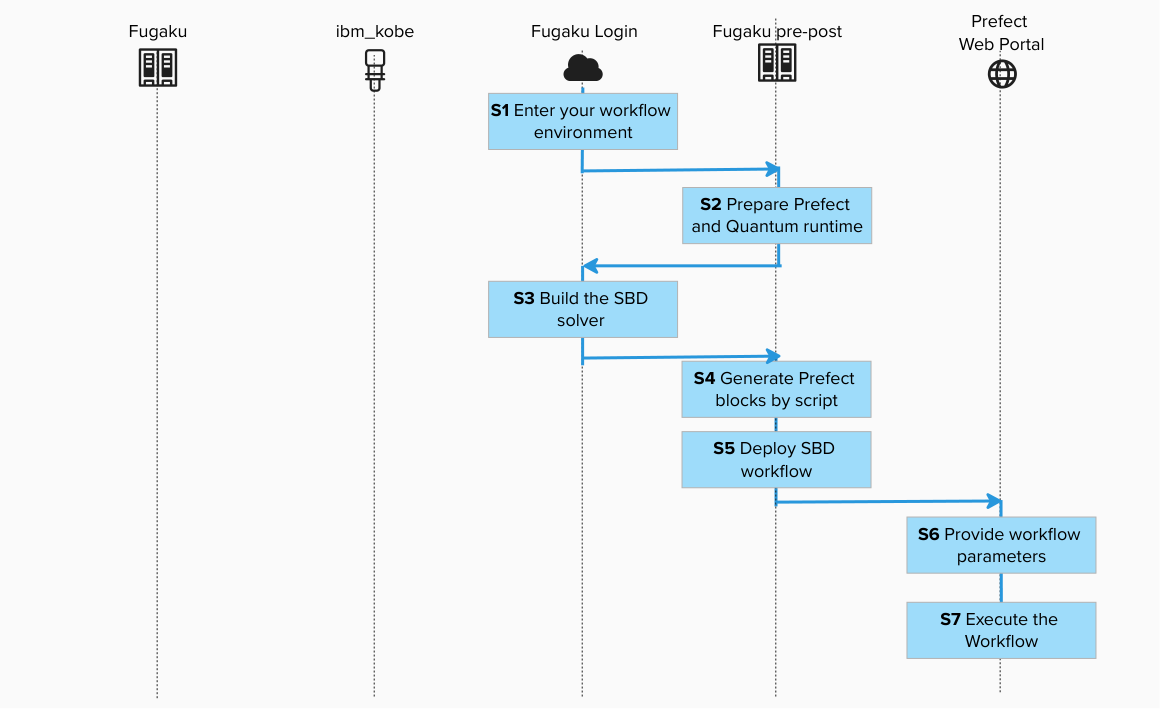
Step 1. Enter your workflow environment
Connect to the environment where Prefect CLI is configured and Fugaku scheduler commands are available.
![]()
ssh -A <your_account>@<fugaku_login_host>
Execute the interact session for Pre/Post Node in the login node.
![]()
srun -p mem2 -n 1 --mem 8G --time=60 --pty bash -i
Step 2. Prepare Prefect and Quantum runtime (Pre/Post Node)
![]()
cd /path/to/work

git clone git@github.com:qiskit-community/qcsc-prefect.git
cd qcsc-prefect

source ~/venv/prefect/bin/activate
uv pip install prefect-qiskit
export SSL_CERT_FILE=$(python -c 'import certifi; print(certifi.where())')
uv pip install --no-deps \
  -e packages/qcsc-prefect-core \
  -e packages/qcsc-prefect-adapters \
  -e packages/qcsc-prefect-blocks \
  -e packages/qcsc-prefect-executor

uv pip install -e algorithms/qcsc_workflow_utility
uv pip install -e algorithms/sbd
Check installation:
![]()
uv pip list | grep -E "(qcsc-prefect|sbd|qcsc)"

qcsc-prefect-blocks                 0.1.0
qcsc-prefect-core                   0.1.0
qcsc-prefect-executor               0.1.0
prefect-sbd                        0.1.0
qcsc-workflow-utility              0.1.0
sbd                                0.1.0
Step 3. Build the SBD solver on Fugaku Login Node (prepare the HPC executable)
Create a new terminal and login to Fugaku Login Node. Navigate to native source and build. This procedure can also be executed on the Pre-Post Node.
![]() or
or ![]()
cd /path/to/work/qcsc-prefect/algorithms/sbd/native
bash ./build_sbd_fugaku.sh
Confirm executable:
![]() or
or ![]()
ls -l | grep diag
realpath ./diag
Example output:
/path/to/work/qcsc-prefect/algorithms/sbd/native/diag
We will use this path in the next step.
Step 4. Generate Prefect blocks by script (Pre/Post Node)
4.1 Create a job working directory and copy config template
![]()
cd /path/to/work/qcsc-prefect
mkdir -p /path/to/work/sbd_jobs
realpath /path/to/work/sbd_jobs
/volxxxxx/mdt6/data/raxxxxx/uxxxxx/sbd_jobs
![]()
cp algorithms/sbd/sbd_blocks.fugaku.example.toml algorithms/sbd/sbd_blocks.toml
vim algorithms/sbd/sbd_blocks.toml
4.2 Edit the configuration file
The copied example already contains the Fugaku tutorial baseline:
hpc_target = "fugaku"launcher = "mpiexec"num_nodes = 2mpiprocs = 2mpi_options = ["-n", "2"]script_filename = "sbd_solver.pjm"metrics_artifact_key = "fugaku-sbd-metrics"
Edit algorithms/sbd/sbd_blocks.toml and update at least:
groupqueuework_dirsbd_executablefugaku_gfscache
| Parameter | Value / Example | Description |
|---|---|---|
hpc_target |
fugaku |
Target scheduler backend |
group |
raXXXXXX |
Fugaku Group ID |
queue |
small |
Fugaku resource group (rscgrp) |
work_dir |
/volxxxxx/mdt6/data/raxxxxx/uxxxxx/sbd_jobs |
Job working directory |
sbd_executable |
/volxxxxx/mdt6/data/raxxxxx/uxxxxx/qcsc-prefect/algorithms/sbd/native/diag |
Absolute path to executable |
num_nodes |
2 |
Number of allocated nodes for this tutorial |
launcher |
mpiexec |
MPI launcher |
mpiprocs |
2 |
Number of MPI processes |
mpi_options |
["-n", "2"] |
MPI options for launcher |
shots |
50000 |
Prefect variable value for SQD sampling (sqd_options.params.shots) |
fugaku_gfscache |
/vol0002 |
Optional GFSCACHE setting |
fugaku_spack_modules |
site-specific list | Optional Spack modules |
4.3 Run block creation script
![]()
python algorithms/sbd/create_blocks.py \
  --config algorithms/sbd/sbd_blocks.toml \
  --hpc-target fugaku
This creates the following blocks (default names):
- CommandBlock:
cmd-sbd-diag - ExecutionProfileBlock:
exec-sbd-fugaku - HPCProfileBlock:
hpc-fugaku-sbd - SBD Solver Job:
davidson-solver - Prefect Variable:
sqd_options
davidson-solver is the block you later pass as Solver Block Ref in the UI.
Internally, this block points to:
- cmd-sbd-diag
- exec-sbd-fugaku
- hpc-fugaku-sbd
Step 5. Deploy SBD workflow (Pre/Post Node)
Deploy = register a Flow as a runnable entry point (Deployment) so it can be started from the Prefect UI/CLI by name.
Set Ray runtime parameter before deploy:
![]()
export PREFECT_RAY_NUM_CPUS=2
[!NOTE]
SBD_TASK_RUNNERisrayby default. If Ray is unstable in your environment, useexport SBD_TASK_RUNNER=concurrentfor troubleshooting.
Deploy:
![]()
sbd-deploy
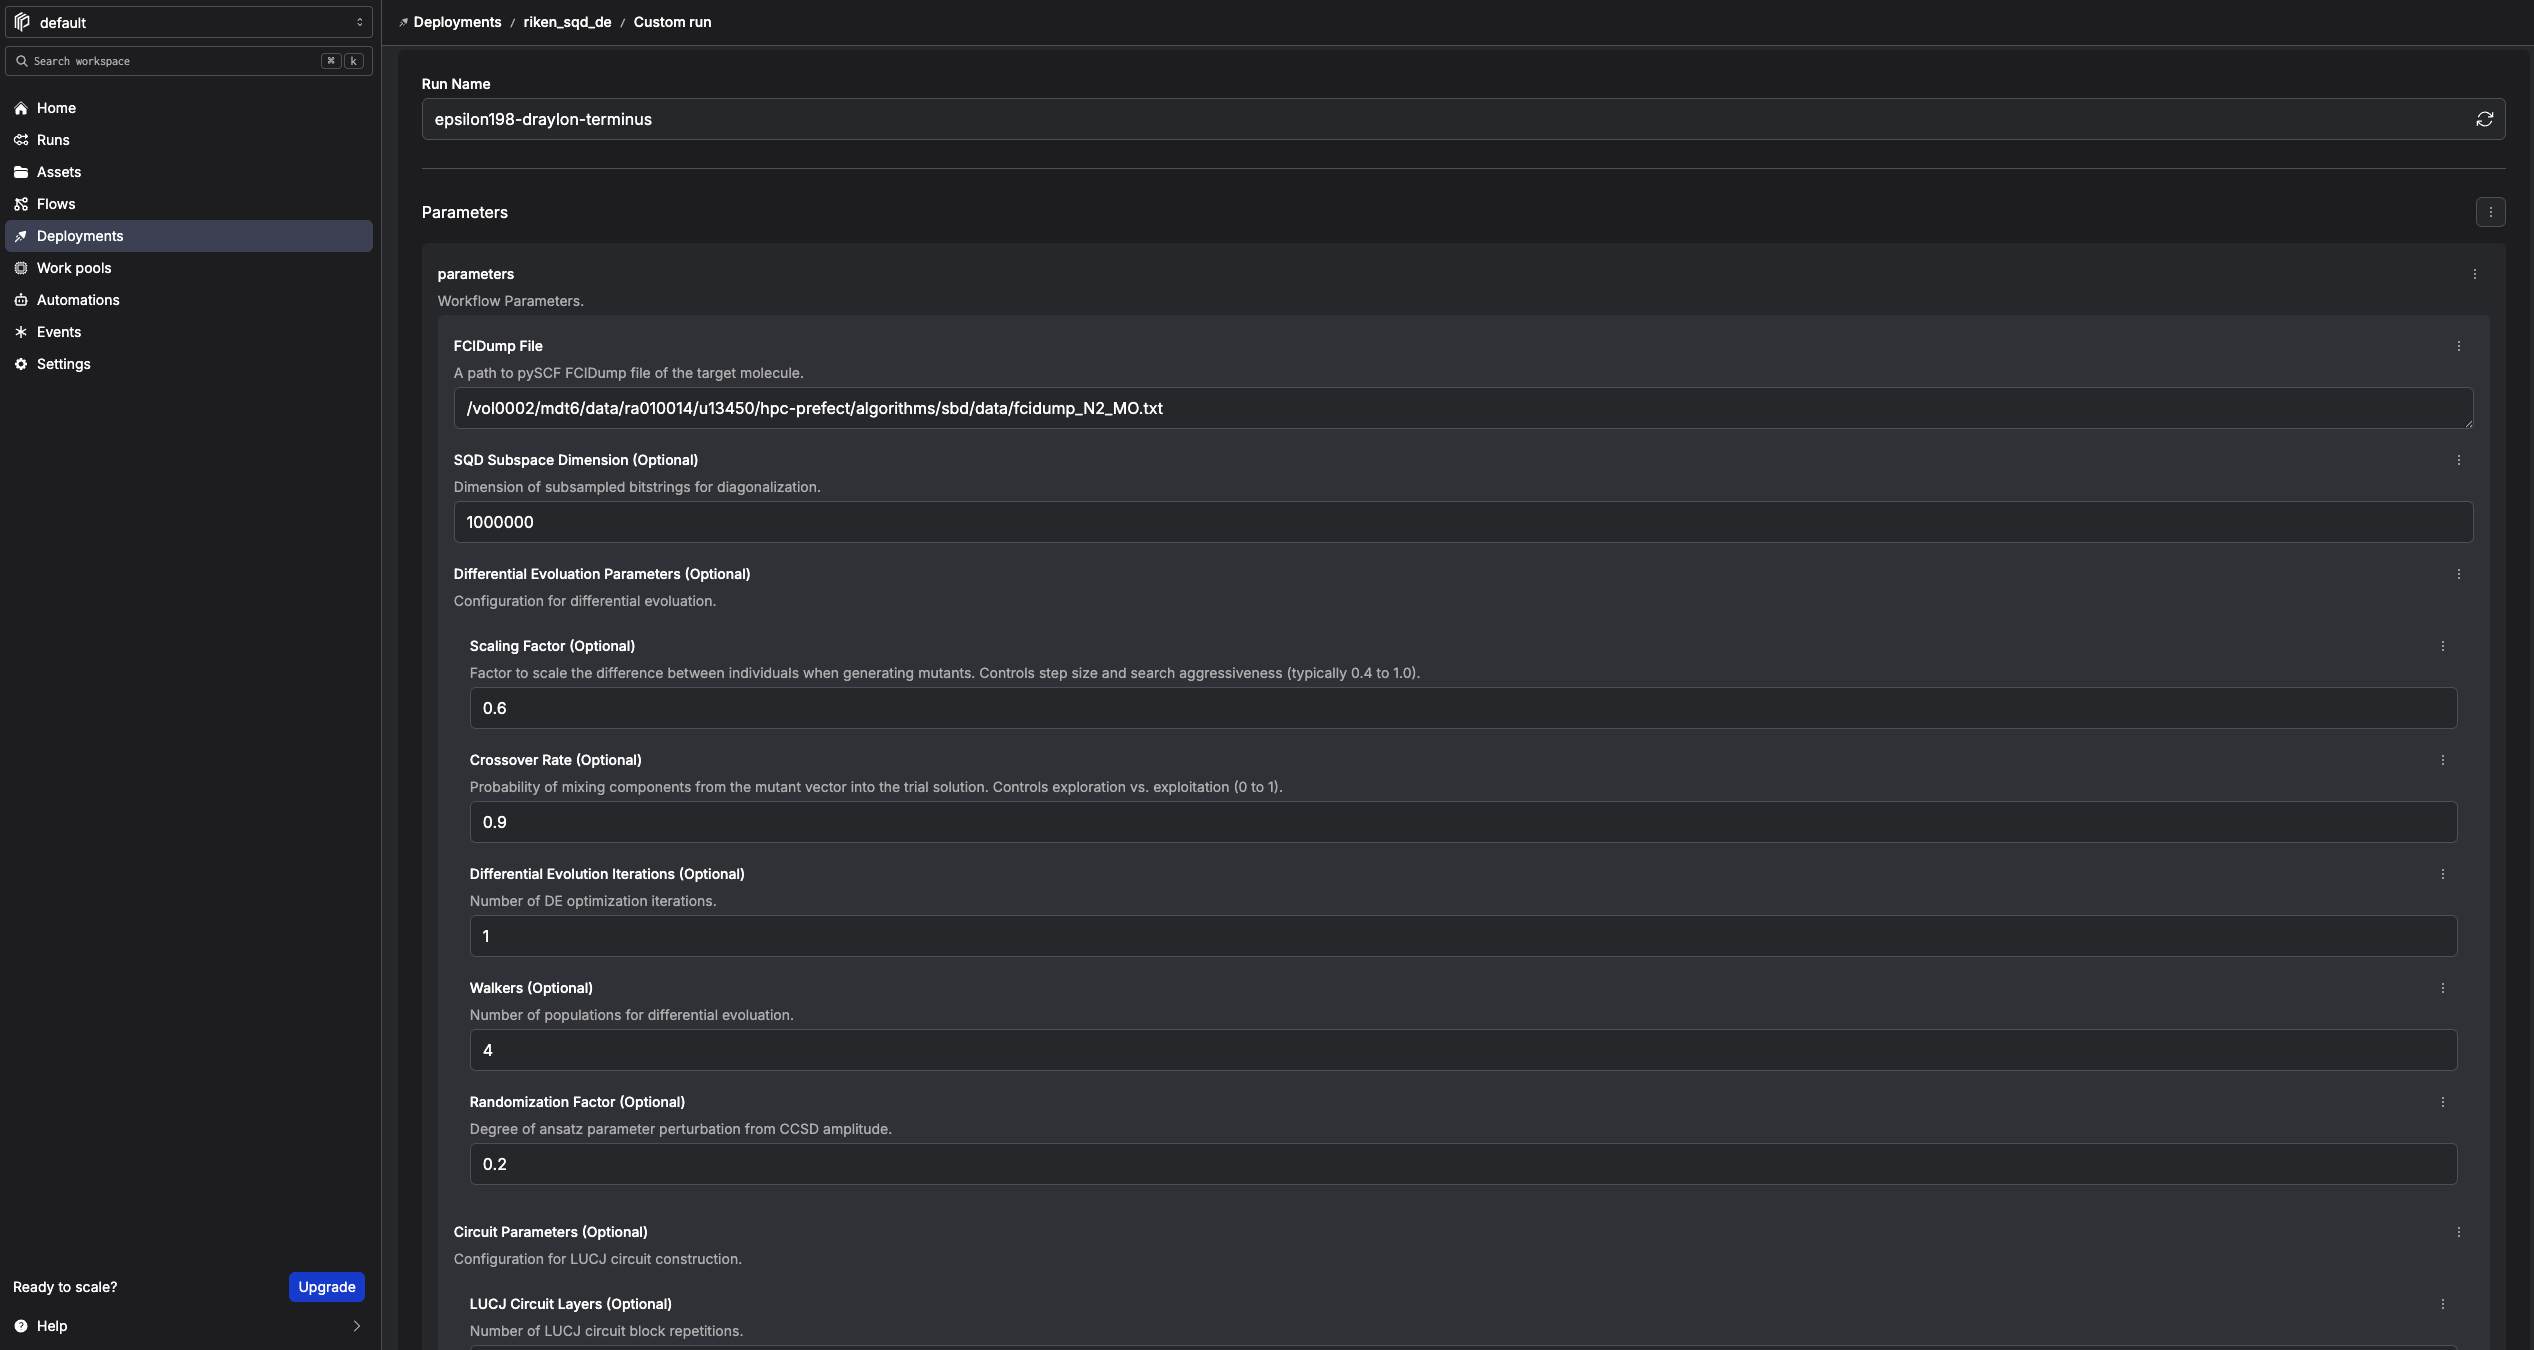
Step 6. Provide workflow parameters
In the Prefect console, click Run → Custom run and set at least:
| Field | Value / Example |
|---|---|
| FCIDump File | /path/to/work/qcsc-prefect/algorithms/sbd/data/fcidump_N2_MO.txt |
| SQD Subspace Dimension (Optional) | 1000000 |
| Differential Evolution Iterations (Optional) | 1 (start small for testing) |
| Quantum Source (Optional) | real-device or random |
| Random Seed (Optional) | 24 |
| Solver Block Ref | sbd_solver_job/davidson-solver |
[!CAUTION] The sample
circ_params.sabre_layout_trialsvalues used in this tutorial are intentionally kept low on Fugaku so the workflow does not spend a very long time in SABRE layout search before submitting to IBM Quantum. Please treat them as safe starting points for this tutorial, not universal best values. Adjustsabre_layout_trialsaccording to your own backend, qubit count, and circuit specification.
Solver Block Ref means: "which SBDSolverJob preset should this run use?"
- It is a stable entry point for users.
- HPC details are still resolved through the underlying 3 blocks.
Step 7. Execute the workflow
Click Start Now → Submit.
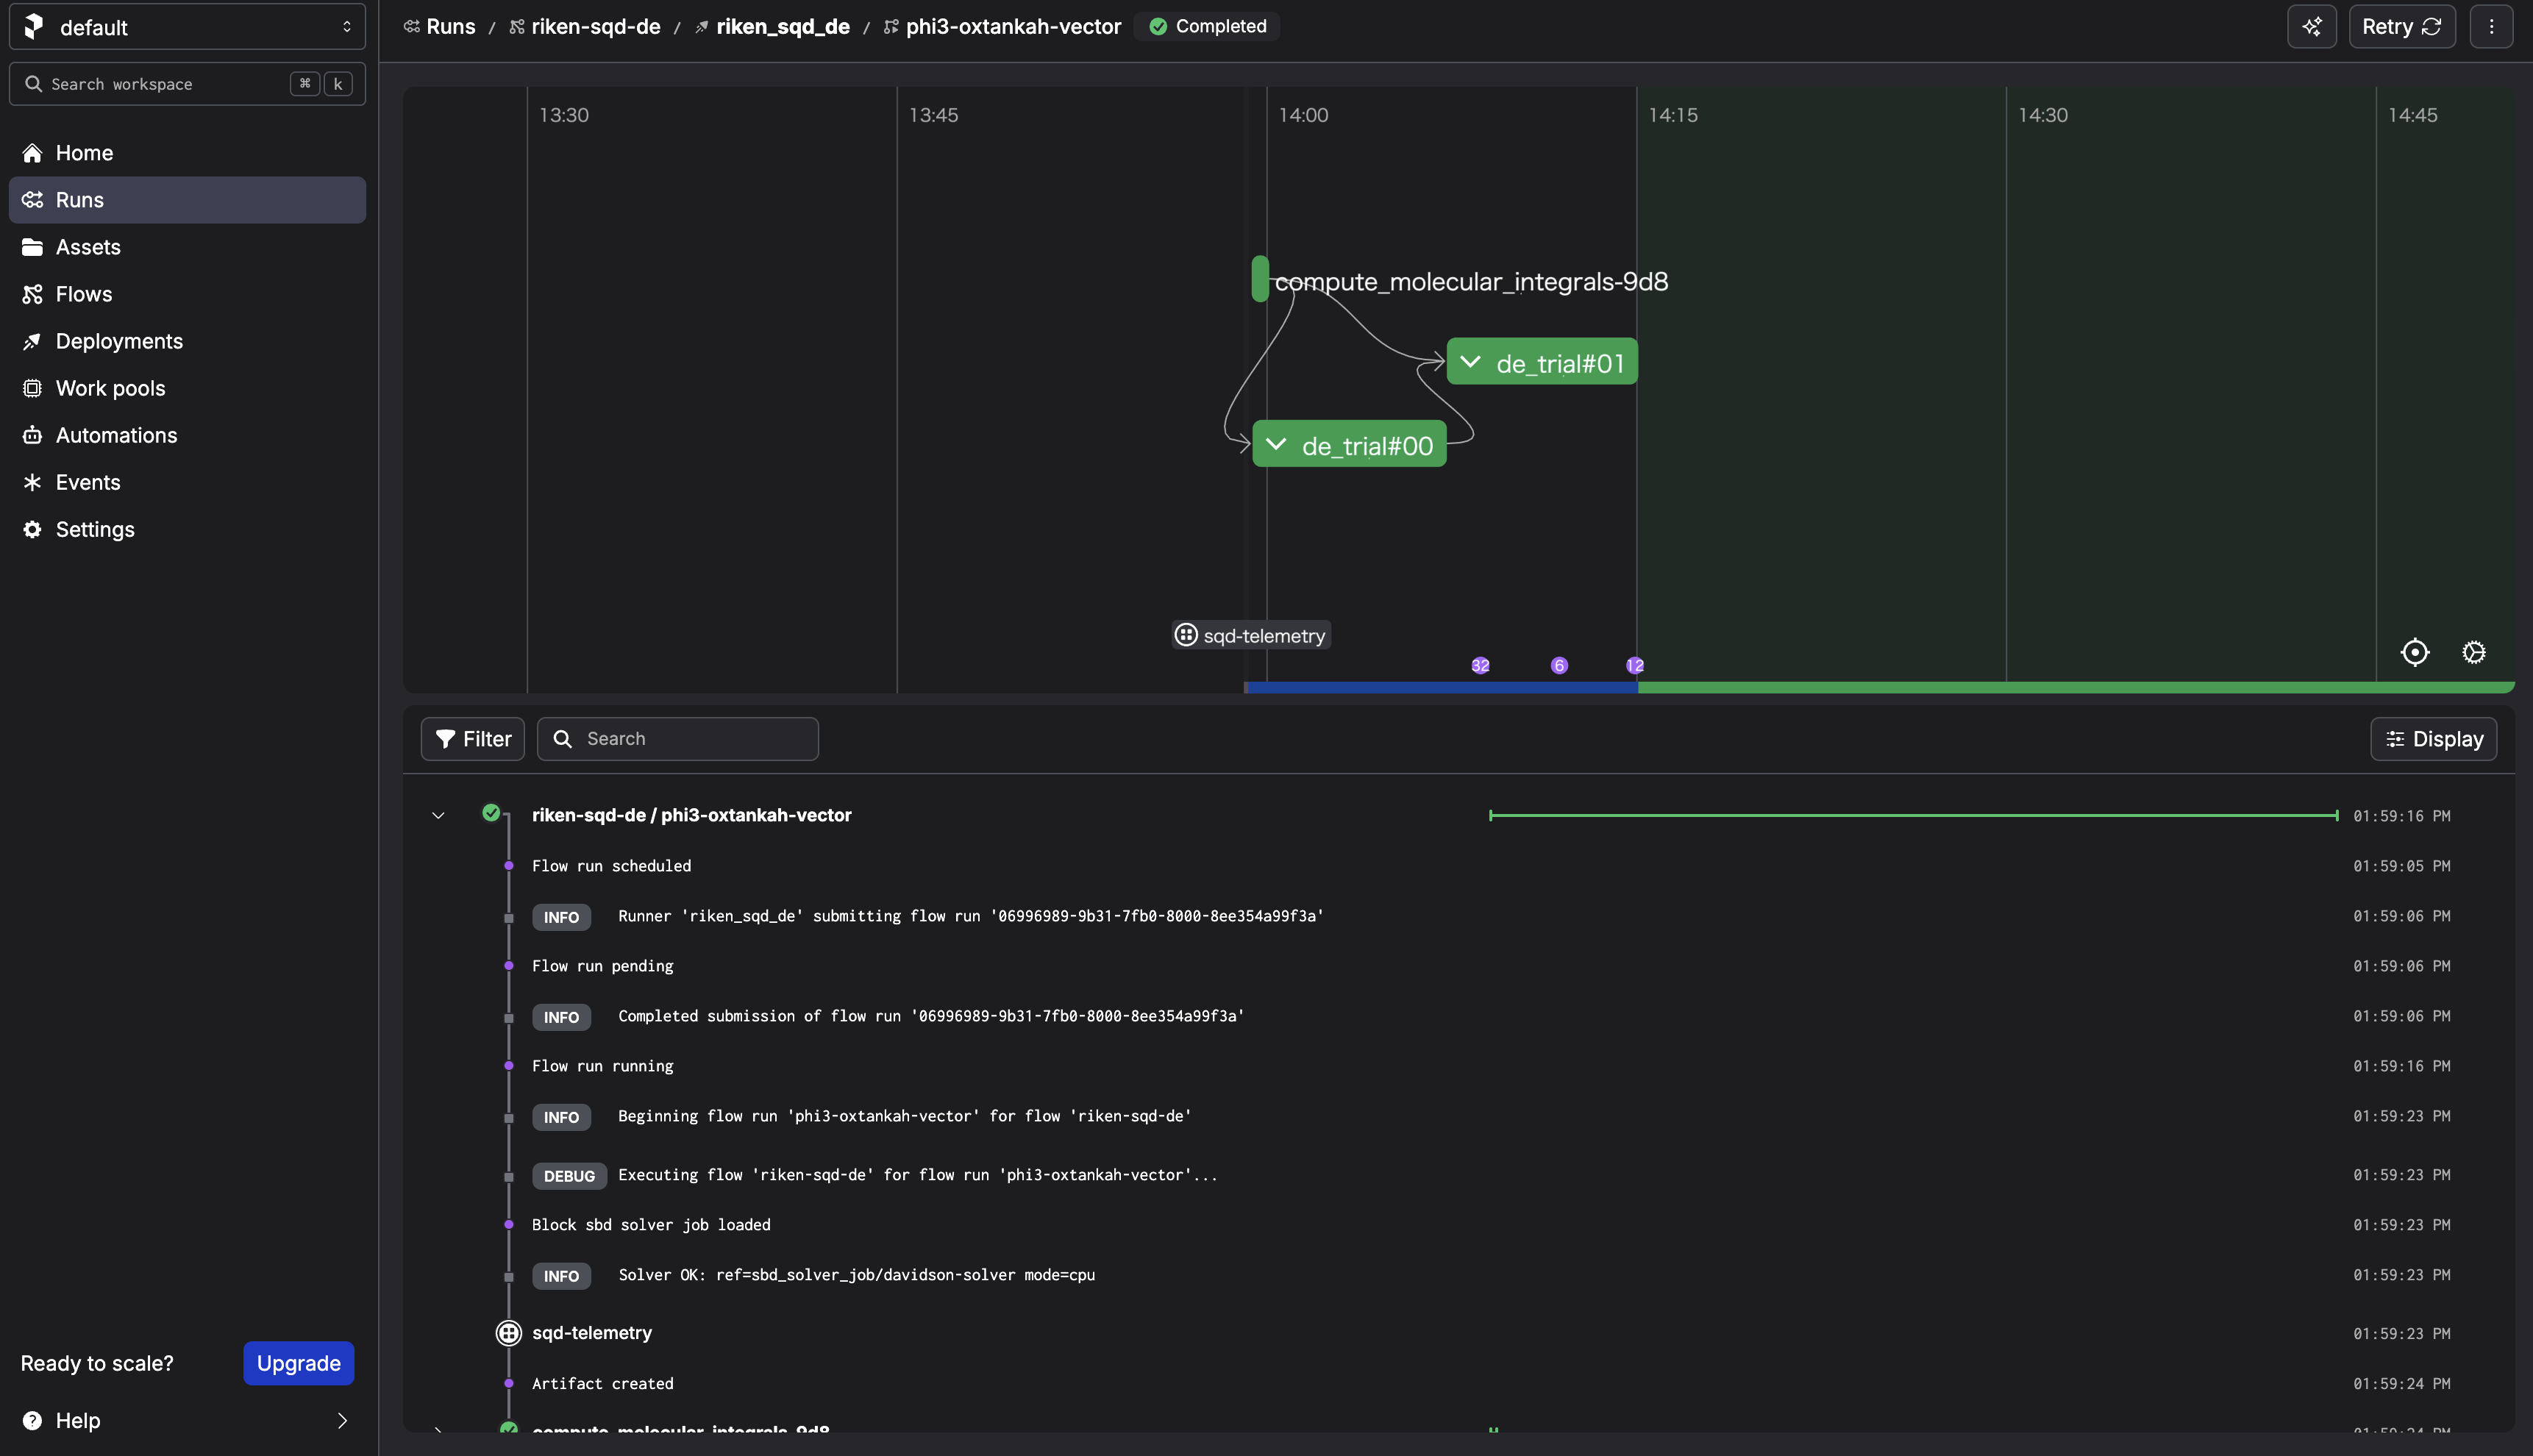
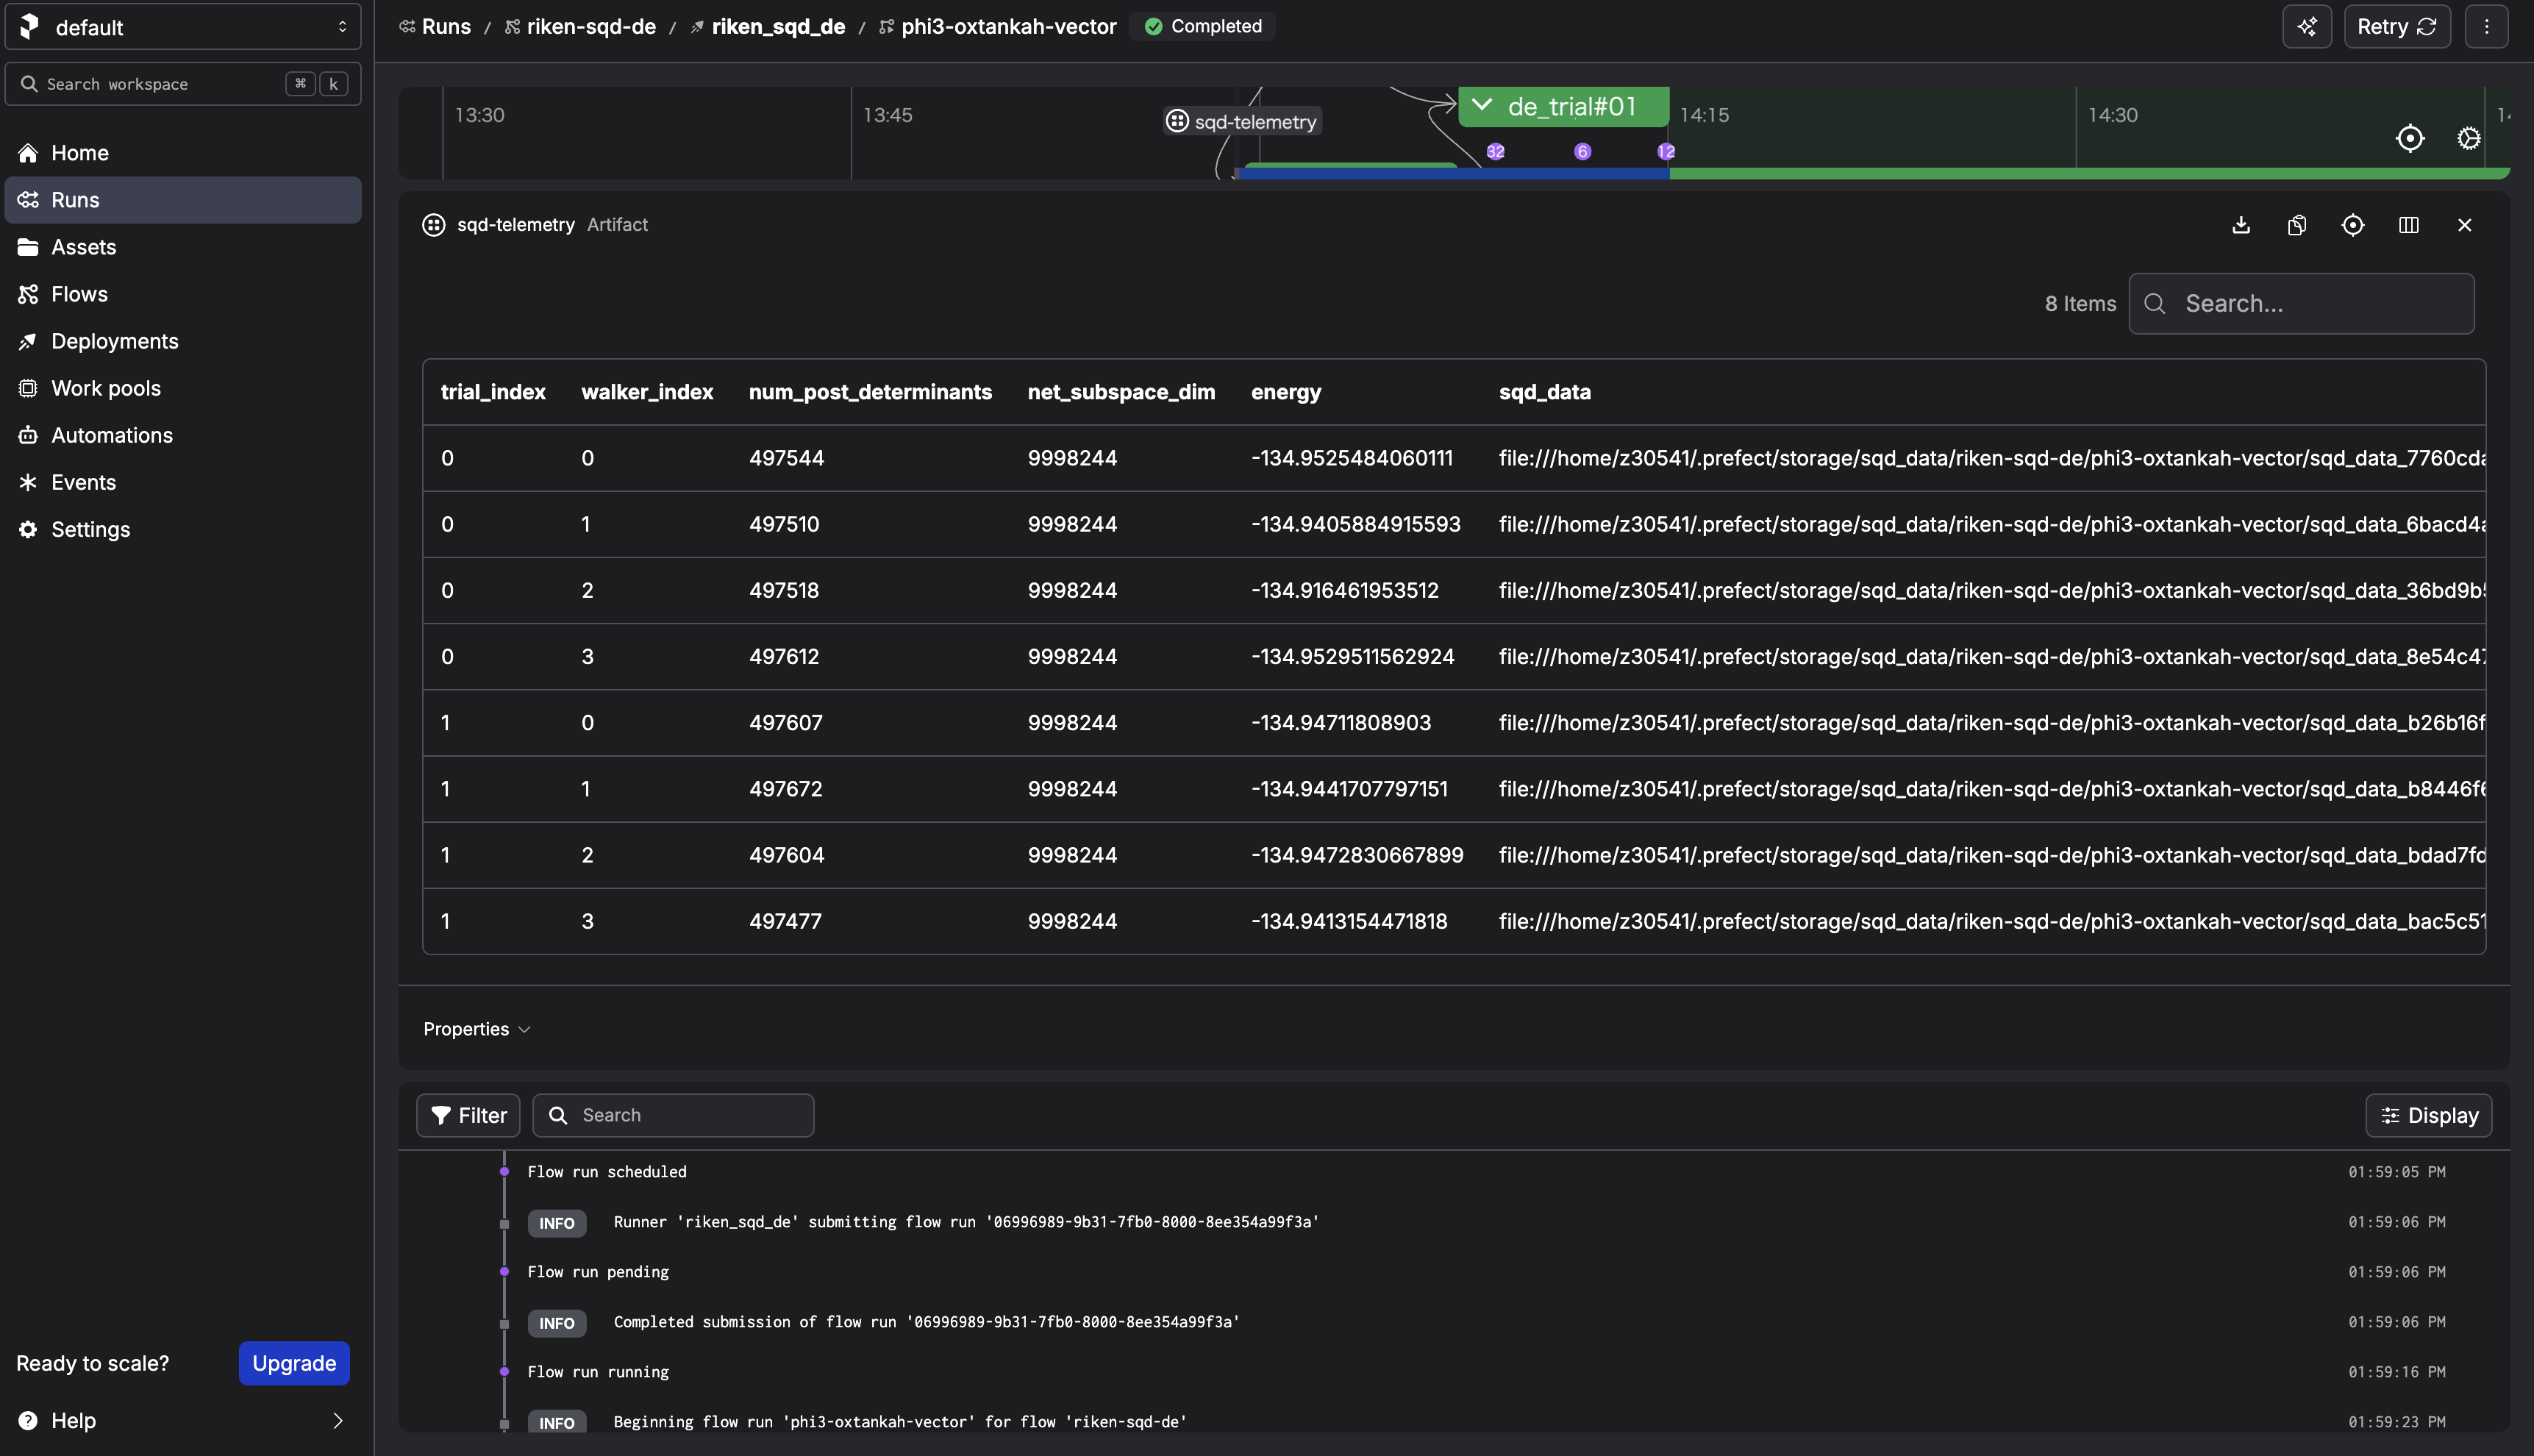
After the run completes, check the sqd-telemetry artifact. It should contain intermediate energies.
3. What happens when you "Submit" from the Prefect UI?
3.1 What the UI actually creates
When you choose Run → Custom run → Submit, the Prefect server creates a Flow Run request for a specific Deployment, with the parameters you provided.
3.2 What actually executes the Flow
The process started by sbd-deploy is the serving process. It:
1. polls the Prefect server for new Flow Runs,
2. when it finds one, it executes the Flow on the host where sbd-deploy is running.
If the serving process stops, the UI can still create Flow Runs, but there is no active runner to pick them up.
3.3 Confirm deployment information
1) List deployments
![]()
prefect deployment ls
2) Inspect deployment
![]()
prefect deployment inspect 'riken-sqd-de/riken_sqd_de'
3) Locate Flow definition
The flow is defined in algorithms/sbd/sbd/main.py.
3.4 What happens in this architecture
walker_sqdloadsSBDSolverJobby name.SBDSolverJob.run(...)preparesfcidump.txtandAlphaDets.bin.- Job is submitted by
run_job_from_blocks(...)using: CommandBlockExecutionProfileBlockHPCProfileBlock- SBD output files (
davidson_energy.txt,occ_a.txt,occ_b.txt,carryover.bin) are parsed. - Flow stores telemetry artifact (
sqd-telemetry).
This keeps workflow code stable while HPC settings are controlled by block instances.
END OF TUTORIAL