Create Your QCSC Workflow with Prefect for Miyabi
This hands-on tutorial guides you through building a small C++ program on the Miyabi-C environment and integrating it into a Prefect workflow. On the Prefect workflow, we also use Prefect Qiskit to show how to write a complete QCSC workflow from scratch.
Our objective is to compute a count dictionary of sampler bitstrings using MPI programming on the QCSC architecture.
Key principles in this tutorial:
- Users do not write new Python code for BitCount
- Blocks are not created manually in UI; they are generated by
create_blocks.py - Workflows run by specifying block names
- Existing tutorial assets can be migrated mainly by changing import lines
Prefect Core Concepts (quick mapping with Introduction to Prefect)
You will see these terms:
- Flow: the end-to-end workflow entrypoint
- examples/prefect_bitcount_demo/flow_optimized.py
- Task: individual units executed inside a flow
- Optimized flow task 1 (quantum-sampling-task in flow_optimized.py): quantum sampling and input.bin preparation
- Optimized flow task 2 (hpc-bitcount-task in flow_optimized.py): HPC execution and count reconstruction
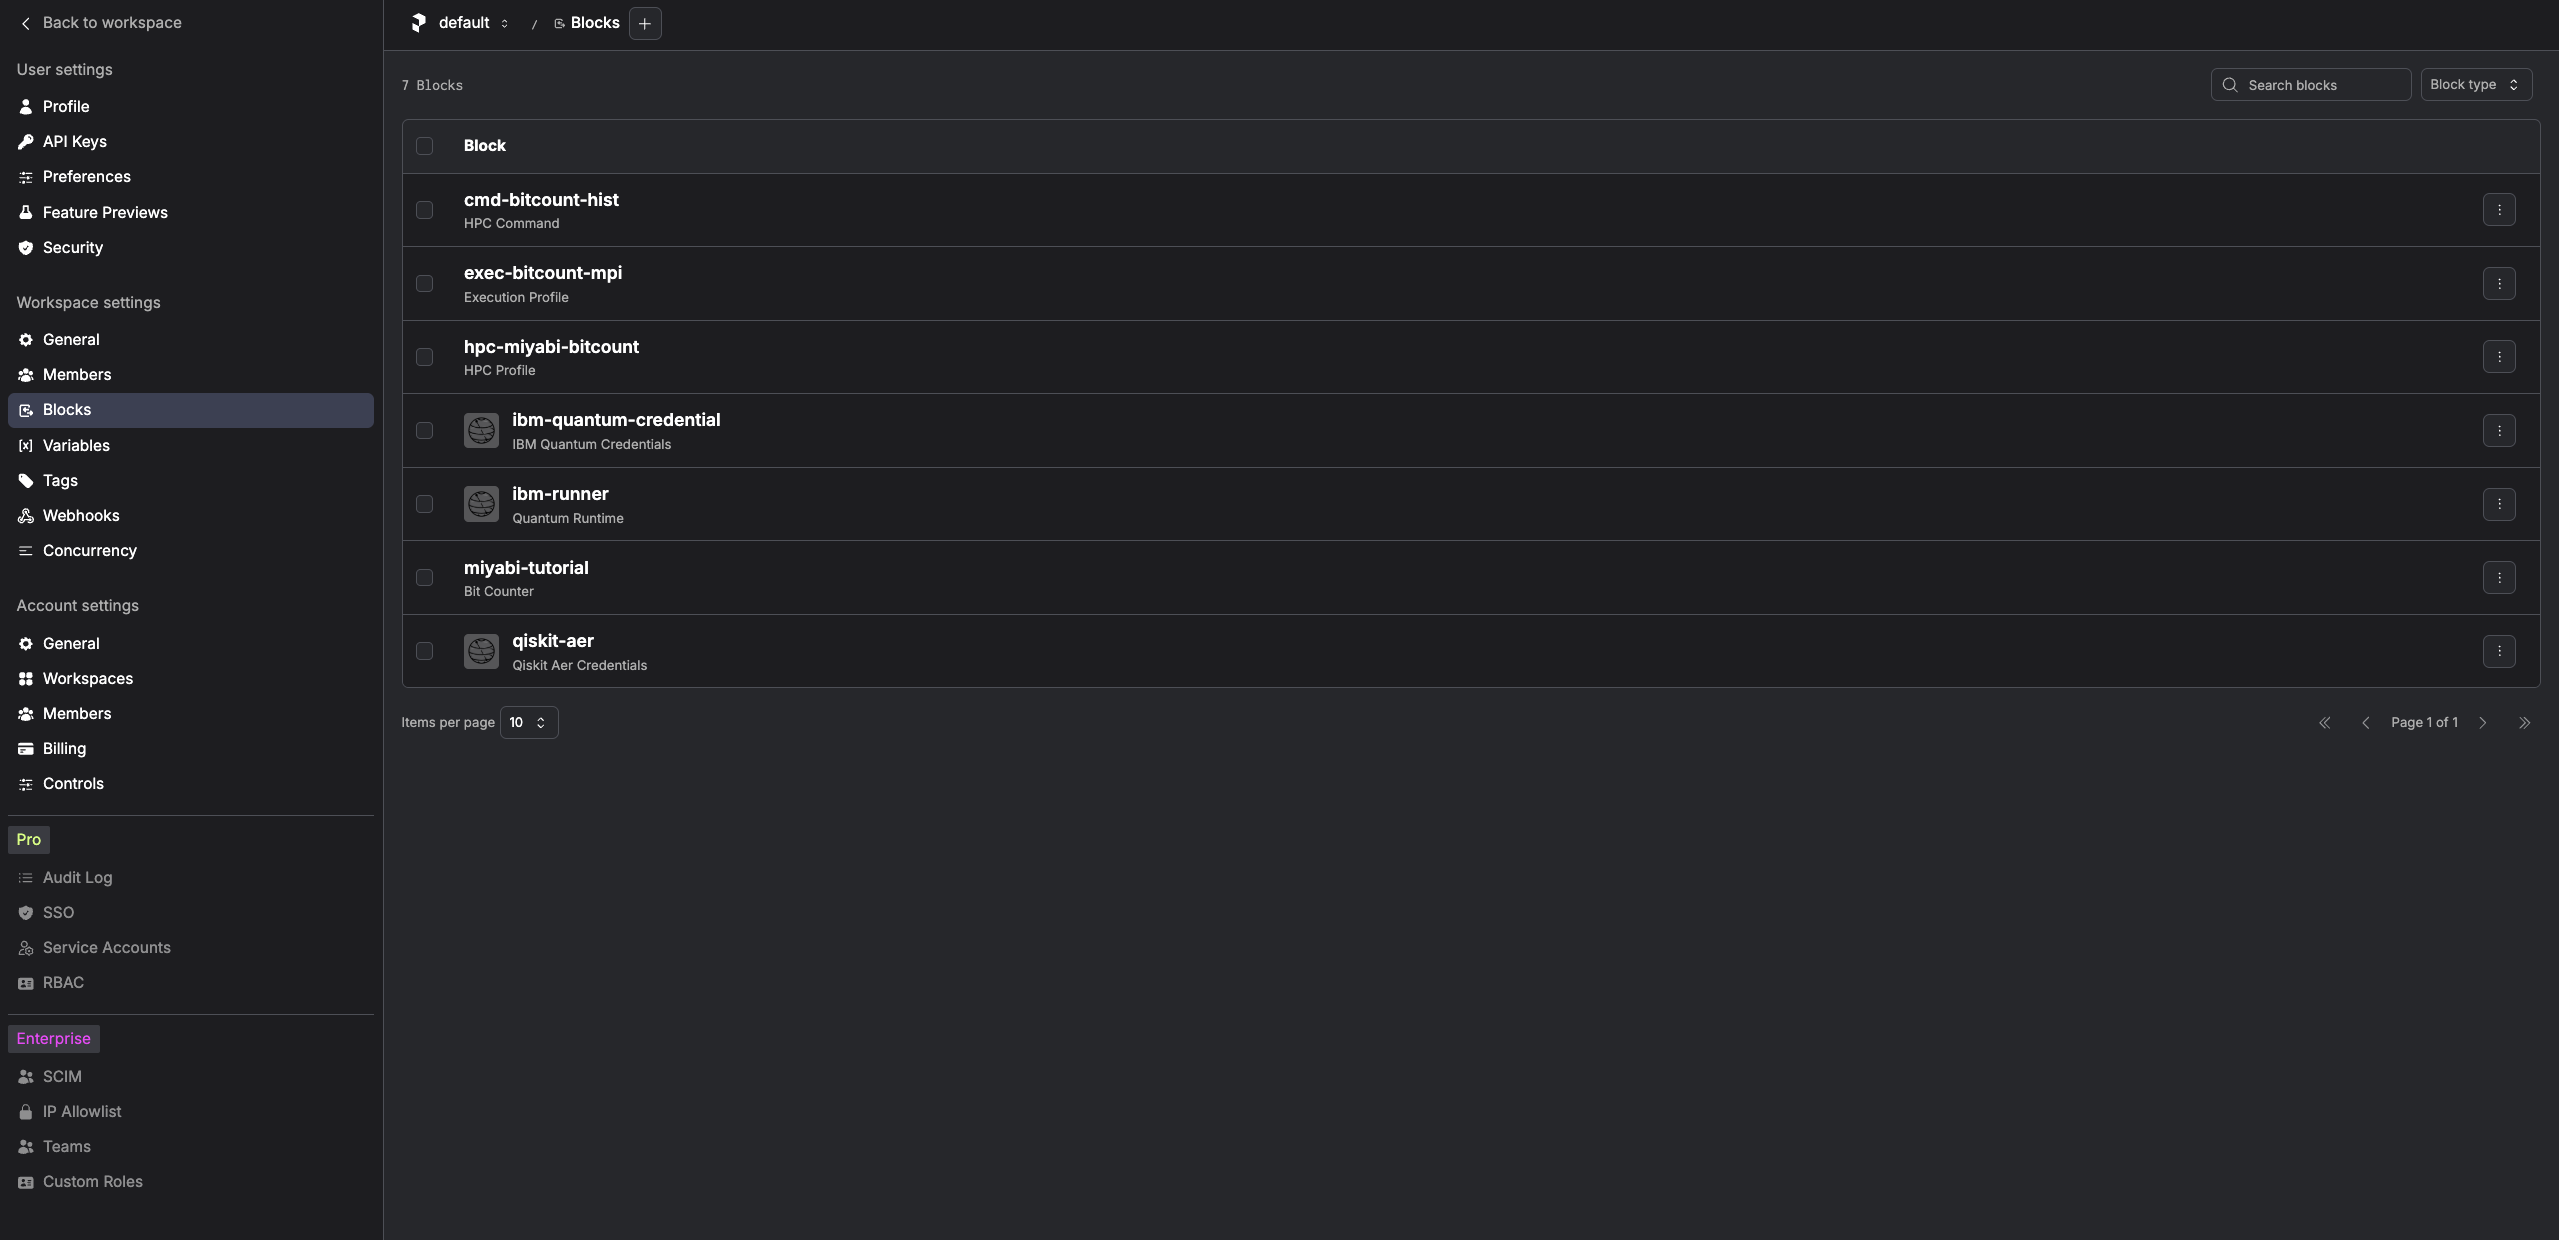
- Block: reusable server-side configuration stored in Prefect
- IBM Quantum Credentials : IBM Cloud CRN + API key
- QuantumRuntime block: ibm-runner (pre-created)
- CommandBlock: cmd-bitcount-hist
- ExecutionProfileBlock: exec-bitcount-mpi
- HPCProfileBlock: hpc-miyabi-bitcount
- BitCounter block: miyabi-tutorial (legacy-style facade, optional)
- Variable: server-side runtime parameters
- miyabi-bitcount-options (optimized flow)
What you need
- Accounts / IDs:
- Common: (a) MDX/Miyabi-C account (+ OTP), (b) IBM Cloud API key + Service CRN (Quantum), (c) IBMid
- Prefect backend (choose one): On-Prem Prefect account (MDX) or Prefect Cloud account/workspace
- Local tools: SSH client, an authenticator app (OTP), and a modern browser.
Choose your Prefect backend (On-Prem or Cloud)
This tutorial supports both backends. Choose one backend first, then use the same backend consistently for:
- opening the Web Portal
- creating blocks/variables (
create_blocks.py) - running the flow
| Item | On-Prem Prefect (MDX) | Prefect Cloud |
|---|---|---|
| Web Portal | Your organization-hosted Prefect UI | https://app.prefect.cloud |
| Authentication | SSO (often IBMid) | Prefect Cloud account + API key |
| CLI setup | prefect-auth login |
prefect cloud login --key <PREFECT_API_KEY> |
| Scope of blocks/variables | Stored in on-prem workspace | Stored in selected cloud workspace |
Identity & authentication checklist
Before the hands-on, confirm the identity mapping below. Mismatched emails are a common cause of access failures in enterprise/on-prem environments.
| System | What you use to sign in | Must match other emails? (common policy) | Notes |
|---|---|---|---|
| Miyabi-C / HPC | HPC account + SSH key + OTP | No | Common for both backends |
| MDX workflow client | SSH to mdx-workflow-host |
No | Common for both backends |
| Prefect (On-Prem) | SSO account (often IBMid) | Often YES (org policy) | Use your organization policy |
| Prefect Cloud | Prefect Cloud user + API key | Not required | On free tier, metadata retention is 7 days |
| IBM Quantum (IBM Cloud) | Service CRN + API key | No | Common for both backends |
If you see SSO-related errors on the MDX Prefect console, first confirm that the email address used for SSO matches the Prefect user email required by your environment administrator.
Prerequisites (One-time setup)
This section prepares stable access from your laptop to MDX and from MDX to Miyabi-C. The whole process image is :
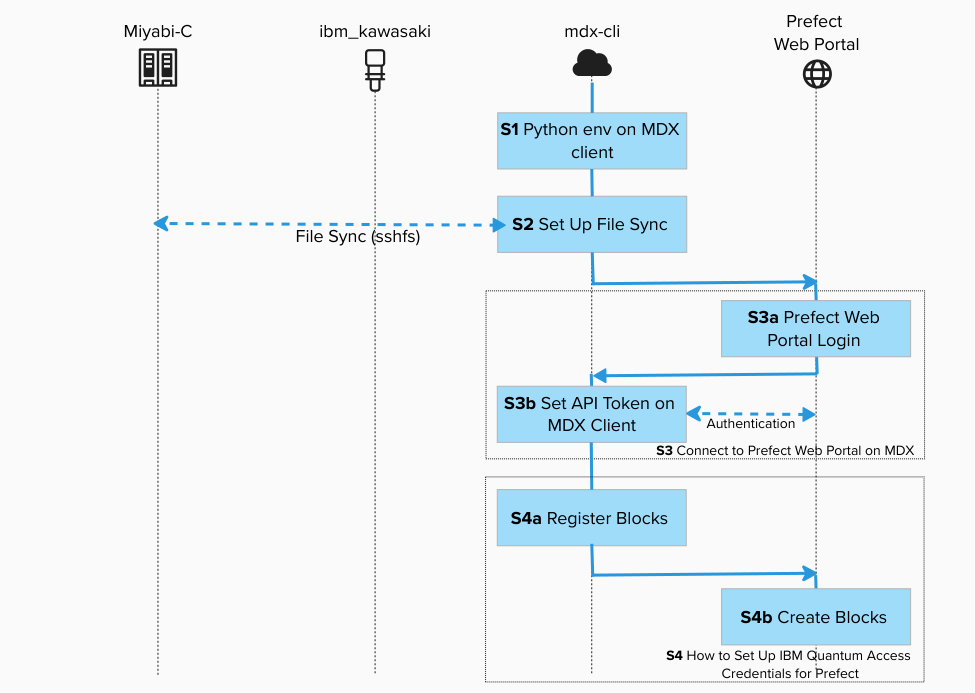
Before starting, make sure:
- You have completed
- Step1 : SSH Connection Setup for MDX and Miyabi-C with Git Configuration
- Step1 : How to Set Up Python Environment on the MDX Workflow Client.
- You have completed Step2 : How to Set Up File Sync Between MDX and Miyabi-C.
- You have completed Step3 : How to Connect to Prefect Web Portal on MDX.
- You have completed Step4 : How to Set Up IBM Quantum Access Credentials for Prefect.
[!IMPORTANT] Replace
gz00andz12345with your actual group and account name.
Existing files used in this tutorial
../../examples/prefect_bitcount_demo/build_on_miyabi.sh../../examples/prefect_bitcount_demo/create_blocks.py../../examples/prefect_bitcount_demo/bitcount_blocks.example.toml../../examples/prefect_bitcount_demo/get_counts_integration.py../../examples/prefect_bitcount_demo/flow_optimized.py../../examples/prefect_bitcount_demo/flow_tutorial_style.py
All steps below use these files as-is.
Create BitCounts Workflow
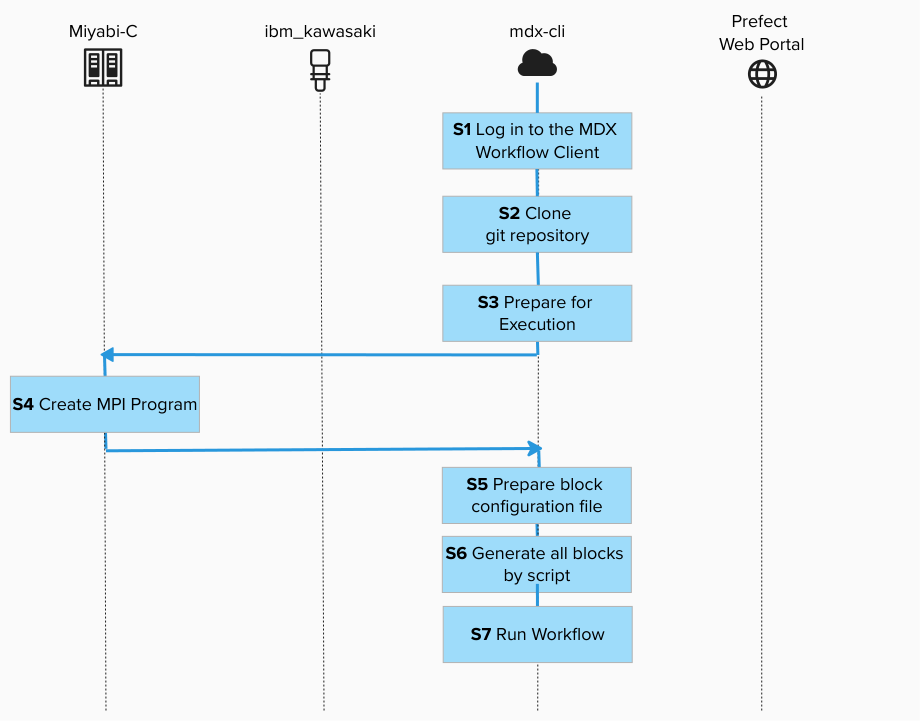
Step 1. Log in to the MDX Workflow Client
Connect to the MDX workflow client using SSH. This is where we will develop the workflow.
![]()
ssh -A z12345@mdx-workflow.example.org
Step 2. Clone qcsc-prefect repository
Prepare qcsc-prefect under /work/gz00/z12345.
You can either clone the repository from GitHub, or copy the tutorial source tree already available on MDX at /large/tutorial/qcsc-prefect.
![]()
cd /work/gz00/z12345
git clone git@github.com:qiskit-community/qcsc-prefect.git
Or:
![]()
cp -r /large/tutorial/qcsc-prefect /work/gz00/z12345/
After either method, continue with /work/gz00/z12345/qcsc-prefect.
Activate your virtual environment for Prefect:
![]()
source ~/venv/prefect/bin/activate
Install necessary packages:
![]()
cd /work/gz00/z12345/qcsc-prefect
uv pip install prefect-qiskit
uv pip install --no-deps \
  -e packages/qcsc-prefect-core \
  -e packages/qcsc-prefect-adapters \
  -e packages/qcsc-prefect-blocks \
  -e packages/qcsc-prefect-executor
Check installations:
![]()
uv pip list | grep prefect
You should see output like:
qcsc-prefect-adapters      0.1.0
qcsc-prefect-blocks        0.1.0
qcsc-prefect-core          0.1.0
qcsc-prefect-executor      0.1.0
prefect                   3.6.17
Step 3. Prepare for Execution
Switch the prefect profile to mdx:
![]()
prefect profile use mdx
Update your prefect token (Only On Prem) if your token is expired.
![]()
prefect-auth login
/work/gz00/z12345/qcsc-prefect/scripts/prefect_sync_env_to_config.sh -p mdx
Make sure the Quantum Runtime block exist:
![]()
prefect block inspect quantum-runtime/ibm-runner
The output may look like:
┌──────────────────────┬─────────────────────────────────────────────┐
│ Block Type           │ Quantum Runtime                             │
│ Block id             │ b2047dc9-e90e-4930-be6c-269478a4d6b4        │
├──────────────────────┼─────────────────────────────────────────────┤
│ resource_name        │ ibm_kawasaki                                │
│ execution_cache      │ True                                        │
│ enable_job_analytics │ True                                        │
│ credentials          │ {'crn':                                     │
│                      │ 'crn:v1:bluemix:public:quantum-computing:u… │
│                      │ 'api_key': '********'}                      │
└──────────────────────┴─────────────────────────────────────────────┘
Step 4. Create MPI Program
Open a new terminal and connect to the Miyabi-C login node:
![]()
ssh -A z12345@miyabi-c.example.org
You will be prompted to enter a verification code. Open your authenticator app and input the OTP.
Create a directory:
![]()
cd /work/gz00/z12345/qcsc-prefect
./examples/prefect_bitcount_demo/build_on_miyabi.sh
Generated binaries:
examples/prefect_bitcount_demo/bin/get_counts_jsonexamples/prefect_bitcount_demo/bin/get_counts_hist
Step 4.1. What get_counts_json and get_counts_hist do
Source code:
examples/prefect_bitcount_demo/src/get_counts_json.cppexamples/prefect_bitcount_demo/src/get_counts_hist.cpp
Both programs implement the same core MPI bit-count pipeline:
- Read
input.bin(array ofuint32) generated from sampler bitstrings. - Split data across MPI ranks.
- Build local histograms for values in
[0, 2^BITLEN)(BITLEN=10in this demo). - Reduce local histograms to rank 0 and write one output file.
Differences:
get_counts_json- Uses
MPI_Scatter(equal-size partition per rank). - Writes a human-readable sparse JSON file:
output.json. - Useful for quick inspection and debugging.
get_counts_hist- Uses
MPI_Scatterv(handles non-even partition sizes). - Uses
uint64counters and writes a fixed-size binary histogram:hist_u64.bin. - Preferred for larger workloads and used by default in this tutorial (
executable_key=bitcount_hist).
Step 5. Prepare block configuration file
Back to MDX termial,
![]()
mkdir -p /work/gz00/z12345/miyabi_tutorial
cp examples/prefect_bitcount_demo/bitcount_blocks.example.toml \
   examples/prefect_bitcount_demo/bitcount_blocks.toml
vim examples/prefect_bitcount_demo/bitcount_blocks.toml
Set at least the following keys in bitcount_blocks.toml:
hpc_target = "miyabi"projectqueuework_dir(base directory where each run creates ajob_xxxxdirectory)
Step 6. Generate all blocks by script
![]()
python examples/prefect_bitcount_demo/create_blocks.py \
  --config examples/prefect_bitcount_demo/bitcount_blocks.toml \
  --hpc-target miyabi
Optional CLI overrides:
![]()
python examples/prefect_bitcount_demo/create_blocks.py \
  --config examples/prefect_bitcount_demo/bitcount_blocks.toml \
  --hpc-target miyabi \
  --shots 200000 \
  --num-nodes 4 \
  --mpiprocs 8
Step 6.1. What this script creates (default names)
| Type | Default name | Purpose |
|---|---|---|
| CommandBlock | cmd-bitcount-hist |
Command definition (executable_key=bitcount_hist) |
| ExecutionProfileBlock | exec-bitcount-mpi |
Nodes, MPI settings, walltime, modules |
| HPCProfileBlock | hpc-miyabi-bitcount |
Miyabi queue/project/executable resolution |
| Prefect Variable | miyabi-bitcount-options |
Sampler options + base work_dir for flow_optimized.py |
At this stage, users do not need to define block classes manually.
Step 7A. Run workflow by specifying block names (recommended)
Use flow_optimized.py with block names as runtime parameters:
![]()
python examples/prefect_bitcount_demo/flow_optimized.py \
  --quantum-source real-device \
  --runtime-block ibm-runner \
  --command-block cmd-bitcount-hist \
  --execution-profile-block exec-bitcount-mpi \
  --hpc-profile-block hpc-miyabi-bitcount \
  --options-variable miyabi-bitcount-options
In this mode, the main user inputs are block names.
If you want to skip IBM Quantum for a tutorial/demo run, add --quantum-source random --random-seed 24.
flow_optimized.py resolves the base work directory in this order:
1. --work-dir (if provided)
2. work_dir stored in --options-variable
3. fallback: ./work/prefect_bitcount_optimized
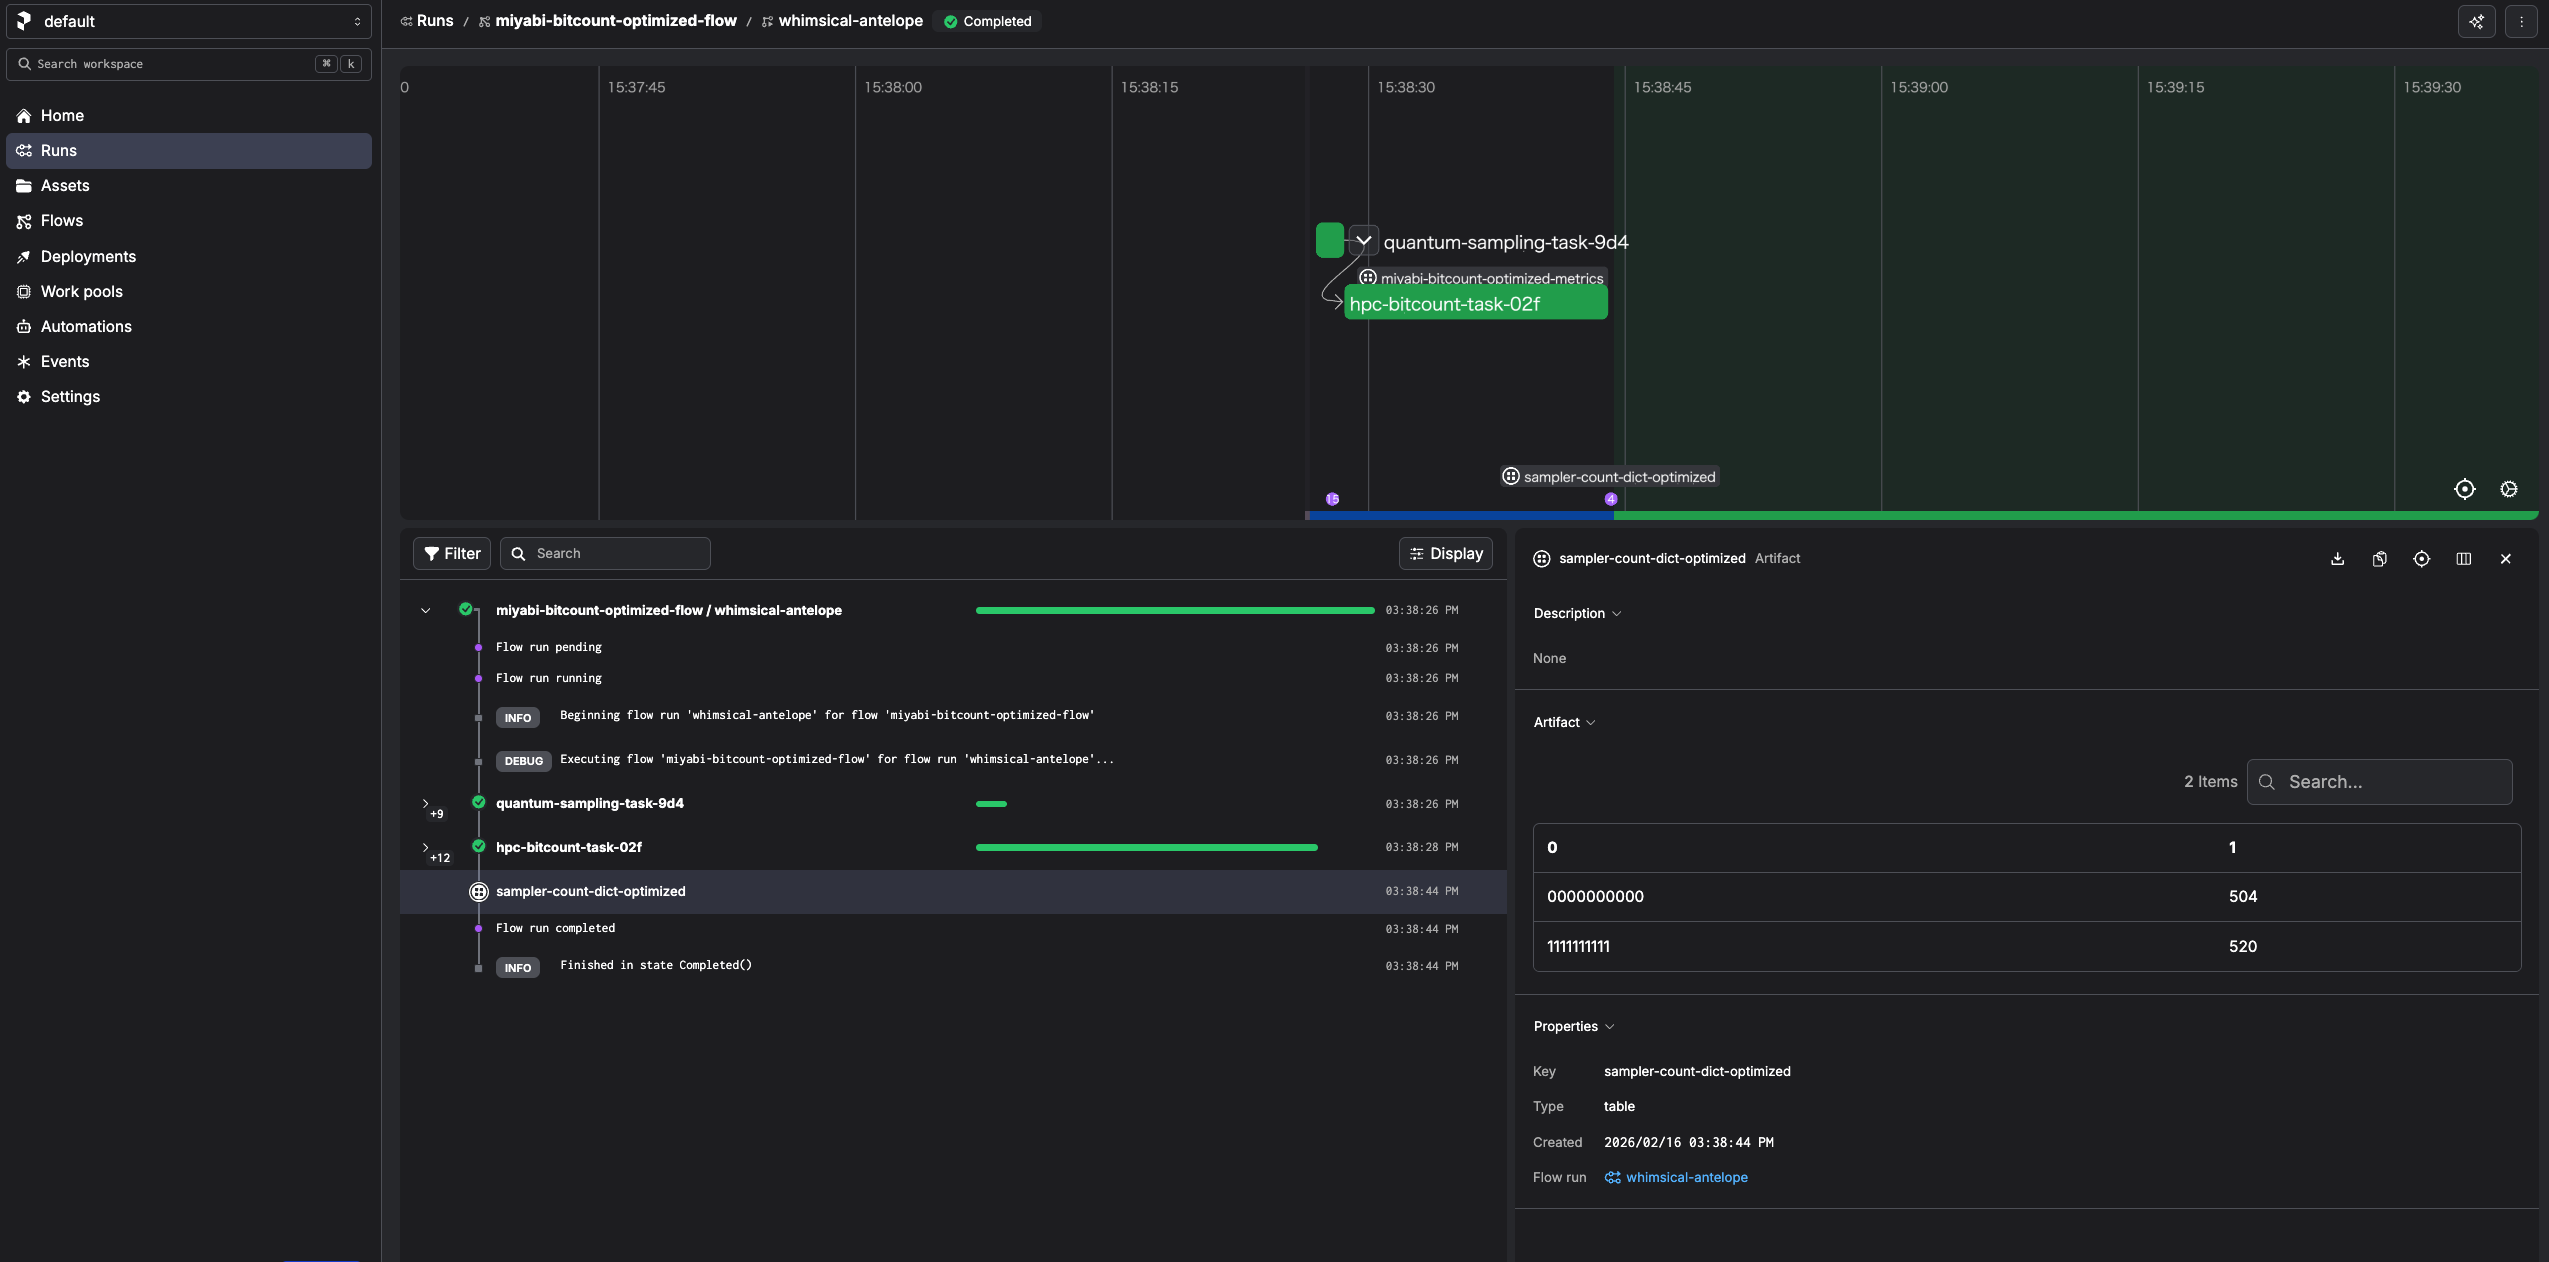
We can also monitor the progress on the Prefect console:
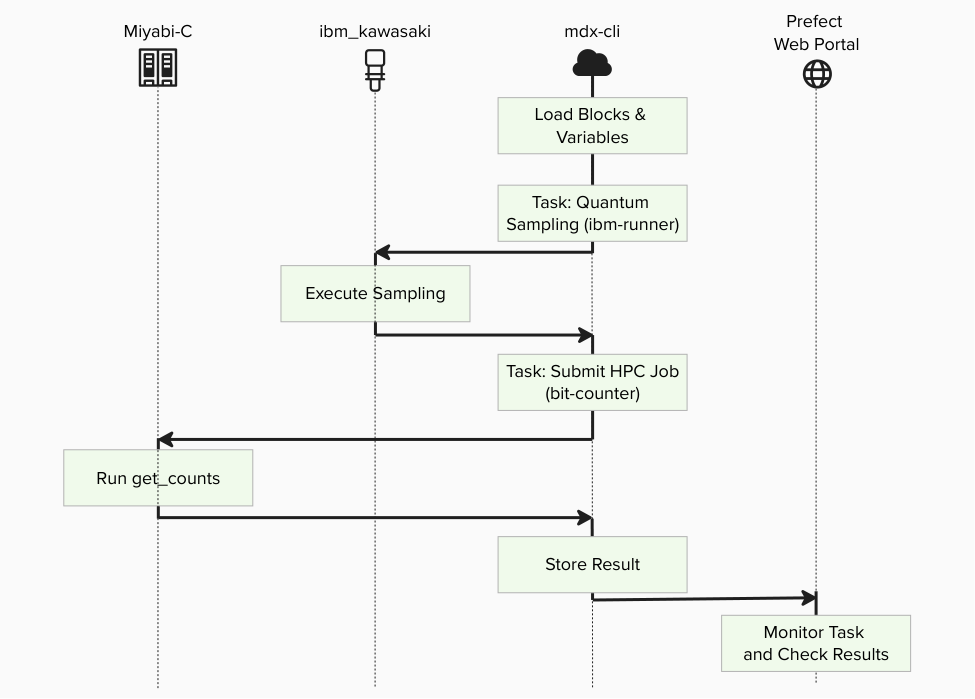
Step 7A.1. What flow_optimized.py does
Code location:
../../examples/prefect_bitcount_demo/flow_optimized.py
This flow is an end-to-end implementation that connects quantum sampling and HPC bit counting with two Prefect tasks.
Execution sequence:
- Task:
quantum-sampling-task - Load the Prefect
QuantumRuntimeblock (default:ibm-runner). - Load sampler options (and optional
work_dir) from a Prefect Variable (default:miyabi-bitcount-options). - If
--quantum-source real-device, build a 10-qubit GHZ circuit, transpile it, and runruntime.sampler(...). - If
--quantum-source random, generate deterministic pseudo-random bitstrings instead. - Convert sampled bitstrings to
uint32values and writeinput.binin a per-run job directory. - Task:
hpc-bitcount-task - Submit the HPC job via
run_job_from_blocks(...)using: CommandBlock(default:cmd-bitcount-hist)ExecutionProfileBlock(default:exec-bitcount-mpi)HPCProfileBlock(default:hpc-miyabi-bitcount)- Read
hist_u64.bin, reconstruct the count dictionary, and publish a Prefect table artifact (sampler-count-dict-optimized). - Return a summary payload (
job_id, totalshots,num_unique_bitstrings, andwork_dir).
Why this flow is recommended:
- Users only pass block/variable names as parameters.
- HPC submission details are encapsulated in blocks.
- The binary histogram path (
hist_u64.bin) is efficient for larger shot counts.
Step 7A.2. Demo switching Miyabi/Fugaku by changing an execution/HPC profile pair
If you want the backend-switch demo to use the recommended flow, use flow_optimized.py, not flow_tutorial_style.py.
Preparation:
- Keep
command_block_nameshared across both targets. - Use target-specific
execution_profile_block_namevalues such asexec-bitcount-miyabiandexec-bitcount-fugaku. - Keep
options_variable_nameshared across both targets, for examplebitcount-options. - If the two configs need different base directories, pass a shared
--work-dirat runtime so the demo does not depend on variable-specific paths. - If the execution recipe truly matches on both systems, you may reuse one
ExecutionProfileBlock, but that should be treated as a special case rather than the default assumption.
Example runtime commands:
![]()
python examples/prefect_bitcount_demo/flow_optimized.py \
  --quantum-source real-device \
  --runtime-block ibm-runner \
  --command-block cmd-bitcount-hist \
  --execution-profile-block exec-bitcount-miyabi \
  --hpc-profile-block hpc-miyabi-bitcount \
  --options-variable bitcount-options \
  --work-dir /work/gz00/z12345/bitcount_demo

python examples/prefect_bitcount_demo/flow_optimized.py \
  --quantum-source real-device \
  --runtime-block ibm-runner \
  --command-block cmd-bitcount-hist \
  --execution-profile-block exec-bitcount-fugaku \
  --hpc-profile-block hpc-fugaku-bitcount \
  --options-variable bitcount-options \
  --work-dir /work/gz00/z12345/bitcount_demo
In this pair, the changing runtime parameters are --execution-profile-block and --hpc-profile-block.
Step 7B. Run legacy tutorial-style workflow (counter.get(bitstrings))
If you have not created the legacy tutorial assets yet, generate them first:
![]()
python examples/prefect_bitcount_demo/create_blocks.py \
  --config examples/prefect_bitcount_demo/bitcount_blocks.toml \
  --hpc-target miyabi \
  --create-legacy-tutorial-assets
You can run flow_tutorial_style.py directly:
![]()
python examples/prefect_bitcount_demo/flow_tutorial_style.py \
  --quantum-source real-device
This flow uses BitCounter.load("miyabi-tutorial").
miyabi-tutorial is created by the opt-in command above.
Step 7B.1. Why old tutorial code still works
Compatibility is provided by the optional BitCounter facade block created by create_blocks.py.
What create_blocks.py prepares when you pass --create-legacy-tutorial-assets:
BitCounterblock:miyabi-tutorialCommandBlock:cmd-bitcount-histExecutionProfileBlock:exec-bitcount-mpiHPCProfileBlock:hpc-miyabi-bitcount- Prefect Variable:
miyabi-tutorial(sampler shots/options)
The miyabi-tutorial block stores references to the three execution blocks above
(command_block_name, execution_profile_block_name, hpc_profile_block_name)
plus root_dir and script settings.
Runtime path in legacy flow:
flow_tutorial_style.pyloads:runtime = QuantumRuntime.load("ibm-runner")counter = BitCounter.load("miyabi-tutorial")options = Variable.get("miyabi-tutorial")- Quantum sampling runs and produces
bitstrings. counter.get(bitstrings)calls the internal task inget_counts_integration.py:- writes
input.binunderroot_dir/job_xxxx - calls
run_job_from_blocks(...)using the block names stored inmiyabi-tutorial - The executor resolves those blocks and runs the same HPC pipeline as the optimized flow.
- Result is read from
hist_u64.bin(oroutput.jsonfallback), then returned ascounts.
So the legacy API surface (counter.get(bitstrings)) stays unchanged, while
execution is delegated to the current block-based architecture.
You can inspect the facade block and referenced blocks:
![]()
prefect block inspect bit-counter/miyabi-tutorial
prefect block inspect hpc_command/cmd-bitcount-hist
prefect block inspect execution_profile/exec-bitcount-mpi
prefect block inspect hpc_profile/hpc-miyabi-bitcount
prefect block ls | rg "miyabi-tutorial|cmd-bitcount-hist|exec-bitcount-mpi|hpc-miyabi-bitcount"
8. Run previous tutorial assets by changing imports only
If you have code from previous create_qcsc_workflow-style tutorials
(counter.get(bitstrings) pattern), migration can be done mainly by replacing
import lines.
Step 8.1. Replacement example
Old:
from get_counts_integration import BitCounter
New (when running from qcsc-prefect root):
from examples.prefect_bitcount_demo.get_counts_integration import BitCounter
If BITLEN is also used:
from examples.prefect_bitcount_demo.get_counts_integration import BITLEN, BitCounter