Run SBD Closed-loop Workflow on Miyabi (qcsc-prefect)
This tutorial walks us through reproducing a Sample-based Quantum Diagonalization (SQD) experiment using the qcsc-prefect architecture.
We will run a hybrid quantum-classical workflow using the SBD solver to diagonalize a sparse chemistry Hamiltonian on the Miyabi-C environment, orchestrated via Prefect.
For Fugaku, see Run SBD Closed-loop Workflow on Fugaku.
The goal is to compute the ground state energy of N2-Mo State.
Prerequisites
Before starting, make sure:
- You have completed Create Your QCSC Workflow with Prefect.
- You have completed How to Set Up IBM Quantum Access Credentials for Prefect.
[!IMPORTANT] - Replace
gz00andz12345with your actual group and account name. - There is currently an issue where the~(home) directory on mdx runs out of available space. As a workaround, we can use the/largeor/workdirectory instead. In this tutorial, we use the/workdirectory.
0. What changes from BitCounts?
What you did in BitCounts (quick recap)
- (HPC side) Compile C++ and produce an executable (
get_counts) — build on the execution environment. - (Prefect side) Register a Block type from Python code (e.g.,
prefect block register -f ...). - (Flow side) A Flow loads Blocks and Variables and runs tasks (quantum → HPC → post-process).
What SBD closed-loop adds
- HPC execution expands from a single
get_countsbinary to a full SBD solver (diag) + closed-loop logic. - Additional Blocks are required (solver job block, etc.).
- Deployment (Deploy) becomes important so that participants can run from the Prefect UI reliably.
- Block creation is automated via script instead of manual UI editing.
What is SBDSolverJob and why it appears here
SBDSolverJob is a workflow-facing facade block for the SBD domain. It is used so users can select one solver preset from the UI (for example CPU/GPU variants) with:
sbd_solver_job/<block_name>
Important: this does not replace the 3-block architecture.
CommandBlock= WHAT executable to runExecutionProfileBlock= HOW to run (MPI/walltime/modules)HPCProfileBlock= WHERE to run (queue/project/target)SBDSolverJob= SBD-specific wrapper that stores:- references to the three blocks above
- SBD-specific runtime arguments (
task_comm_size,block,iteration, etc.) - job file conventions (
root_dir,script_filename)
At runtime, SBDSolverJob.run(...) eventually calls run_job_from_blocks(...) and delegates actual submission to those three base blocks.
1. Big picture: Flow / Task / Block / Variable / Deployment
1.1 Minimal "where it runs" model
- MDX workflow client (mdx-cli): where the Prefect process runs the Flow (the "runner/worker" side)
- Miyabi-C: where HPC binaries (e.g.,
diag) run via PBS/MPI - IBM Quantum: where quantum sampling runs via Qiskit Runtime (if used by the workflow)
1.2 Mapping to Prefect core concepts
Flow (end-to-end experiment procedure)
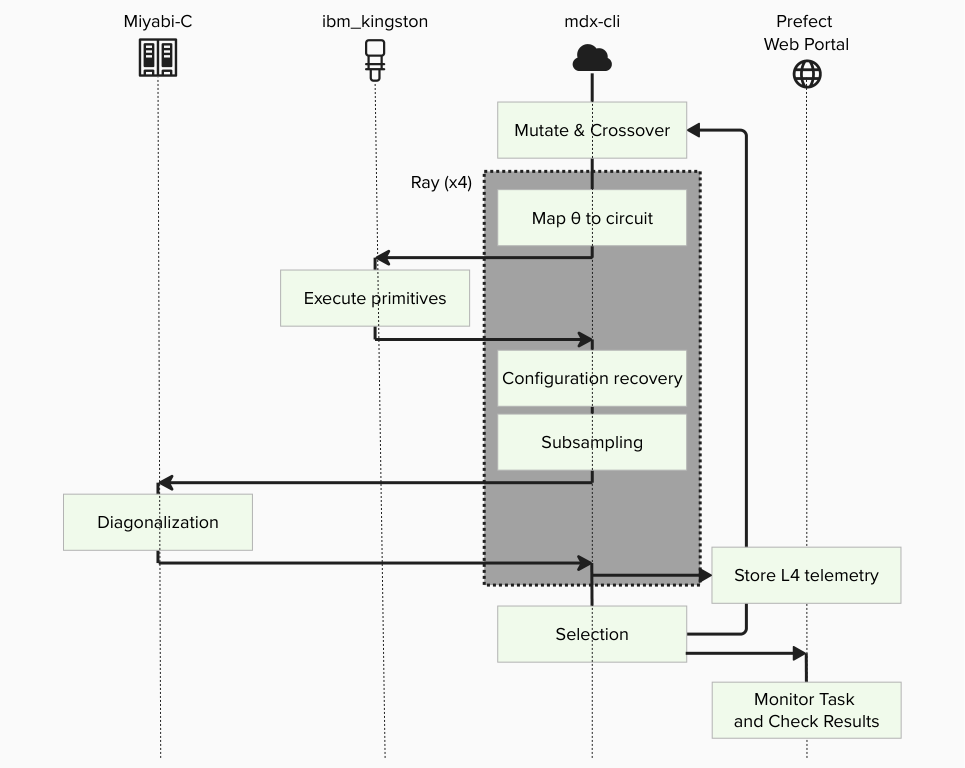
The entire closed-loop SQD experiment is implemented as a single Flow, including iterations, branching, and convergence checks.
Tasks (individual steps)
- Execute quantum sampling (IBM Quantum / Qiskit Runtime)
- Subsampling / configuration recovery (Python on MDX)
- Davidson diagonalization (PBS job on Miyabi-C)
- Collect results and store artifacts (Prefect)
Blocks (reusable "configuration + credentials")
- Quantum: IBM Quantum credentials / runtime configuration
- HPC: SBD solver job settings (queue, nodes, executable path, modules, etc.)
- Command: Command execution settings
- Execution Profile: MPI execution settings
Variables (runtime parameters)
- Quantum sampler options (shots, DD settings, etc.) and other run-time knobs are stored as Prefect Variables.
Deployment (how the Flow becomes runnable from the UI)
Deployment is the "launch entry" that tells Prefect: - which Flow to run, - under which deployment name, - and how it should be executed by a serving process.
2. Tutorial steps
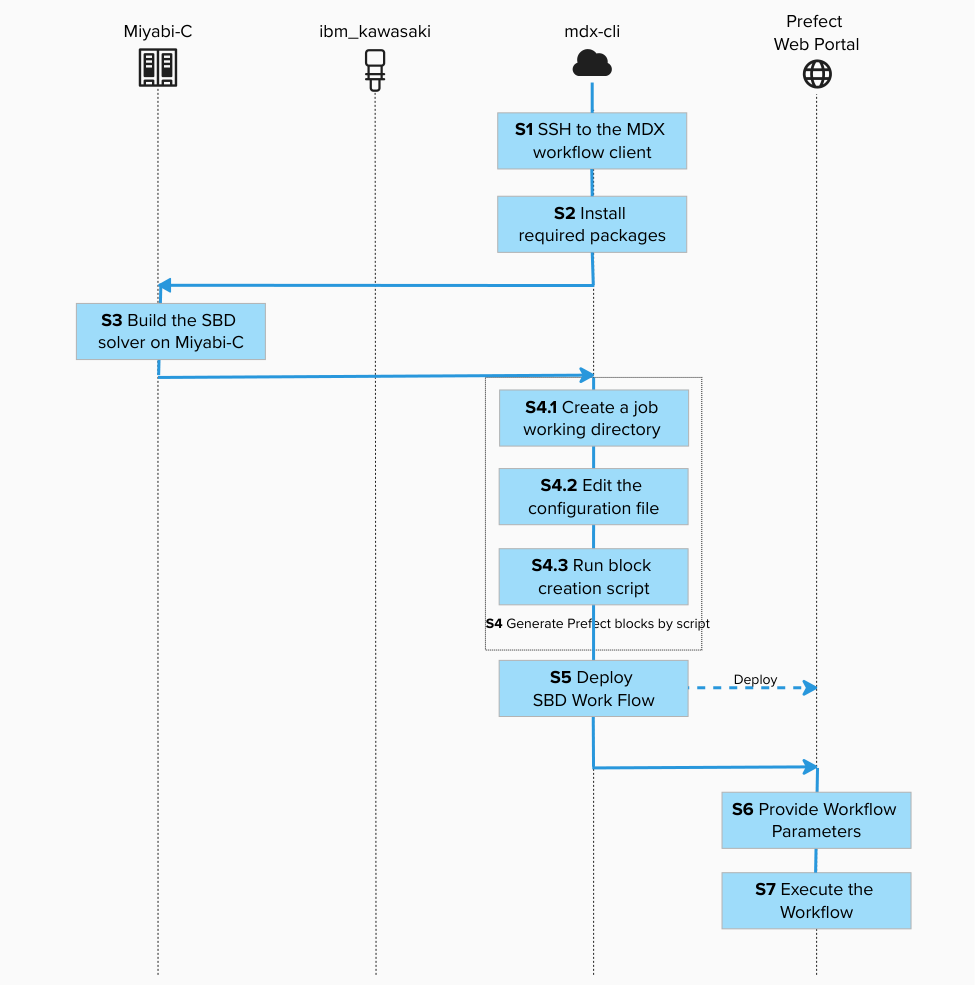
Step 1. SSH to the MDX workflow client (where the Flow is executed)
Connect to the MDX workflow client using SSH. This is where we will install the workflow.
![]()
ssh -A z12345@mdx-workflow.example.org
Activate the environment:
![]()
source ~/venv/prefect/bin/activate
Step 2. Install required packages (bring the Flow definition into your environment)
![]()
cd /work/gz00/z12345/qcsc-prefect

uv pip install --no-deps \
  -e packages/qcsc-prefect-core \
  -e packages/qcsc-prefect-adapters \
  -e packages/qcsc-prefect-blocks \
  -e packages/qcsc-prefect-executor

uv pip install -e algorithms/qcsc_workflow_utility
uv pip install -e algorithms/sbd
Check that the packages are installed correctly:
![]()
uv pip list | grep -E "(qcsc-prefect|sbd|qcsc)"

qcsc-prefect-adapters               0.1.0
qcsc-prefect-blocks                 0.1.0
qcsc-prefect-core                   0.1.0
qcsc-prefect-executor               0.1.0
qcsc-workflow-utility              0.1.0
sbd                                0.1.0
Step 3. Build the SBD solver on Miyabi-C (prepare the HPC executable)
3.1 SSH to Miyabi-C
[!NOTE] The operating system and computer architecture of the MDX workflow server differs from that of the Miyabi-C compute nodes. To run programs written in compiled languages such as C++, it's important to build them directly on the environment where they will be executed.
Open a new terminal and connect to the Miyabi-C login node:
![]()
ssh -A z12345@miyabi-c.example.org
Navigate to the directory and build:
![]()
cd /work/gz00/z12345/qcsc-prefect/algorithms/sbd/native
bash ./build_sbd.sh
This process may take several minutes. After completion, a directory named diag in the native directory:
![]()
ls -l | grep diag
Example output:
-rwxr-x--- 1 z12345 gz00 1542016 Nov 30 15:18 diag
Great! You have completed building SBD on Miyabi-C!
3.2 Record the absolute path of diag (you will paste it into the solver Block)
Get the absolute path to the SBD executable:
![]()
realpath ./diag
Example output:
/work/gz00/z12345/qcsc-prefect/algorithms/sbd/native/diag
We will need this path in the next step.
Once we completed this step, we can escape from the session (e.g. press <ctrl> + d) and log out from the Miyabi login node.
Go back to the SSH shell of the MDX workflow server to proceed with the following steps.
Step 4. Generate Prefect blocks by script (Block Type vs Block Instance)
This approach uses automated block creation via script instead of manual UI editing.
4.1 Create a job working directory and copy config template
![]()
cd /work/gz00/z12345/qcsc-prefect
mkdir -p /work/gz00/z12345/sbd_jobs
cp algorithms/sbd/sbd_blocks.example.toml algorithms/sbd/sbd_blocks.toml
Update your prefect token (Only On Prem) if your token is expired.
![]()
prefect-auth login
/work/gz00/z12345/qcsc-prefect/scripts/prefect_sync_env_to_config.sh -p mdx
4.2 Edit the configuration file
Edit algorithms/sbd/sbd_blocks.toml and set the following parameters.
vim algorithms/sbd/sbd_blocks.toml
Set at least: - project - queue - work_dir - sbd_executable
| Parameter | Value / Example | Description |
|---|---|---|
project |
gz00 |
Your Miyabi project name |
queue |
regular-c |
Queue name on Miyabi |
work_dir |
/work/gz00/z12345/sbd_jobs |
Job working directory |
sbd_executable |
/work/gz00/z12345/qcsc-prefect/algorithms/sbd/native/diag |
Absolute path to diag executable |
mpiprocs |
8 |
Number of MPI processes |
mpi_options |
["-np", "8"] |
MPI options |
task_comm_size |
1 |
Task communicator size |
adet_comm_size |
1 |
Alpha determinant communicator size |
bdet_comm_size |
1 |
Beta determinant communicator size |
block |
4 |
Block size |
iteration |
1 |
Number of iterations |
tolerance |
0.01 |
Convergence tolerance |
carryover_ratio |
0.1 |
Carryover ratio |
[!NOTE] For Miyabi, start with low MPI parallelism (
-np 8) to avoid memory OOM, then scale up only after confirming stability. Adding more processes yields shorter wall-clock time, but it demands more memory space to copy state vectors. With too many processes, the job will be killed by out-of-memory (OOM-killed).
4.3 Run block creation script
![]()
python algorithms/sbd/create_blocks.py --config algorithms/sbd/sbd_blocks.toml
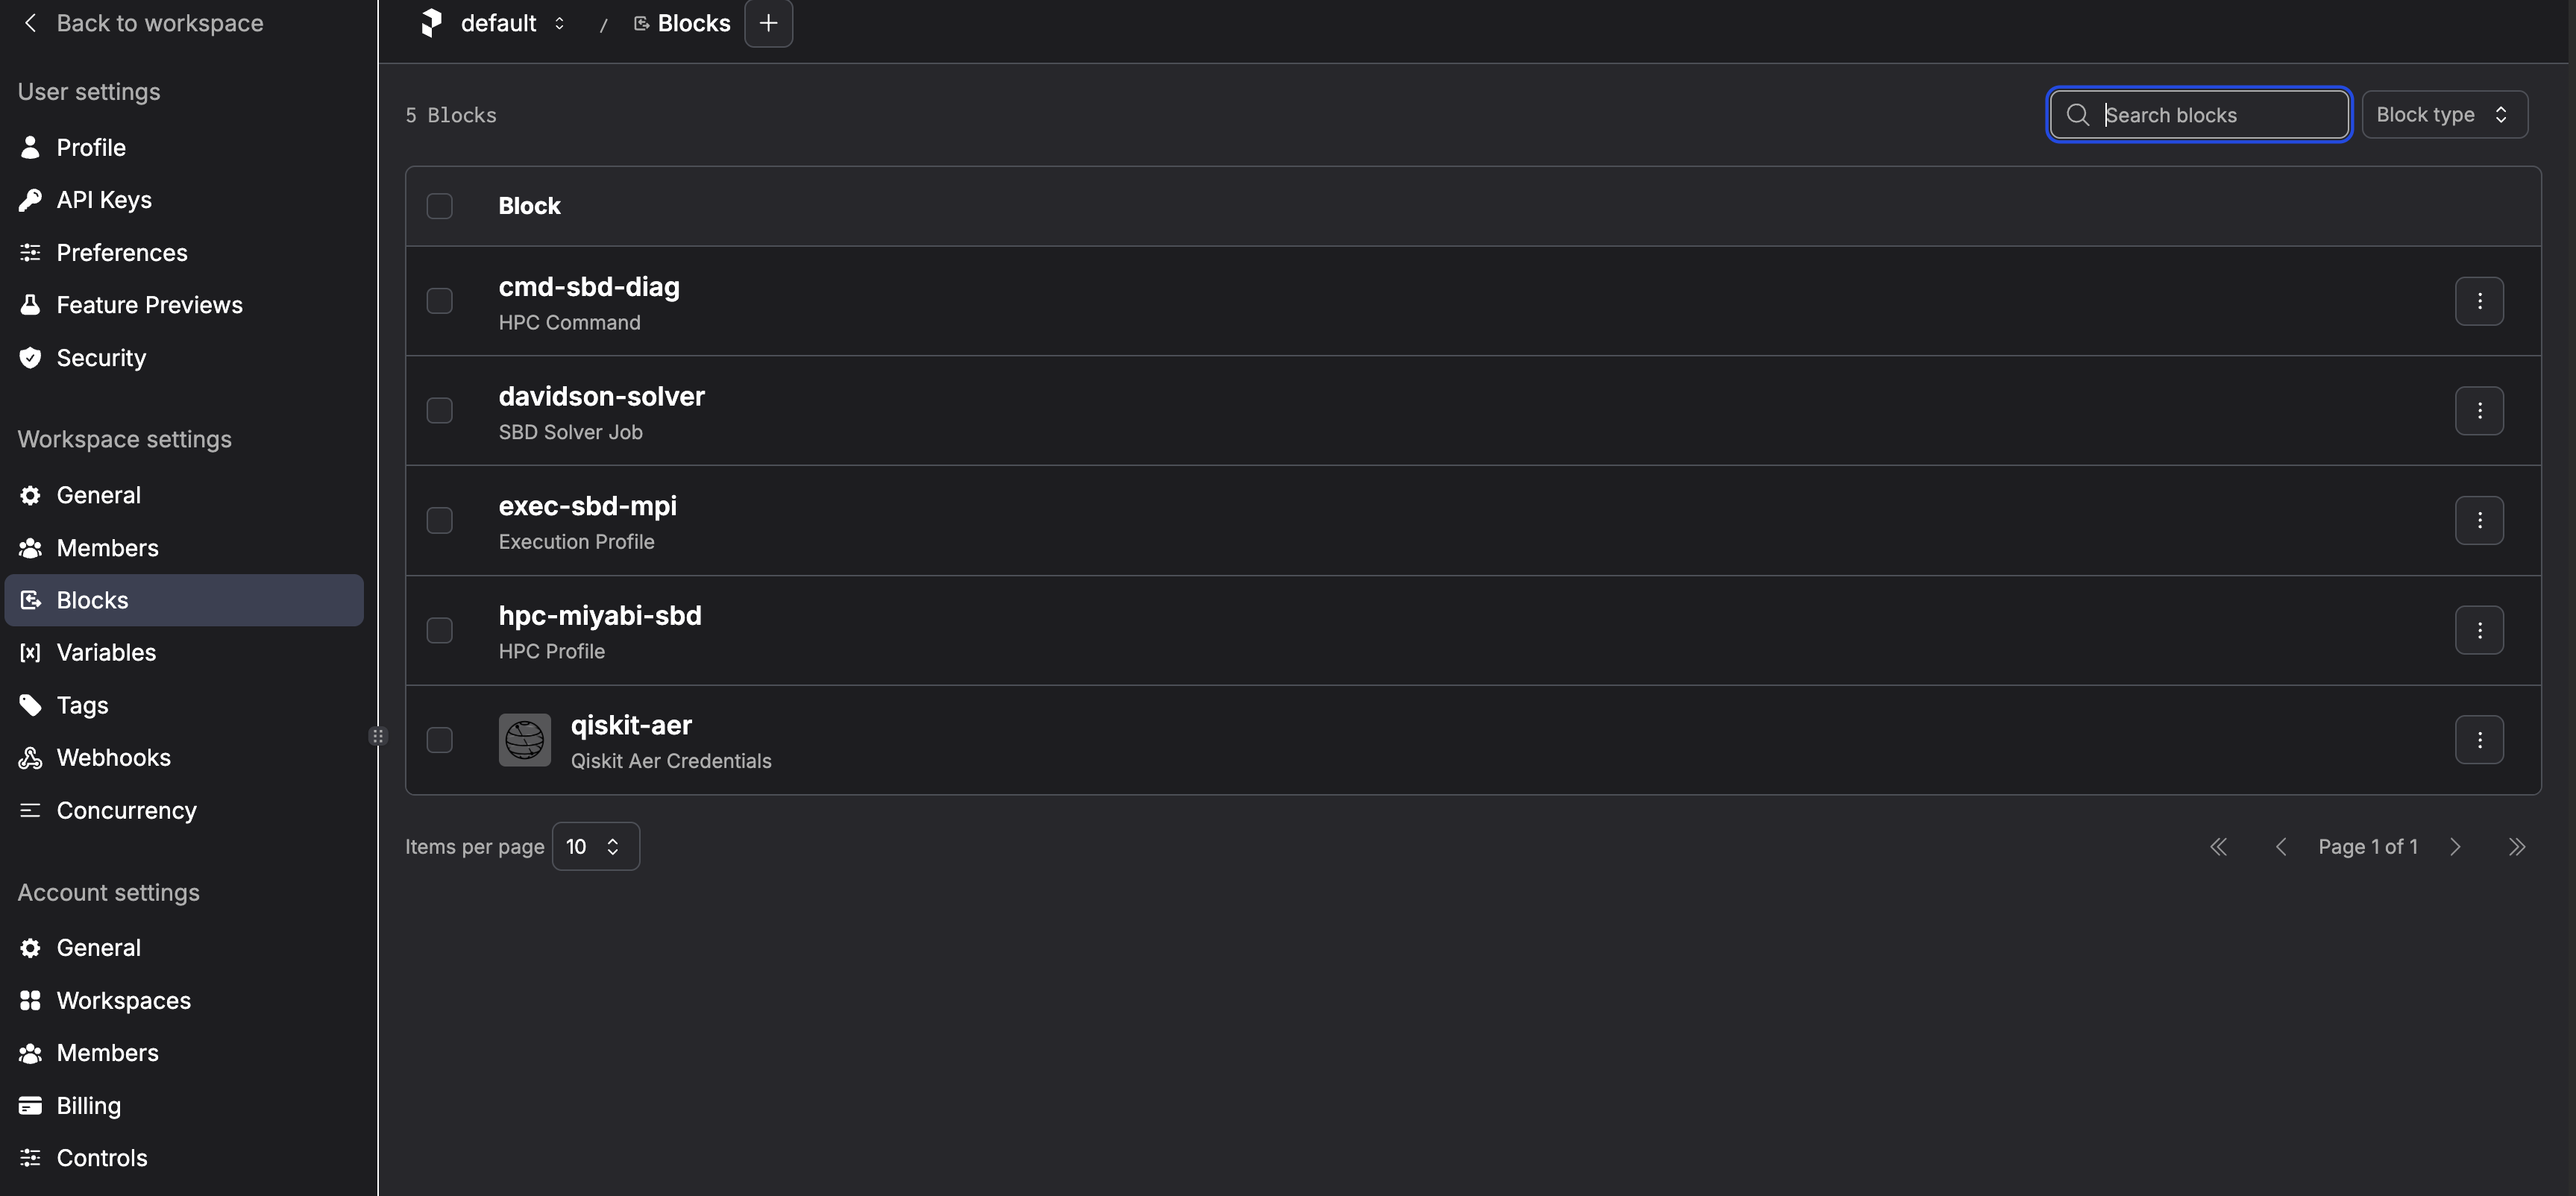
This creates the following blocks (default names):
- CommandBlock:
cmd-sbd-diag - ExecutionProfileBlock:
exec-sbd-mpi - HPCProfileBlock:
hpc-miyabi-sbd - SBD Solver Job:
davidson-solver - Prefect Variable:
sqd_options
davidson-solver is the block you later pass as Solver Block Ref in the UI.
Internally, this block points to:
- cmd-sbd-diag
- exec-sbd-mpi
- hpc-miyabi-sbd
Step 5. Deploy SBD Work Flow
Deploy = register a Flow as a runnable entry point (Deployment) so it can be started from the Prefect UI/CLI by name.
Having Python code on disk is not enough for stable UI-driven execution. Deployment records "what to run" and "how to run it".
Start a screen session:
![]()
screen -S sbd-workflow
Activate environment and deploy:
![]()
cd /work/gz00/z12345/qcsc-prefect
source ~/venv/prefect/bin/activate
sbd-deploy
You should see:
Your flow 'riken-sqd-de' is being served and polling for scheduled runs!

To trigger a run for this flow, use the following command:

        $ prefect deployment run 'riken-sqd-de/riken_sqd_de'

You can also run your flow via the Prefect UI: ...
Detach the screen session (<ctrl> + a, then d).
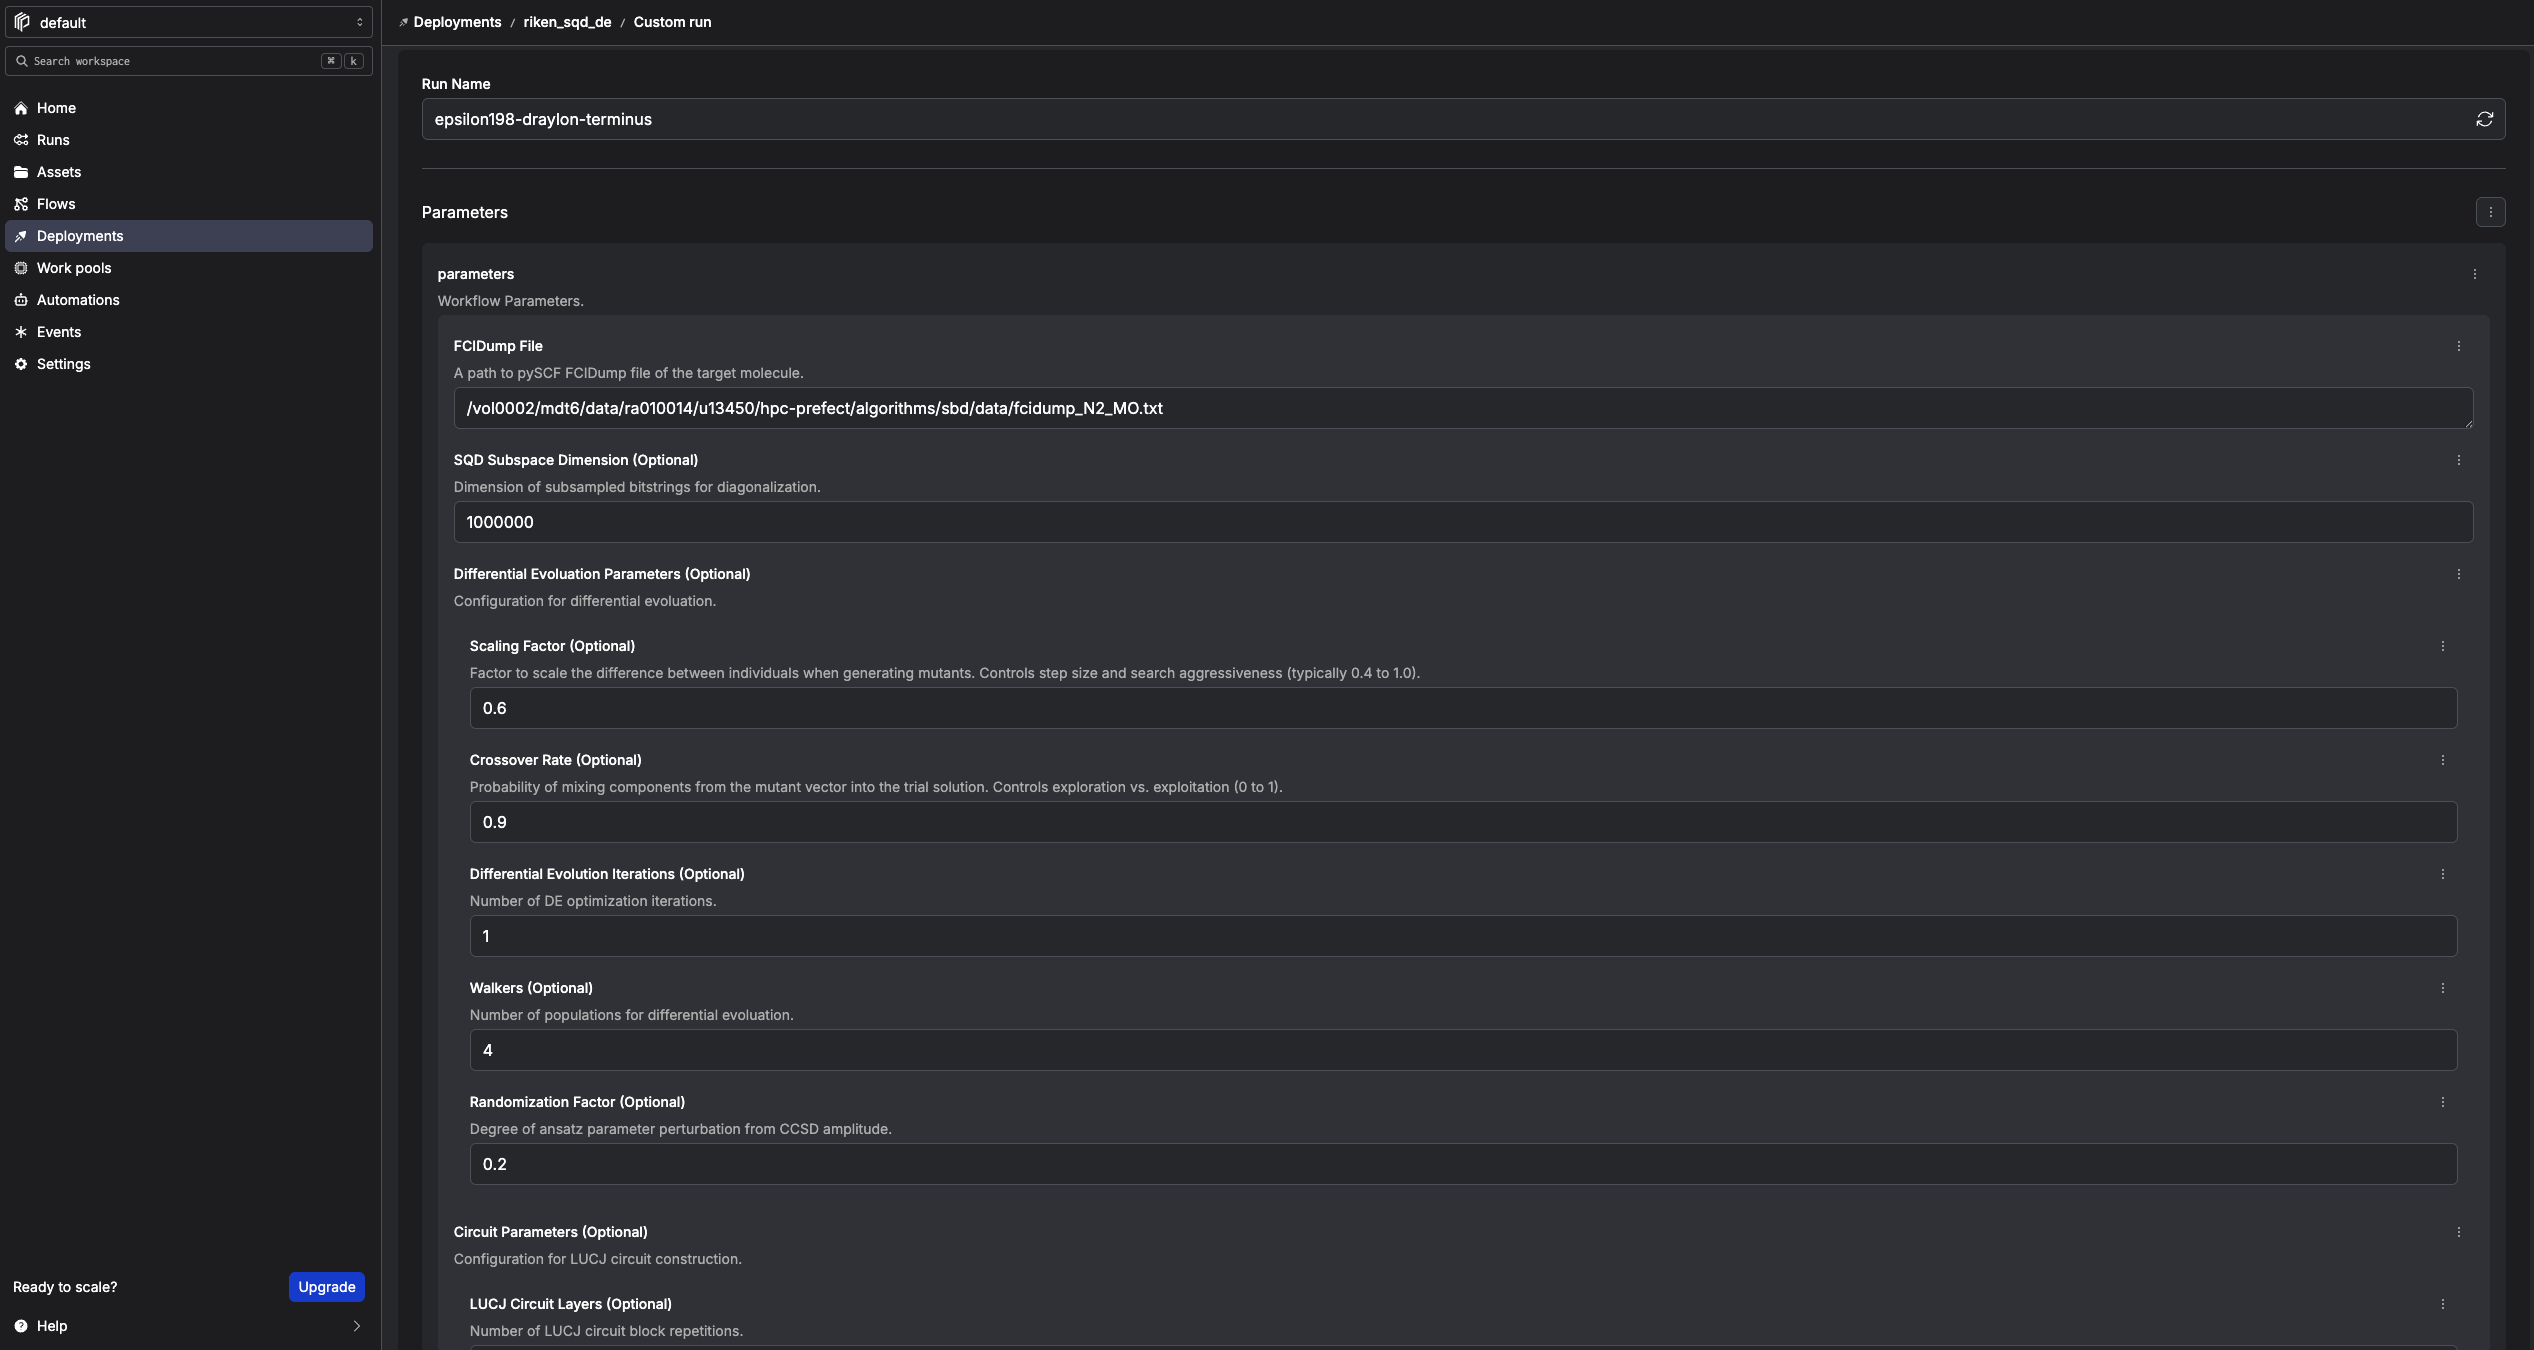
Step 6. Provide Workflow Parameters
In the Prefect console, click Run → Custom run and set as following. Any fields not explicitly specified may remain at their default values.
| Field | Value / Example |
|---|---|
| FCIDump File | /work/gz00/z12345/qcsc-prefect/algorithms/sbd/data/fcidump_N2_MO.txt |
| SQD Subspace Dimension (Optional) | 1000000 (start small for testing) |
| Differential Evolution Iterations (Optional) | 1 (start small for testing) |
| Quantum Source (Optional) | real-device or random |
| Random Seed (Optional) | 24 |
| Solver Block Ref | sbd_solver_job/davidson-solver |
Solver Block Ref means: "which SBDSolverJob preset should this run use?"
- It is a stable entry point for users.
- HPC details are still resolved through the underlying 3 blocks.
Quantum Source controls how SQD obtains bitstrings:
- real-device: use the QuantumRuntime block (ibm-runner) and submit to IBM Quantum Runtime
- random: skip IBM Quantum and generate deterministic pseudo-random bitstrings with Random Seed
[!NOTE] For this tutorial, the number of iterations is set to 1 for a quick test, but feel free to increase it as needed.
Step 7. Execute the Workflow
Click Start Now → Submit.
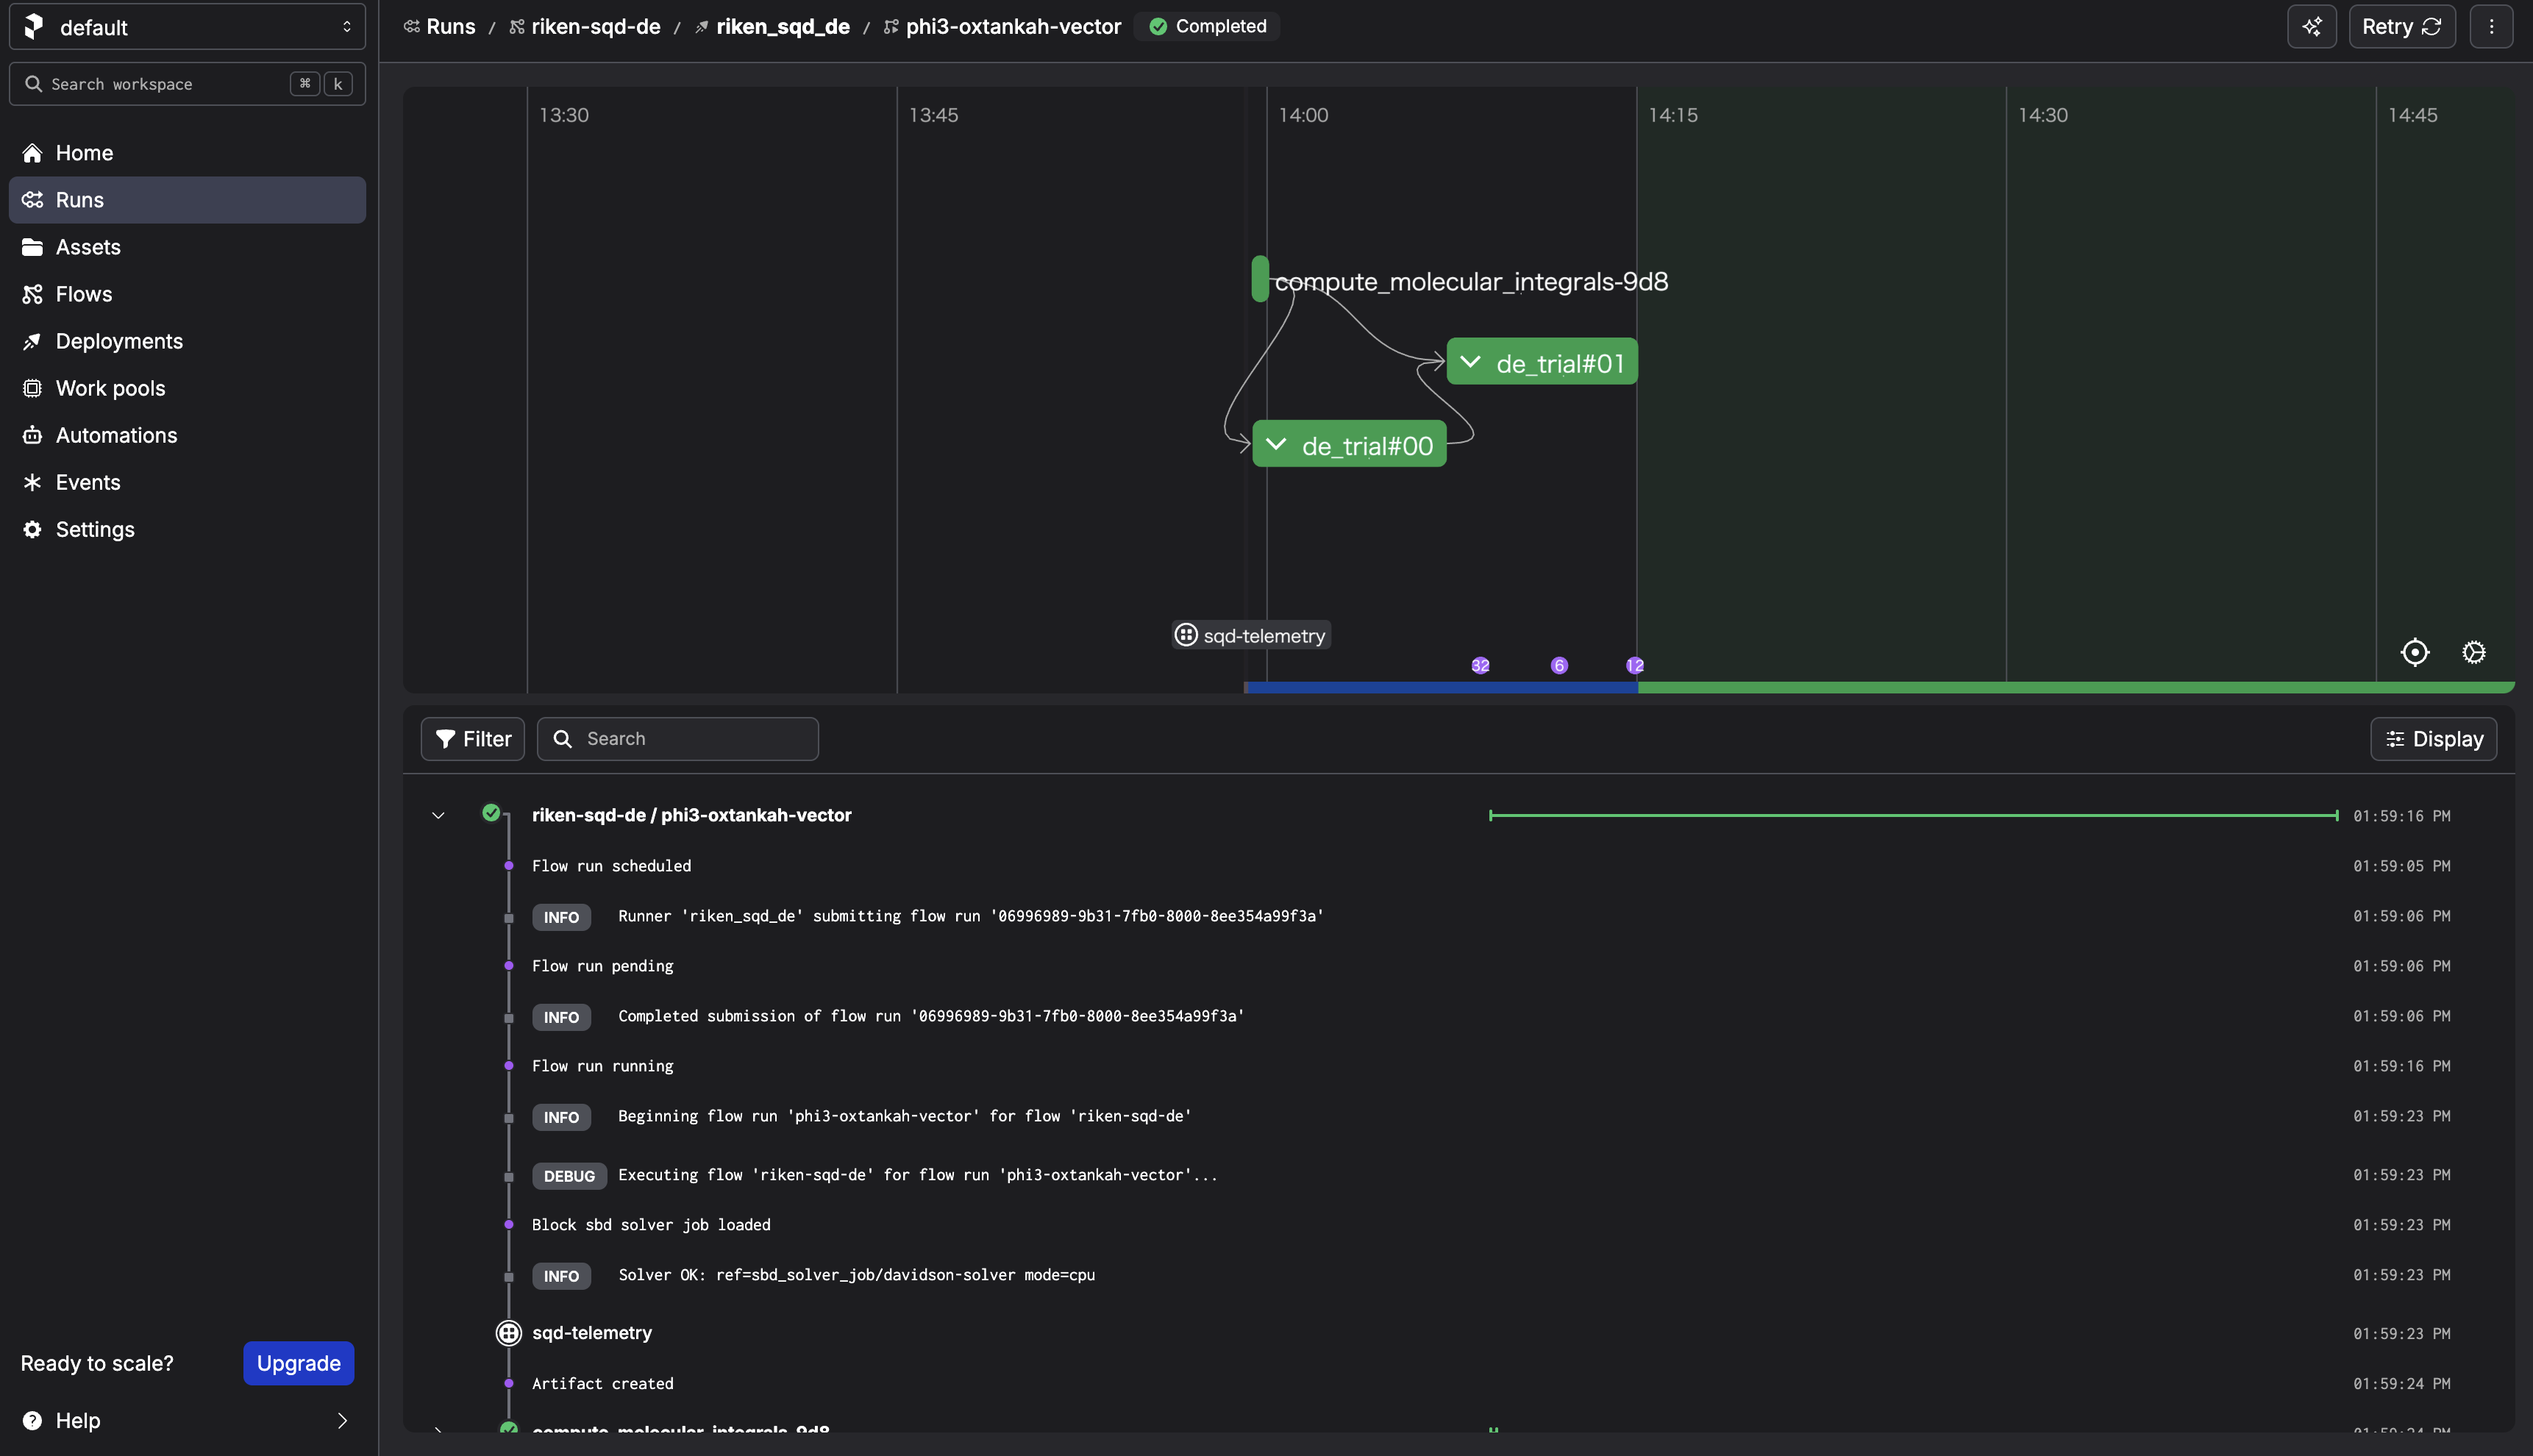
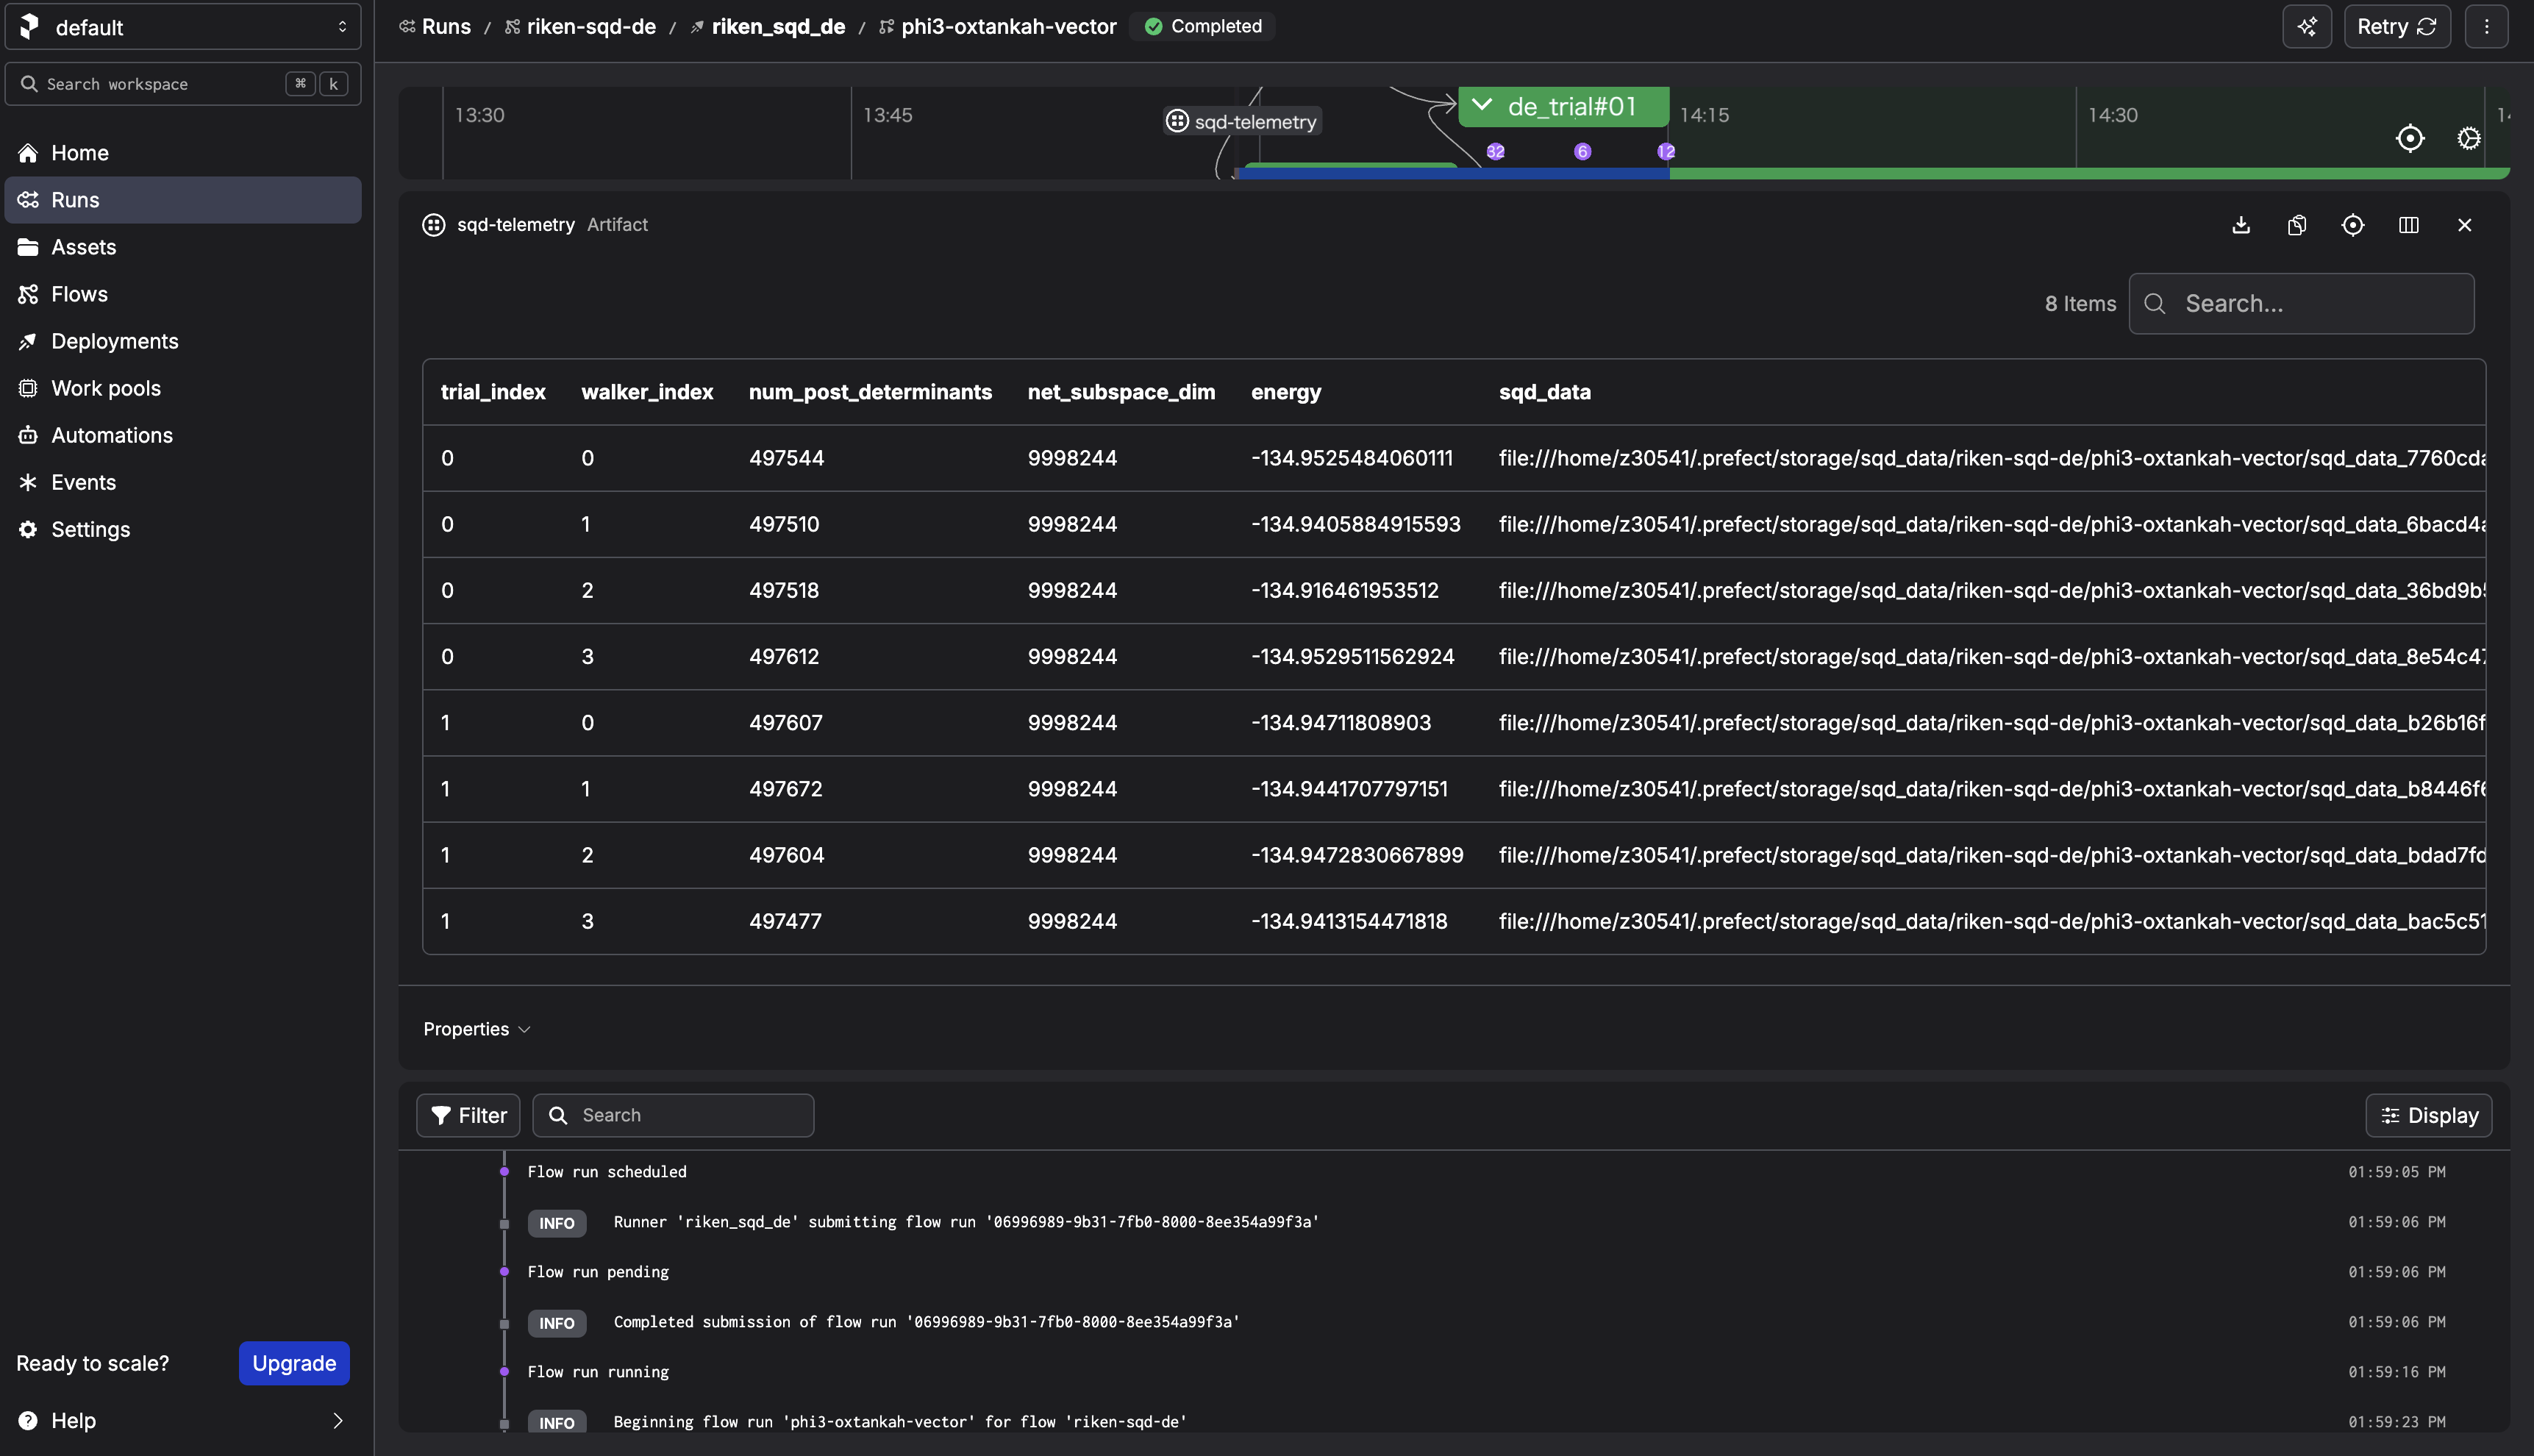
After the run completes, check the sqd-telemetry artifact. It should contain intermediate energies. The final energy should converge around -134.94 Hartree for N2.
Step 8. Cleanup
Follow How to shutdown the workflow.
3. What happens when you "Submit" from the Prefect UI?
3.1 What the UI actually creates
When you choose Run → Custom run → Submit, the Prefect server creates a Flow Run request for a specific Deployment, with the parameters you provided.
3.2 What actually executes the Flow (the key mental model)
The process started by sbd-deploy is the serving process. It:
1. polls the Prefect server for new Flow Runs,
2. when it finds one, it executes the Flow on mdx-cli.
If the
screensession dies (orsbd-deploystops), the UI can still create Flow Runs, but there is no active "runner" to pick them up — so the run will not progress.
3.3 Confirm the information of the deployment
Instead of memorizing filenames, teach participants to trace the entry point:
1) List deployments
prefect deployment ls
2) Inspect the deployment (shows the entry point / flow reference)
prefect deployment inspect 'riken-sqd-de/riken_sqd_de'
3) Locate the Flow definition in the repo
The flow is defined in algorithms/sbd/sbd/main.py
3.4 What happens in this architecture
walker_sqdloadsSBDSolverJobby name.SBDSolverJob.run(...)preparesfcidump.txtandAlphaDets.bin.- Job is submitted by
run_job_from_blocks(...)using: CommandBlockExecutionProfileBlockHPCProfileBlock- SBD output files (
davidson_energy.txt,occ_a.txt,occ_b.txt,carryover.bin) are parsed. - Flow stores telemetry artifact (
sqd-telemetry).
This keeps workflow code stable while HPC settings are controlled by block instances.
Appendix: Using GPU Solvers and Custom Solver Blocks
This section explains how to: 1. Create a GPU-enabled SBD solver Block 2. Select which Solver to use at run time 3. Add custom Solver configurations without modifying the workflow code
This is an advanced usage of the SBD closed-loop workflow.
A. Creating a GPU Solver Block
You already created a CPU solver Block:
davidson-solver
A.1 Place the GPU binary on MDX
For the GPU version, place the binary under:
/work/gz00/z12345/qcsc-prefect/algorithms/sbd/native/diag-gpu
On the MDX workflow client, copy the prebuilt GPU binary with:
![]()
cd /work/gz00/z12345/qcsc-prefect
cp /large/tutorial/diag-gpu algorithms/sbd/native/
This tutorial assumes the GPU solver runs with the binary name diag-gpu.
A.2 Edit configuration for GPU
Copy and edit the configuration file:
![]()
cp algorithms/sbd/sbd_blocks.toml algorithms/sbd/sbd_blocks_gpu.toml
vim algorithms/sbd/sbd_blocks_gpu.toml
Edit algorithms/sbd/sbd_blocks_gpu.toml and change:
| Parameter | Value / Example |
|---|---|
execution_profile_block_name |
exec-sbd-gpu |
hpc_profile_block_name |
hpc-miyabi-sbd-gpu |
solver_block_name |
davidson-solver-gpu |
queue |
regular-g |
sbd_executable |
/work/gz00/z12345/qcsc-prefect/algorithms/sbd/native/diag-gpu |
launcher |
mpirun |
mpiprocs |
1 |
modules |
Do not set |
mpi_options |
["-n", "1"] |
solver_mode |
gpu |
[!NOTE] For GPU runs, use
diag-gpuas the executable name. Do not point the GPU block todiag. GPU runs on Miyabi do not needmodule load intel/2023.2.0ormodule load impi/2021.10.0. Use dedicated GPU block names so that the existing CPU blocks remain available.create_blocks.pywill save the GPU execution profile without module loads. In the closed-loop workflow, GPU runs automatically add--adetfile AlphaDets.binand--carryoverfile carryover.txttodiag-gpu. Ifsolver_mode = "gpu"and you omit these names,create_blocks.pynow defaults toexec-sbd-gpu,hpc-miyabi-sbd-gpu, anddavidson-solver-gpu.
A.3 Create the GPU Block
Run:
python algorithms/sbd/create_blocks.py --config algorithms/sbd/sbd_blocks_gpu.toml
This creates a GPU block set that can coexist with the CPU block set.
B. How the Workflow Selects a Solver
The workflow does not hard-code Solver names. Instead, it accepts a Block reference at run time.
The format is:
<block_type_slug>/<block_name>
For example:
sbd_solver_job/davidson-solver
sbd_solver_job/davidson-solver-gpu
C. Selecting the Solver at Run Time
When launching a run from the Prefect UI: 1. Click Run → Custom run 2. Set the parameter:
| Field | Example |
|---|---|
| Solver Block Ref | sbd_solver_job/davidson-solver-gpu |
This tells the workflow to use the GPU solver Block.
END OF TUTORIAL