Create Your QCSC Workflow with Prefect for Fugaku
This hands-on tutorial guides you through building a small C++ program on the Fugaku environment and integrating it into a Prefect workflow using a custom FugakuJobBlock class.
On the Prefect workflow, we also use Prefect Qiskit to show how to write a complete QCSC workflow from scratch.
Our objective is to compute a count dictionary of sampler bitstrings using MPI programming on the QCSC architecture.
Key principles in this tutorial:
- Users do not write new Python code for BitCount
- Blocks are not created manually in UI; they are generated by
create_blocks.py - Workflows run by specifying block names
- Existing assets are reused as-is from
examples/prefect_bitcount_demo
Prefect Core Concepts (quick mapping with Introduction to Prefect)
You will see these terms:
- Flow: the end-to-end workflow entrypoint
- examples/prefect_bitcount_demo/flow_optimized.py
- Task: individual units executed inside a flow
- quantum-sampling-task in flow_optimized.py
- hpc-bitcount-task in flow_optimized.py
- Block: reusable server-side configuration stored in Prefect
- IBM Quantum Credentials: IBM Cloud CRN + API key
- QuantumRuntime block: ibm-runner (pre-created)
- CommandBlock: cmd-bitcount-hist
- ExecutionProfileBlock: exec-bitcount-fugaku
- HPCProfileBlock: hpc-fugaku-bitcount
- Variable: server-side runtime parameters
- fugaku-bitcount-options
What you need
- Accounts / IDs: (a) Fugaku account, (b) Prefect Web Portal account (API Key), (c) IBM Cloud API key + Service CRN (Quantum)
- Local tools: SSH client and a modern browser.
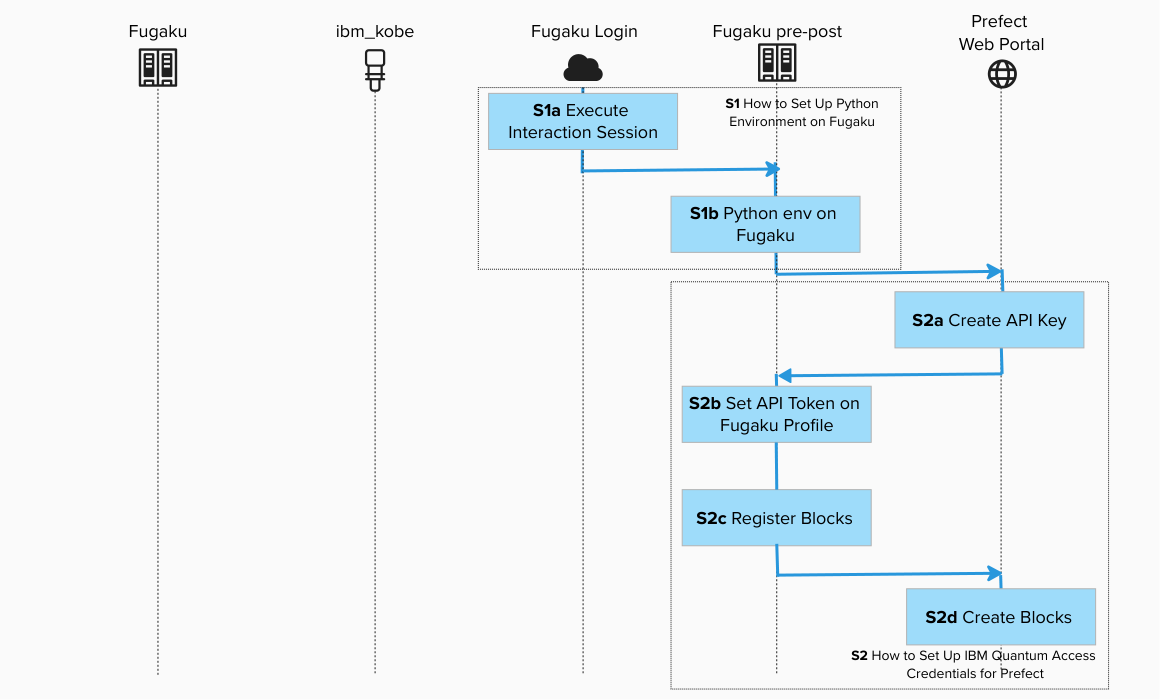
Prerequisites (One-time setup)
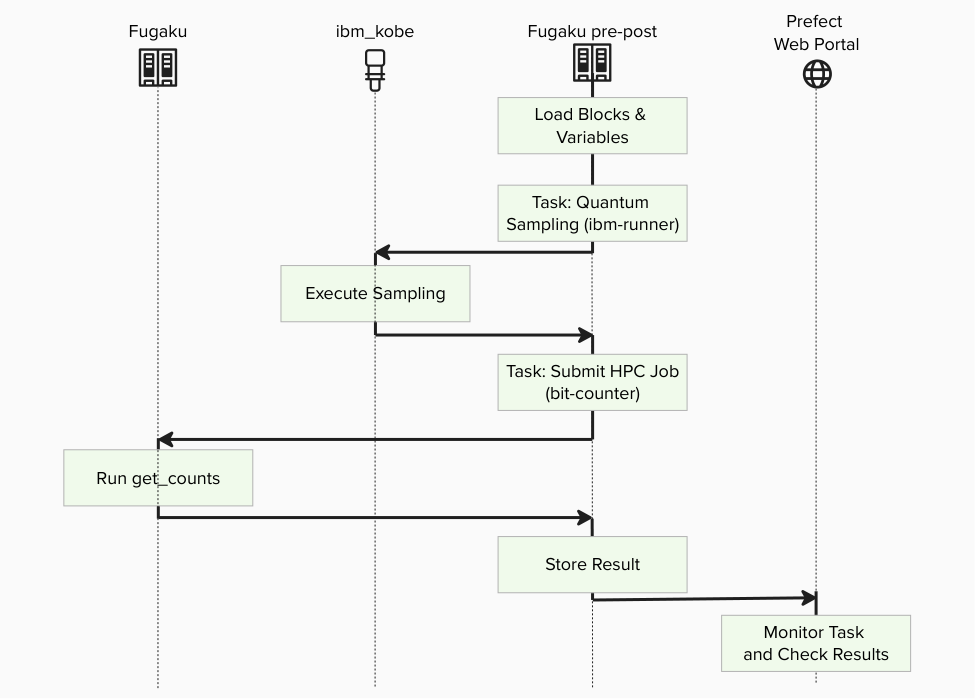
The whole process image is :
Before starting, make sure:
- You have completed Step1 : How to Set Up Python Environment on Fugaku Pre/Post Node.
- You have completed Step2 : How to Set Up IBM Quantum Access Credentials for Prefect.
[!IMPORTANT] Replace
ra00000,u12345andvol0000xwith your actual group, account name and mount volume.
Existing files used in this tutorial
../../examples/prefect_bitcount_demo/build_on_fugaku.sh../../examples/prefect_bitcount_demo/create_blocks.py../../examples/prefect_bitcount_demo/bitcount_blocks.example.toml../../examples/prefect_bitcount_demo/flow_optimized.py../../examples/prefect_bitcount_demo/src/get_counts_json.cpp../../examples/prefect_bitcount_demo/src/get_counts_hist.cpp
All steps below use these files as-is.
Create BitCounts Workflow on Fugaku
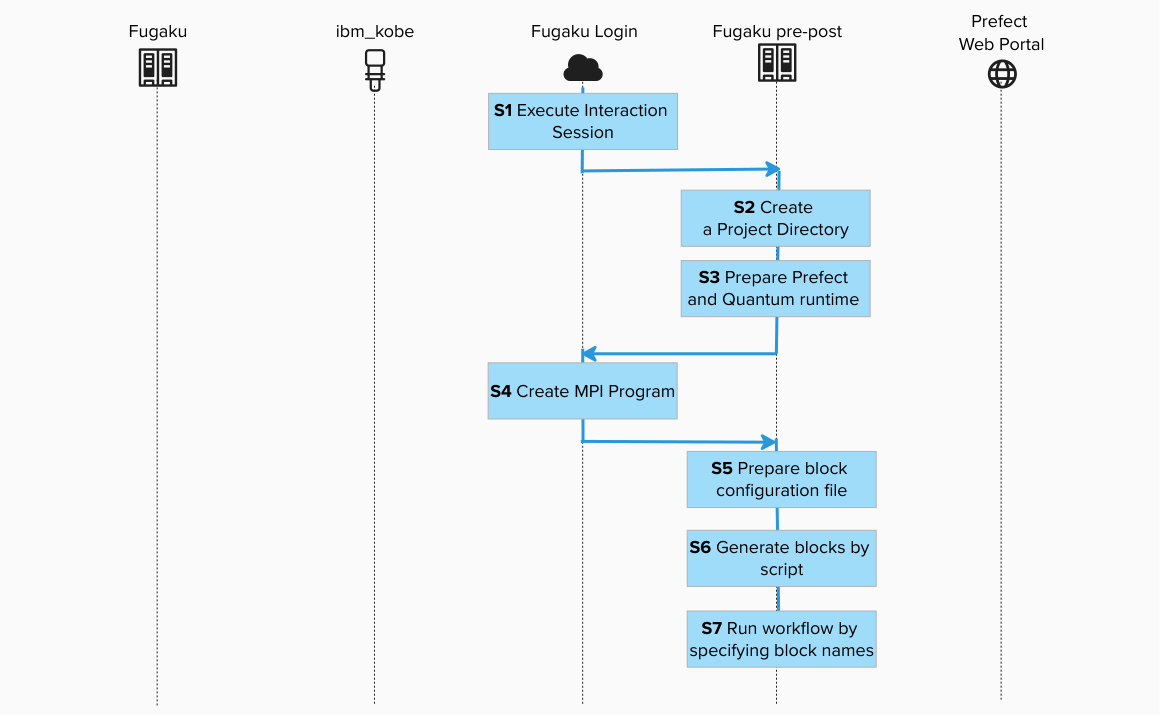
Step 1: Log in to Fugaku and execute the interact session for Pre/Post Node
![]()
ssh -A <your_account>@<fugaku_login_host>
Execute the interact session for Pre/Post Node in the login node.
![]()
srun -p mem2 -n 1 --mem 4G --time=60 --pty bash -i
Step 2. Create a Project Directory repository(Pre/Post Node)
Create a project directory:
![]()
mkdir fugaku_tutorial && cd fugaku_tutorial
Step 3. Prepare Prefect and Quantum runtime (Pre/Post Node)
![]()
cd /path/to/work

git clone git@github.com:qiskit-community/qcsc-prefect.git
cd qcsc-prefect

source ~/venv/prefect/bin/activate
export SSL_CERT_FILE=$(python -c 'import certifi; print(certifi.where())')
uv pip install prefect-qiskit
uv pip install --no-deps \
  -e packages/qcsc-prefect-core \
  -e packages/qcsc-prefect-adapters \
  -e packages/qcsc-prefect-blocks \
  -e packages/qcsc-prefect-executor
SSL_CERT_FILE is required on Fugaku for IBM Quantum access in this environment.
Use Fugaku cloud profile
![]()
prefect profile use cloud-fugaku
Step 4. Build MPI program on Fugaku (Login Node)
![]()
ssh -A <your_account>@<fugaku_login_host>
Open a new terminal and connect to the login node and execute the build script.
![]()
cd /path/to/work/qcsc-prefect
./examples/prefect_bitcount_demo/build_on_fugaku.sh
Generated binaries:
examples/prefect_bitcount_demo/bin/get_counts_jsonexamples/prefect_bitcount_demo/bin/get_counts_hist
Get the absolute path to the get_counts executable:
![]()
realpath ./examples/prefect_bitcount_demo/bin/get_counts_hist
/vol000x/mdt6/data/ra00000/u12345/qcsc-prefect/examples/prefect_bitcount_demo/bin/get_counts_hist
Step 4.1. What get_counts_json and get_counts_hist do
Both programs implement the same MPI bit-count pipeline:
- Read
input.bin(array ofuint32) generated from sampler bitstrings. - Split data across MPI ranks.
- Build local histograms for values in
[0, 2^BITLEN)(BITLEN=10). - Reduce local histograms to rank 0 and write one output file.
Differences:
get_counts_json- Uses
MPI_Scatter(equal-size partition). - Writes sparse JSON (
output.json). get_counts_hist- Uses
MPI_Scatterv(non-even partition handling). - Writes fixed-size binary histogram (
hist_u64.bin). - Used by default (
executable_key=bitcount_hist).
Step 5. Prepare block configuration file (Pre/Post Node)
![]()
cd /path/to/work/qcsc-prefect
cp examples/prefect_bitcount_demo/bitcount_blocks.example.toml \
   examples/prefect_bitcount_demo/bitcount_blocks.toml
vim examples/prefect_bitcount_demo/bitcount_blocks.toml
Set at least these keys for Fugaku:
hpc_target = "fugaku"group(Fugaku group e.g. ra00000)queue(Fugaku rscgrp, e.g.small)work_diroptimized_executable(absolute path toget_counts_hist)
Optional Fugaku keys:
fugaku_gfscachefugaku_spack_modulesfugaku_mpi_options_for_pjm
Step 6. Generate blocks by script (Pre/Post Node)
![]()
python examples/prefect_bitcount_demo/create_blocks.py \
  --config examples/prefect_bitcount_demo/bitcount_blocks.toml \
  --hpc-target fugaku
Step 6.1. What this creates (default names)
| Type | Default name | Purpose |
|---|---|---|
| CommandBlock | cmd-bitcount-hist |
Command definition (executable_key=bitcount_hist) |
| ExecutionProfileBlock | exec-bitcount-fugaku |
Nodes, MPI settings, walltime |
| HPCProfileBlock | hpc-fugaku-bitcount |
Fugaku rscgrp/group/executable/gfscache settings |
| Prefect Variable | fugaku-bitcount-options |
Sampler options (shots, etc.) |
Legacy
BitCounterfacade assets are not created by default here. If you need the compatibility facade, create it from a Miyabi config. For cross-target demos, preferflow_optimized.pyand switch the execution/HPC profile pair at runtime.
Step 7. Run workflow by specifying block names (Pre/Post Node)
Use flow_optimized.py with Fugaku block names:
![]()
python examples/prefect_bitcount_demo/flow_optimized.py \
  --quantum-source real-device \
  --runtime-block ibm-runner \
  --command-block cmd-bitcount-hist \
  --execution-profile-block exec-bitcount-fugaku \
  --hpc-profile-block hpc-fugaku-bitcount \
  --options-variable fugaku-bitcount-options \
  --script-filename bitcount_optimized.pjm
In this mode, the main user inputs are block names.
If you want to skip IBM Quantum for a tutorial/demo run, add --quantum-source random --random-seed 24.
We can also monitor the progress on the Prefect console:
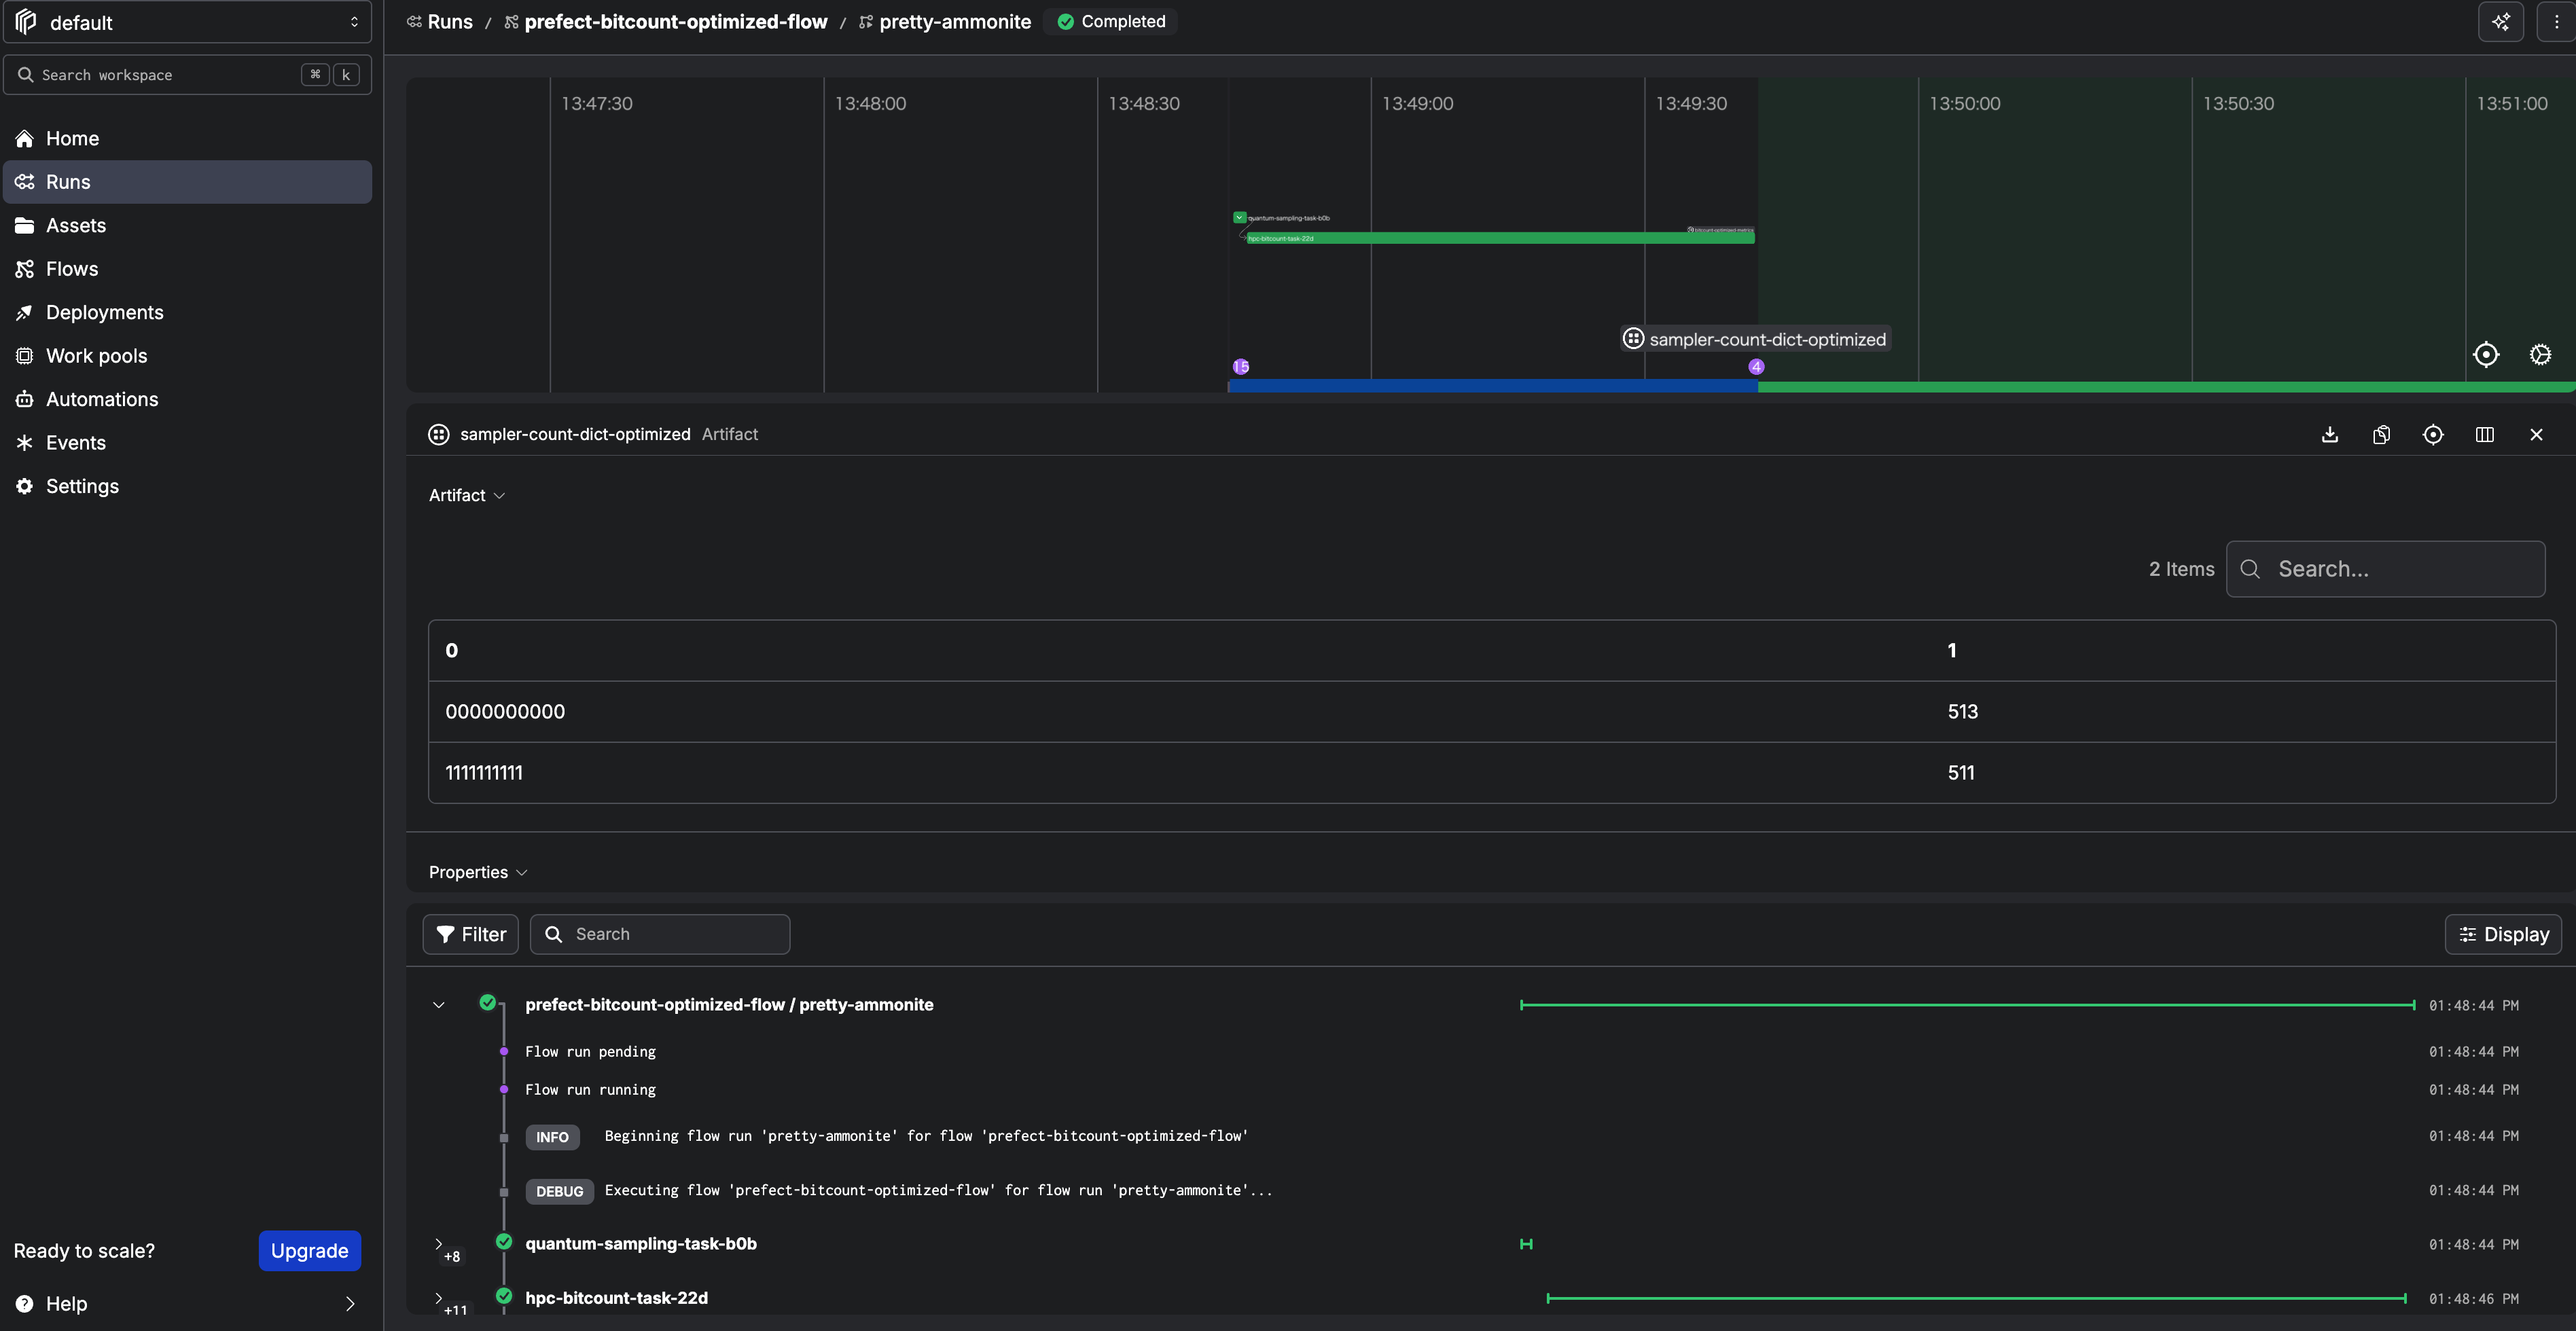
Step 7.1. What flow_optimized.py does
Code location:
../../examples/prefect_bitcount_demo/flow_optimized.py
Execution sequence:
quantum-sampling-task- Load
QuantumRuntimeblock (ibm-runner) - Load sampler options variable (
fugaku-bitcount-options) - Build and run GHZ sampling, or generate deterministic pseudo-random bitstrings when
--quantum-source randomis selected - Write
input.bininto a run-specific job directory hpc-bitcount-task- Submit HPC job via
run_job_from_blocks(...)usingCommandBlock,ExecutionProfileBlock, andHPCProfileBlock - Read
hist_u64.bin, reconstruct counts, publish artifact