Note
இந்தப் பக்கம் docs/tutorials/08_quantum_kernel_trainer.ipynb இலிருந்து உருவாக்கப்பட்டது.
குவாண்டம் கன்வல்யூஷன் நியூரல் நெட்வொர்க்#
1. அறிமுகம்#
Throughout this tutorial, we discuss a Quantum Convolutional Neural Network (QCNN), first proposed by Cong et. al. [1]. We implement such a QCNN on Qiskit by modeling both the convolutional layers and pooling layers using a quantum circuit. After building such a network, we train it to differentiate horizontal and vertical lines from a pixelated image. The following tutorial is thus divided accordingly;
QCNN மற்றும் CCNN இடையே உள்ள வேறுபாடுகள்
QCNN இன் கூறுகள்
தரவு உருவாக்கம்
ஒரு QCNN உருவாக்குதல்
எங்கள் QCNN பயிற்சி
எங்கள் QCNN சோதனை
குறிப்புகள்
இந்த டுடோரியலுக்கு தேவையான நூலகங்கள் மற்றும் தொகுப்புகளை இறக்குமதி செய்வதன் மூலம் முதலில் தொடங்குவோம்.
[1]:
import json
import matplotlib.pyplot as plt
import numpy as np
from IPython.display import clear_output
from qiskit import QuantumCircuit
from qiskit.circuit import ParameterVector
from qiskit.circuit.library import ZFeatureMap
from qiskit.quantum_info import SparsePauliOp
from qiskit_algorithms.optimizers import COBYLA
from qiskit_algorithms.utils import algorithm_globals
from qiskit_machine_learning.algorithms.classifiers import NeuralNetworkClassifier
from qiskit_machine_learning.neural_networks import EstimatorQNN
from sklearn.model_selection import train_test_split

algorithm_globals.random_seed = 12345
1. QCNN மற்றும் CCNN இடையே உள்ள வேறுபாடுகள்#
1.1 கிளாசிக்கல் கன்வல்யூஷனல் நியூரல் நெட்வொர்க்குகள்#
கிளாசிக்கல் கன்வல்யூஷனல் நியூரல் நெட்வொர்க்குகள் (சிசிஎன்என்) என்பது செயற்கை நரம்பியல் நெட்வொர்க்குகளின் துணைப்பிரிவாகும், அவை கொடுக்கப்பட்ட உள்ளீட்டின் குறிப்பிட்ட அம்சங்களையும் வடிவங்களையும் தீர்மானிக்கும் திறனைக் கொண்டுள்ளன. இதன் காரணமாக, அவை பொதுவாக பட அங்கீகாரம் மற்றும் ஆடியோ செயலாக்கத்தில் பயன்படுத்தப்படுகின்றன.
CCNN இல் பயன்படுத்தப்படும் இரண்டு வகையான அடுக்குகளான கன்வல்யூஷனல் லேயர் மற்றும் பூலிங் லேயர் ஆகியவற்றின் விளைவாக அம்சங்களைத் தீர்மானிக்கும் திறன் உள்ளது.
ஒரு CCNN இன் உதாரணத்தை படம் 1 இல் காணலாம், அங்கு CCNN ஒரு உள்ளீட்டு படத்தில் பூனை அல்லது நாய் உள்ளதா என்பதை தீர்மானிக்க பயிற்சியளிக்கப்படுகிறது. அவ்வாறு செய்ய, உள்ளீட்டுப் படம் தொடர்ச்சியான மாற்று கன்வல்யூஷனல் (C) மற்றும் பூலிங் லேயர்கள் (P) வழியாக செல்கிறது, இவை அனைத்தும் வடிவங்களைக் கண்டறிந்து ஒவ்வொரு வடிவத்தையும் பூனை அல்லது நாயுடன் தொடர்புபடுத்துகின்றன. முழுமையாக இணைக்கப்பட்ட அடுக்கு (FC) ஒரு வெளியீட்டை நமக்கு வழங்குகிறது, இது உள்ளீட்டுப் படம் பூனையா அல்லது நாயா என்பதைத் தீர்மானிக்க அனுமதிக்கிறது.
கன்வல்யூஷனல் லேயர் ஒரு கர்னலைப் பயன்படுத்துகிறது, இது ஒரு குறிப்பிட்ட உள்ளீட்டின் அம்சங்களையும் வடிவங்களையும் தீர்மானிக்கும். இதற்கு ஒரு உதாரணம் ஒரு படத்தில் உள்ள அம்சத்தைக் கண்டறிதல் ஆகும், இதில் உள்ளீட்டு படத்தில் குறிப்பிட்ட வடிவங்களை வெவ்வேறு அடுக்குகள் கண்டறியும். இது படம் 1 இல் காட்டப்பட்டுள்ளது, இங்கு \(l^{th}\) அடுக்கு \(ij\) சமதளப் பரப்பில் உள்ள அம்சங்களையும் வடிவங்களையும் அங்கீகரிக்கிறது. பயிற்சி செயல்பாட்டில் கொடுக்கப்பட்ட வெளியீட்டுடன் இது போன்ற அம்சங்களை இணைக்க முடியும், மேலும் தரவுத்தொகுப்பைப் பயிற்றுவிக்க இந்த செயல்முறையைப் பயன்படுத்தலாம்.
மறுபுறம், ஒரு பூலிங் லேயர் உள்ளீட்டுத் தரவின் பரிமாணத்தைக் குறைக்கிறது, இது CCNN இல் கணக்கீட்டு செலவு மற்றும் கற்றல் அளவுருக்களின் அளவைக் குறைக்கிறது. CCNN இன் திட்டவட்டத்தை கீழே காணலாம்.
CCNN இல் மேலும் தகவல்களுக்கு, [2] பார்க்கவும்.
|ஸ்கிரீன்ஷாட்%202022-08-09%20at%2017.03.09.png| படம் 1. பூனை மற்றும் நாயின் படங்களுக்கு இடையில் வகைப்படுத்த CCNN ஐப் பயன்படுத்துவதற்கான ஒரு திட்டவட்டமான விளக்கம். இங்கே, பல கன்வல்யூஷனல் மற்றும் பூலிங் லேயர்கள் பயன்படுத்தப்படுவதைக் காண்கிறோம், இவை அனைத்தும் பூலிங் லேயர்களைப் பயன்படுத்துவதால் பரிமாணத்தில் குறைந்து வருகின்றன. உள்ளீடு படம் பூனையா அல்லது நாயா என்பதை CCNN இன் வெளியீடு தீர்மானிக்கிறது. படம் பெறப்பட்ட படிவம் [1].
1.2 குவாண்டம் கன்வல்யூஷன் நியூரல் நெட்வொர்க்கள்#
Quantum Convolutional Neural Networks (QCNN) behave in a similar manner to CCNNs. First, we encode our pixelated image into a quantum circuit using a given feature map, such Qiskit’s ZFeatureMap or ZZFeatureMap or others available in the circuit library.
எங்கள் படத்தை குறியாக்கம் செய்த பிறகு, அடுத்த பகுதியில் வரையறுக்கப்பட்டுள்ளபடி, மாற்று கன்வல்யூஷனல் மற்றும் பூலிங் லேயர்களைப் பயன்படுத்துகிறோம். இந்த மாற்று அடுக்குகளைப் பயன்படுத்துவதன் மூலம், ஒரு குவிட் இருக்கும் வரை நமது சுற்று பரிமாணத்தைக் குறைக்கிறோம். மீதமுள்ள இந்த ஒரு குவிட்டின் வெளியீட்டை அளவிடுவதன் மூலம் நமது உள்ளீட்டு படத்தை வகைப்படுத்தலாம்.
குவாண்டம் கன்வல்யூஷனல் லேயர் இரண்டு குவிட் யூனிட்டரி ஆபரேட்டர்களின் வரிசையைக் கொண்டிருக்கும், இது எங்கள் சர்க்யூட்டில் உள்ள குவிட்களுக்கு இடையிலான உறவுகளை அடையாளம் கண்டு தீர்மானிக்கிறது. இந்த ஒற்றையடி வாயில்கள் அடுத்த பகுதியில் கீழே வரையறுக்கப்பட்டுள்ளன.
For the Quantum Pooling Layer, we cannot do the same as is done classically to reduce the dimension, i.e. the number of qubits in our circuit. Instead, we reduce the number of qubits by performing operations upon each until a specific point and then disregard certain qubits in a specific layer. It is these layers where we stop performing operations on certain qubits that we call our 'pooling layer'. Details of the pooling layer is discussed further in the next section.
QCNN இல், ஒவ்வொரு அடுக்கிலும் அளவுருப்படுத்தப்பட்ட சுற்றுகள் உள்ளன, அதாவது ஒவ்வொரு அடுக்கின் அளவுருக்களையும் சரிசெய்வதன் மூலம் எங்கள் வெளியீட்டு முடிவை மாற்றுகிறோம். எங்கள் QCNN பயிற்சி போது, அது எங்கள் QCNN இழப்பு செயல்பாடு குறைக்க இந்த அளவுருக்கள் சரி செய்யப்பட்டது.
நான்கு குவிட் QCNN இன் எளிய உதாரணத்தை கீழே காணலாம்.
படம் 2: எடுத்துக்காட்டு QCNN நான்கு குபிட்களைக் கொண்டுள்ளது. முதல் கன்வல்யூஷனல் லேயர் அனைத்து குபிட்களிலும் செயல்படுகிறது. இதைத் தொடர்ந்து முதல் பூலிங் லேயர், முதல் இரண்டையும் புறக்கணிப்பதன் மூலம் QCNN இன் பரிமாணத்தை நான்கு குபிட்களில் இருந்து இரண்டு குபிட்களாக குறைக்கிறது. இரண்டாவது கன்வல்யூஷனல் லேயர், QCNN இல் இன்னும் பயன்பாட்டில் உள்ள இரண்டு குபிட்களுக்கு இடையே உள்ள அம்சங்களைக் கண்டறிந்து, அதைத் தொடர்ந்து மற்றொரு பூலிங் லேயர், பரிமாணத்தை இரண்டு குபிட்களில் இருந்து ஒன்றுக்குக் குறைக்கிறது, இது எங்கள் வெளியீட்டு குபிட்டாக இருக்கும்.
2. QCNN இன் கூறுகள்#
இந்த டுடோரியலின் பிரிவு 1 இல் விவாதிக்கப்பட்டுள்ளபடி, ஒரு CCNN கன்வல்யூஷனல் மற்றும் பூலிங் லேயர்களைக் கொண்டிருக்கும். இங்கே, QCNNக்கான இந்த அடுக்குகளைக் குவாண்டம் சர்க்யூட்டில் பயன்படுத்தப்படும் வாயில்களின் அடிப்படையில் வரையறுத்து, ஒவ்வொரு லேயருக்கும் 4 குபிட்களுக்கான உதாரணத்தை விளக்குகிறோம்.
இந்த அடுக்குகள் ஒவ்வொன்றும் பயிற்சி செயல்முறை முழுவதும் டியூன் செய்யப்பட்ட அளவுருக்களைக் கொண்டிருக்கும், அவை இழப்பு செயல்பாட்டைக் குறைக்கும் மற்றும் கிடைமட்ட மற்றும் செங்குத்து கோடுகளுக்கு இடையில் வகைப்படுத்த QCNNக்கு பயிற்சி அளிக்கும்.
கோட்பாட்டளவில், நமது நெட்வொர்க்கின் கன்வல்யூஷனல் மற்றும் பூலிங் லேயர்களுக்கு எந்த அளவுரு சுற்றுகளையும் ஒருவர் பயன்படுத்தலாம். எடுத்துக்காட்டாக, [2] இல், Gellmann Matrices (Poli Matrices இன் முப்பரிமாண பொதுமைப்படுத்தல்) ஒரு ஜோடி குவிட்களில் செயல்படும் ஒவ்வொரு யூனிட்டரி வாயிலுக்கும் ஜெனரேட்டர்களாகப் பயன்படுத்தப்படுகின்றன.
இங்கே, நாங்கள் ஒரு வித்தியாசமான அணுகுமுறையை எடுத்து, [3] இல் முன்மொழியப்பட்ட இரண்டு குபிட் யூனிட்டரியின் அடிப்படையில் எங்கள் அளவுரு சுற்றுகளை உருவாக்குகிறோம். \(U(4)\) இல் உள்ள ஒவ்வொரு ஒற்றையணி அணியும் சிதைக்கப்படலாம் என்று இது கூறுகிறது
எங்கே \(A_j \in \text{SU}(2)\), \(\otimes\) என்பது டென்சர் தயாரிப்பு, மற்றும் \(N(\alpha, \beta, \gamma) = exp(i [\alpha \sigma_x\sigma_x + \beta \sigma_y\sigma_y + \gamma \sigma_z\sigma_z ])\), இதில் \(\alpha, \beta, \gamma\) ஆகியவை நாம் சரிசெய்யக்கூடிய அளவுருக்கள்.
இதிலிருந்து, ஒவ்வொரு யூனிட்டரியும் 15 அளவுருக்களைச் சார்ந்துள்ளது என்பது தெளிவாகிறது மற்றும் QCNN முழு ஹில்பர்ட் இடத்தையும் பரப்புவதற்கு, எங்கள் QCNN இல் உள்ள ஒவ்வொரு யூனிட்டரியும் ஒவ்வொன்றும் 15 அளவுருக்களைக் கொண்டிருக்க வேண்டும் என்பதைக் குறிக்கிறது.
இந்த பெரிய அளவு அளவுருக்களை சரிசெய்வது கடினமாக இருக்கும் மற்றும் நீண்ட பயிற்சி நேரங்களுக்கு வழிவகுக்கும். இந்தச் சிக்கலைச் சமாளிக்க, எங்கள் அன்சாட்ஸை ஹில்பர்ட் இடத்தின் ஒரு குறிப்பிட்ட துணைவெளிக்கு வரம்பிட்டு, இரண்டு குபிட் யூனிட்டரி கேட் \(N(\alpha, \beta, \gamma)\) என வரையறுக்கிறோம். இந்த இரண்டு குபிட் யூனிட்டரிகள், [3] இல் காணப்படுவது போல் கீழே காணலாம் மற்றும் QCNN இல் உள்ள ஒவ்வொரு அடுக்குகளிலும் அனைத்து அண்டை க்யூபிட்களுக்கும் பயன்படுத்தப்படும்.
பாராமெட்ரைஸ் செய்யப்பட்ட அடுக்குகளுக்கு எங்கள் இரண்டு குவிட் யூனிட்டரியாக \(N(\alpha, \beta, \gamma)\) ஐ மட்டும் பயன்படுத்துவதன் மூலம், எங்கள் QCNN ஐ ஒரு குறிப்பிட்ட துணைவெளியில் கட்டுப்படுத்துகிறோம், அதில் உகந்த தீர்வு இருக்காது. QCNN இன் துல்லியத்தை உள்ளடக்கியது மற்றும் குறைக்கிறது. இந்த டுடோரியலின் நோக்கத்திற்காக, எங்கள் QCNN இன் பயிற்சி நேரத்தைக் குறைக்க இந்த அளவுரு சுற்றுகளைப் பயன்படுத்துவோம்.
படம் 3: \(N(\alpha, \beta, \gamma) = exp(i[\alpha \sigma_x\sigma_x + \beta \sigma_y\sigma_y + \gamma \sigma_z\sigma_z ] க்கு இரண்டு குபிட் யூனிட்டரி சர்க்யூட் அளவுருக்கள் )\) [3] இல் காணப்பட்டது, இங்கு \(\alpha = \frac{\pi}{2} - 2\theta\), \(\beta = 2\phi - \frac{\pi}{2}\) மற்றும் \(\gamma = \frac{\pi}{2} - 2\lambda\) சுற்றில் காணப்பட்டது. இந்த இரண்டு குபிட் யூனிட்டரி எங்கள் அம்ச வரைபடத்தில் உள்ள அனைத்து அண்டை க்யூபிட்களுக்கும் பயன்படுத்தப்படும்.
2.1 காணவொலுஷனல் அடுக்கு#
இந்த டுடோரியலின் அடுத்த படி, எங்கள் QCNN இன் கன்வல்யூஷனல் லேயர்களை வரையறுக்க வேண்டும். அம்ச வரைபடத்தைப் பயன்படுத்தி தரவு குறியாக்கம் செய்யப்பட்ட பிறகு, இந்த அடுக்குகள் குவிட்களுக்குப் பயன்படுத்தப்படும்.
அவ்வாறு செய்ய, நாம் முதலில் ஒரு அளவுருப்படுத்தப்பட்ட ஒற்றையடி வாயிலைத் தீர்மானிக்க வேண்டும், இது நமது கன்வல்யூஷனல் மற்றும் பூலிங் அடுக்குகளை உருவாக்கப் பயன்படும்.
[2]:
# We now define a two qubit unitary as defined in [3]
def conv_circuit(params):
    target = QuantumCircuit(2)
    target.rz(-np.pi / 2, 1)
    target.cx(1, 0)
    target.rz(params[0], 0)
    target.ry(params[1], 1)
    target.cx(0, 1)
    target.ry(params[2], 1)
    target.cx(1, 0)
    target.rz(np.pi / 2, 0)
    return target


# Let's draw this circuit and see what it looks like
params = ParameterVector("θ", length=3)
circuit = conv_circuit(params)
circuit.draw("mpl", style="clifford")
[2]:

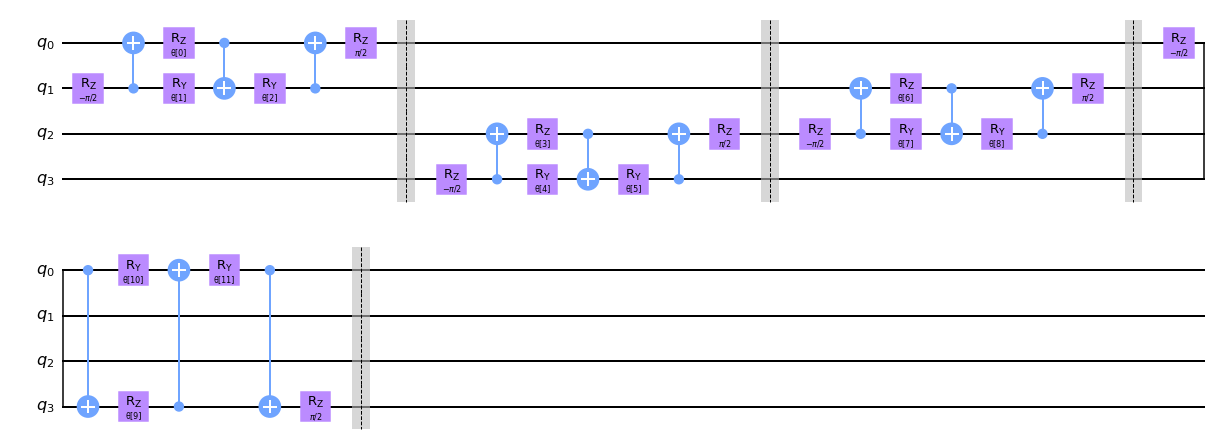
இப்போது இந்த யூனிட்டரிகளை நாங்கள் வரையறுத்துள்ளோம், எங்கள் QCNN இல் கன்வல்யூஷனல் லேயருக்கு ஒரு செயல்பாட்டை உருவாக்க வேண்டிய நேரம் இது. அவ்வாறு செய்ய, கீழே உள்ள conv_layer செயல்பாட்டில் காணப்படுவது போல் இரண்டு குபிட் யூனிட்டரியை அண்டை க்விட்களுக்குப் பயன்படுத்துகிறோம்.
Note that we first apply the two qubit unitary to all even pairs of qubits followed by applying to odd pairs of qubits in a circular coupling manner, i.e. the as well as neighboring qubits being coupled, the first and final qubit are also coupled through a unitary gate.
சதி செய்யும் போது வசதிக்காக எங்கள் குவாண்டம் சர்க்யூட்களில் தடைகளைச் சேர்ப்போம் என்பதை நினைவில் கொள்ளவும், இருப்பினும் அவை உண்மையான QCNN க்கு தேவையில்லை மற்றும் பின்வரும் சுற்றுகளில் இருந்து பிரித்தெடுக்கப்படலாம்.
[3]:
def conv_layer(num_qubits, param_prefix):
    qc = QuantumCircuit(num_qubits, name="Convolutional Layer")
    qubits = list(range(num_qubits))
    param_index = 0
    params = ParameterVector(param_prefix, length=num_qubits * 3)
    for q1, q2 in zip(qubits[0::2], qubits[1::2]):
        qc = qc.compose(conv_circuit(params[param_index : (param_index + 3)]), [q1, q2])
        qc.barrier()
        param_index += 3
    for q1, q2 in zip(qubits[1::2], qubits[2::2] + [0]):
        qc = qc.compose(conv_circuit(params[param_index : (param_index + 3)]), [q1, q2])
        qc.barrier()
        param_index += 3

    qc_inst = qc.to_instruction()

    qc = QuantumCircuit(num_qubits)
    qc.append(qc_inst, qubits)
    return qc


circuit = conv_layer(4, "θ")
circuit.decompose().draw("mpl", style="clifford")
[3]:
2.2 பூலிங் லேயர்#
The purpose of a pooling layer is to reduce the dimensions of our Quantum Circuit, i.e. reduce the number of qubits in our circuit, while retaining as much information as possible from previously learned data. Reducing the amount of qubits also reduces the computational cost of the overall circuit, as the number of parameters that the QCNN needs to learn decreases.
இருப்பினும், நமது குவாண்டம் சர்க்யூட்டில் உள்ள குபிட்களின் அளவைக் குறைக்க முடியாது. இதன் காரணமாக, கிளாசிக்கல் அணுகுமுறையுடன் ஒப்பிடும்போது பூலிங் லேயரை வேறு விதத்தில் வரையறுக்க வேண்டும்.
To 'artificially' reduce the number of qubits in our circuit, we first begin by creating pairs of the \(N\) qubits in our system.
ஆரம்பத்தில் அனைத்து குபிட்களையும் இணைத்த பிறகு, முன்பு விவரிக்கப்பட்டபடி, ஒவ்வொரு ஜோடிக்கும் பொதுவான 2 குபிட் யூனிட்டரியைப் பயன்படுத்துகிறோம். இந்த இரண்டு குபிட் யூனிட்டரியைப் பயன்படுத்திய பிறகு, மீதமுள்ள நியூரல் நெட்வொர்க்கிற்கு ஒவ்வொரு ஜோடி குபிட்களிலிருந்தும் ஒரு குபிட்டைப் புறக்கணிக்கிறோம்.
This layer therefore has the overall effect of 'combining' the information of the two qubits into one qubit by first applying the unitary circuit, encoding information from one qubit into another, before disregarding one of qubits for the remainder of the circuit and not performing any operations or measurements on it.
பூலிங் லேயர்களில் பரிமாணத்தைக் குறைக்க ஒருவர் டைனமிக் சர்க்யூட்டையும் பயன்படுத்தலாம் என்பதை நாங்கள் கவனிக்கிறோம். இது சுற்றுவட்டத்தில் உள்ள சில குபிட்களில் அளவீடுகளைச் செய்வதையும், எங்கள் பூலிங் லேயர்களில் இடைநிலை கிளாசிக்கல் பின்னூட்ட சுழற்சியைக் கொண்டிருப்பதையும் உள்ளடக்கும். இந்த அளவீடுகளைப் பயன்படுத்துவதன் மூலம், ஒருவர் சுற்றுகளின் பரிமாணத்தையும் குறைக்கலாம்.
இந்த டுடோரியலில், நாங்கள் முந்தைய அணுகுமுறையைப் பயன்படுத்துகிறோம், மேலும் ஒவ்வொரு பூலிங் லேயரிலும் குபிட்களைப் புறக்கணிக்கிறோம். இந்த அணுகுமுறையைப் பயன்படுத்தி, QCNN பூலிங் லேயரை உருவாக்குகிறோம், இது நமது \(N\) qubit Quantum Circuit இன் பரிமாணங்களை \(N/2\) ஆக மாற்றுகிறது.
அவ்வாறு செய்ய, முதலில் இரண்டு குபிட் யூனிட்டரியை வரையறுக்கிறோம், இது இரண்டு குபிட் அமைப்பை ஒன்றாக மாற்றுகிறது.
[4]:
def pool_circuit(params):
    target = QuantumCircuit(2)
    target.rz(-np.pi / 2, 1)
    target.cx(1, 0)
    target.rz(params[0], 0)
    target.ry(params[1], 1)
    target.cx(0, 1)
    target.ry(params[2], 1)

    return target


params = ParameterVector("θ", length=3)
circuit = pool_circuit(params)
circuit.draw("mpl", style="clifford")
[4]:
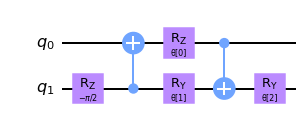
இந்த இரண்டு குவிட் யூனிட்டரி சர்க்யூட்டைப் பயன்படுத்திய பிறகு, எதிர்கால அடுக்குகளில் முதல் குவிட்டை (q0) புறக்கணிப்போம், எங்கள் QCNN இல் இரண்டாவது குவிட்டை (q1) மட்டுமே பயன்படுத்துவோம்
N குபிட்களுக்கான எங்கள் பூலிங் லேயரை உருவாக்க, இந்த இரண்டு குபிட் பூலிங் லேயரை வெவ்வேறு ஜோடி குபிட்களுக்குப் பயன்படுத்துகிறோம். உதாரணமாக, அதை நான்கு குபிட்களுக்குத் திட்டமிடுகிறோம்.
[5]:
def pool_layer(sources, sinks, param_prefix):
    num_qubits = len(sources) + len(sinks)
    qc = QuantumCircuit(num_qubits, name="Pooling Layer")
    param_index = 0
    params = ParameterVector(param_prefix, length=num_qubits // 2 * 3)
    for source, sink in zip(sources, sinks):
        qc = qc.compose(pool_circuit(params[param_index : (param_index + 3)]), [source, sink])
        qc.barrier()
        param_index += 3

    qc_inst = qc.to_instruction()

    qc = QuantumCircuit(num_qubits)
    qc.append(qc_inst, range(num_qubits))
    return qc


sources = [0, 1]
sinks = [2, 3]
circuit = pool_layer(sources, sinks, "θ")
circuit.decompose().draw("mpl", style="clifford")
[5]:
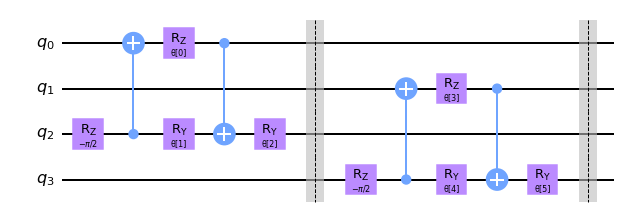
In this particular example, we reduce the dimensionality of our four qubit circuit to the last two qubits, i.e. the last two qubits in this particular example. These qubits are then used in the next layer, while the first two are neglected for the remainder of the QCNN.
3. தரவு உருவாக்கம்#
One common use of a CCNN is an image classifier, where a CCNN detects particular features and patterns (such as straight lines or curves) of the pixelated images through the use of the feature maps in the convolutional layer. By learning the relationship between these features, it can then classify and label handwritten digits with ease.
Because of a classical CNN’s ability to recognize features and patterns easily, we will train our QCNN to also determine patterns and features of a given set of pixelated images, and classify between two different patterns.
To simplify the dataset, we only consider 2 x 4 pixelated images. The patterns we will train the QCNN to distinguish will be a horizontal or vertical line, which can be placed anywhere in the image, alongside a noisy background.
We first begin by generating this dataset. To create a 'horizontal' or 'vertical' line, we assign pixels value to be \(\frac{\pi}{2}\) which will represent the line in our pixelated image. We create a noisy background by assigning every other pixel a random value between \(0\) and \(\frac{\pi}{4}\) which will create a noisy background.
Note that when we create our dataset, we need to split it into the training set and testing set of images, the datasets we train and test our neural network respectively.
We also need to label our datasets such that the QCNN can learn to differentiate between the two patterns. In this example we label images with a horizontal line with -1 and images with a vertical line +1.
[6]:
def generate_dataset(num_images):
    images = []
    labels = []
    hor_array = np.zeros((6, 8))
    ver_array = np.zeros((4, 8))

    j = 0
    for i in range(0, 7):
        if i != 3:
            hor_array[j][i] = np.pi / 2
            hor_array[j][i + 1] = np.pi / 2
            j += 1

    j = 0
    for i in range(0, 4):
        ver_array[j][i] = np.pi / 2
        ver_array[j][i + 4] = np.pi / 2
        j += 1

    for n in range(num_images):
        rng = algorithm_globals.random.integers(0, 2)
        if rng == 0:
            labels.append(-1)
            random_image = algorithm_globals.random.integers(0, 6)
            images.append(np.array(hor_array[random_image]))
        elif rng == 1:
            labels.append(1)
            random_image = algorithm_globals.random.integers(0, 4)
            images.append(np.array(ver_array[random_image]))

        # Create noise
        for i in range(8):
            if images[-1][i] == 0:
                images[-1][i] = algorithm_globals.random.uniform(0, np.pi / 4)
    return images, labels
Let’s now create our dataset below and split it into our test and training datasets. We pass a random_state so the split will be the same each time this notebook is run so the final results do not vary.
[7]:
images, labels = generate_dataset(50)

train_images, test_images, train_labels, test_labels = train_test_split(
    images, labels, test_size=0.3, random_state=246
)
Let’s see some examples in our dataset
[8]:
fig, ax = plt.subplots(2, 2, figsize=(10, 6), subplot_kw={"xticks": [], "yticks": []})
for i in range(4):
    ax[i // 2, i % 2].imshow(
        train_images[i].reshape(2, 4),  # Change back to 2 by 4
        aspect="equal",
    )
plt.subplots_adjust(wspace=0.1, hspace=0.025)
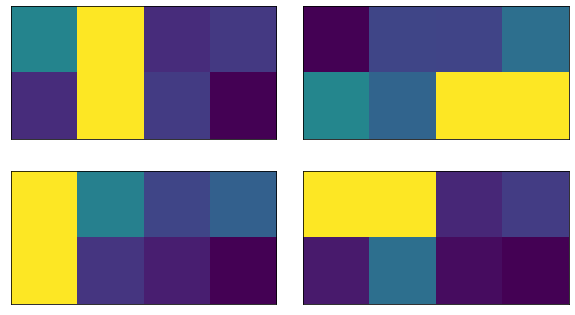
As we can see each image contains either a vertical or horizontal line, that the QCNN will learn how to differentiate. Now that we have built our dataset, it is time to discuss the components of the QCNN and build our model.
4. Modeling our QCNN#
Now that we have defined both the convolutional layers it is now time to build our QCNN, which will consist of alternating pooling and convolutional layers.
As the images in our dataset contains 8 pixels, we will use 8 qubits in our QCNN.
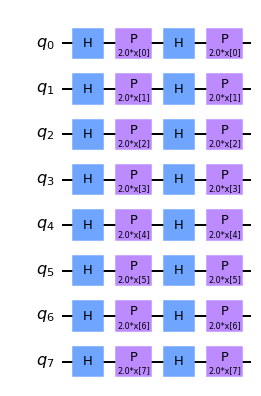
We encode our dataset into our QCNN by applying a feature map. One can create a feature map using one of Qiskit’s built in feature maps, such as ZFeatureMap or ZZFeatureMap.
After analyzing several different Feature maps for this dataset, it was found that QCNN obtains the greatest accuracy when the Z feature map is used. Therefore, throughout the remainder of the tutorial we will use the Z feature Map, of which can be seen below.
[9]:
feature_map = ZFeatureMap(8)
feature_map.decompose().draw("mpl", style="clifford")
[9]:
We create a function for our QCNN, which will contain three sets of alternating convolutional and pooling layers, which can be seen in the schematic below. Through the use of the pooling layers, we thus reduce the dimensionality of our QCNN from eight qubits to one.
To classify our image dataset of horizontal and vertical lines, we measure the expectation value of the Pauli Z operator of the final qubit. Based on the obtained value being +1 or -1, we can conclude that the input image contained either a horizontal or vertical line.
5. Training our QCNN#
The next step is to build our model using our training data.
To classify our system, we perform a measurement from the output circuit. The value we obtain will thus classify whether our input data contains either a vertical line or horizontal line.
The measurement we have chosen in this tutorial is \(<Z>\), i.e. the expectation value of the Pauli Z qubit for the final qubit. Measuring this expectation value, we obtain +1 or -1, which correspond to a vertical or horizontal line respectively.
[10]:
feature_map = ZFeatureMap(8)

ansatz = QuantumCircuit(8, name="Ansatz")

# First Convolutional Layer
ansatz.compose(conv_layer(8, "c1"), list(range(8)), inplace=True)

# First Pooling Layer
ansatz.compose(pool_layer([0, 1, 2, 3], [4, 5, 6, 7], "p1"), list(range(8)), inplace=True)

# Second Convolutional Layer
ansatz.compose(conv_layer(4, "c2"), list(range(4, 8)), inplace=True)

# Second Pooling Layer
ansatz.compose(pool_layer([0, 1], [2, 3], "p2"), list(range(4, 8)), inplace=True)

# Third Convolutional Layer
ansatz.compose(conv_layer(2, "c3"), list(range(6, 8)), inplace=True)

# Third Pooling Layer
ansatz.compose(pool_layer([0], [1], "p3"), list(range(6, 8)), inplace=True)

# Combining the feature map and ansatz
circuit = QuantumCircuit(8)
circuit.compose(feature_map, range(8), inplace=True)
circuit.compose(ansatz, range(8), inplace=True)

observable = SparsePauliOp.from_list([("Z" + "I" * 7, 1)])

# we decompose the circuit for the QNN to avoid additional data copying
qnn = EstimatorQNN(
    circuit=circuit.decompose(),
    observables=observable,
    input_params=feature_map.parameters,
    weight_params=ansatz.parameters,
)
[11]:
circuit.draw("mpl", style="clifford")
[11]:
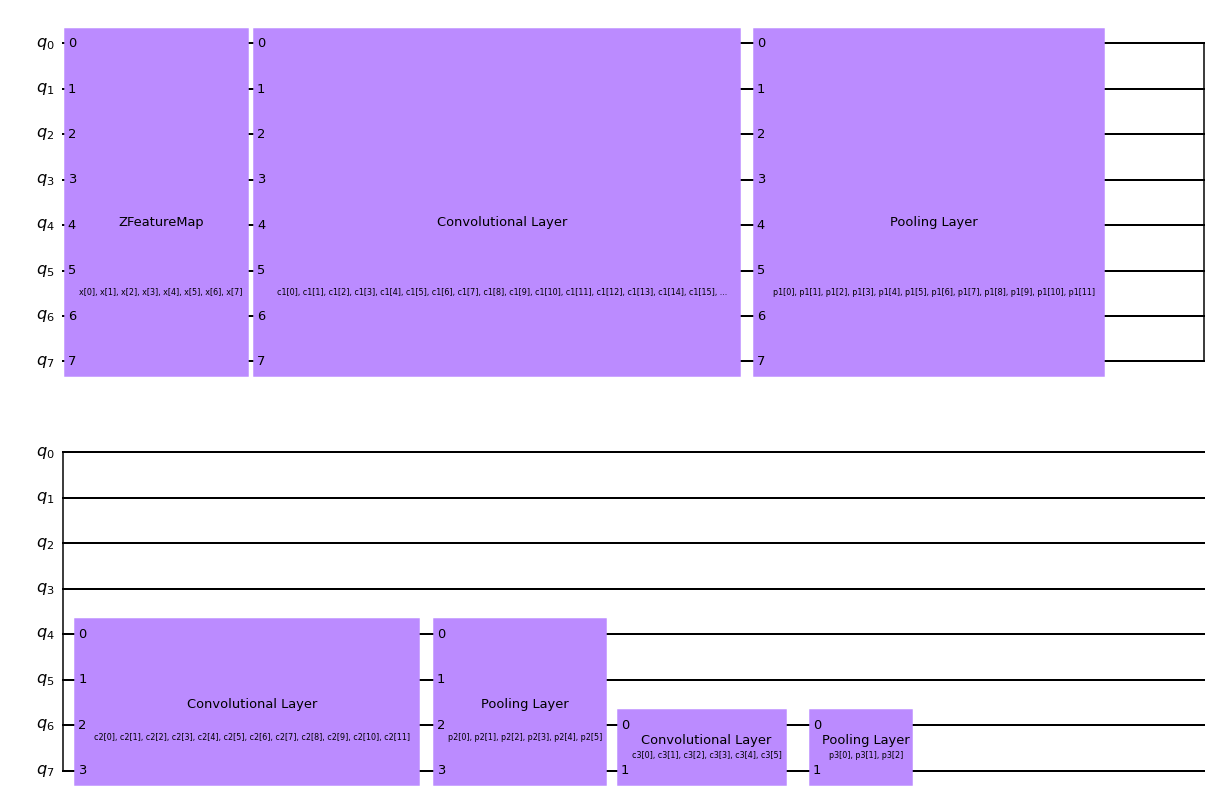
We will also define a callback function to use when training our model. This allows us to view and plot the loss function per each iteration in our training process.
[12]:
def callback_graph(weights, obj_func_eval):
    clear_output(wait=True)
    objective_func_vals.append(obj_func_eval)
    plt.title("Objective function value against iteration")
    plt.xlabel("Iteration")
    plt.ylabel("Objective function value")
    plt.plot(range(len(objective_func_vals)), objective_func_vals)
    plt.show()
In this example, we will use the COBYLA optimizer to train our classifier, which is a numerical optimization method commonly used for classification machine learning algorithms.
We then place the the callback function, optimizer and operator of our QCNN created above into Qiskit Machine Learning’s built in Neural Network Classifier, which we can then use to train our model.
Since model training may take a long time we have already pre-trained the model for some iterations and saved the pre-trained weights. We’ll continue training from that point by setting initial_point to a vector of pre-trained weights.
[13]:
with open("11_qcnn_initial_point.json", "r") as f:
    initial_point = json.load(f)

classifier = NeuralNetworkClassifier(
    qnn,
    optimizer=COBYLA(maxiter=200),  # Set max iterations here
    callback=callback_graph,
    initial_point=initial_point,
)
After creating this classifier, we can train our QCNN using our training dataset and each image’s corresponding label. Because we previously defined the callback function, we plot the overall loss of our system per iteration.
It may take some time to train the QCNN so be patient!
[14]:
x = np.asarray(train_images)
y = np.asarray(train_labels)

objective_func_vals = []
plt.rcParams["figure.figsize"] = (12, 6)
classifier.fit(x, y)

# score classifier
print(f"Accuracy from the train data : {np.round(100 * classifier.score(x, y), 2)}%")
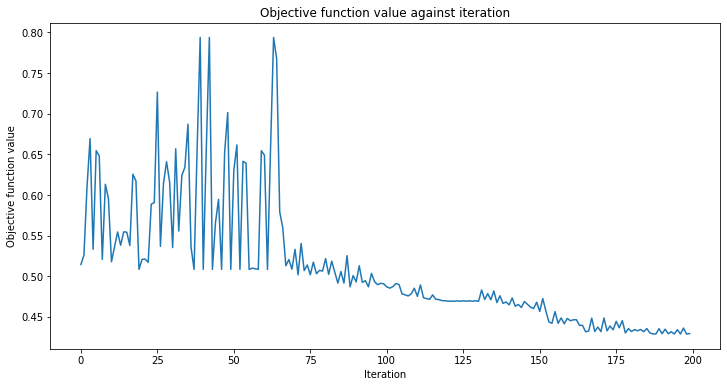
Accuracy from the train data : 97.14%
As we can see from above, the QCNN converges slowly, hence our initial_point was already close to an optimal solution. The next step is to determine whether our QCNN can classify data seen in our test image data set.
6. Testing our QCNN#
After building and training our dataset we now test whether our QCNN can predict images that are not from our test data set.
[15]:
y_predict = classifier.predict(test_images)
x = np.asarray(test_images)
y = np.asarray(test_labels)
print(f"Accuracy from the test data : {np.round(100 * classifier.score(x, y), 2)}%")

# Let's see some examples in our dataset
fig, ax = plt.subplots(2, 2, figsize=(10, 6), subplot_kw={"xticks": [], "yticks": []})
for i in range(0, 4):
    ax[i // 2, i % 2].imshow(test_images[i].reshape(2, 4), aspect="equal")
    if y_predict[i] == -1:
        ax[i // 2, i % 2].set_title("The QCNN predicts this is a Horizontal Line")
    if y_predict[i] == +1:
        ax[i // 2, i % 2].set_title("The QCNN predicts this is a Vertical Line")
plt.subplots_adjust(wspace=0.1, hspace=0.5)
Accuracy from the test data : 93.33%
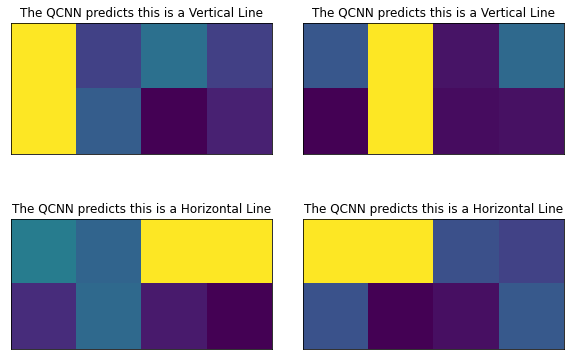
From above, we can indeed see that our QCNN can classify horizontal and vertical lines! Congratulations! Through the use of quantum circuits and quantum convolutional and pooling layers, you have built a Quantum Convolutional Neural Network!
7. References#
[1] Cong, I., Choi, S. & Lukin, M.D. Quantum convolutional neural networks. Nat. Phys. 15, 1273–1278 (2019). https://doi.org/10.1038/s41567-019-0648-8
[2] IBM Convolutional Neural Networks https://www.ibm.com/cloud/learn/convolutional-neural-networks
[3] Vatan, Farrokh, and Colin Williams. "Optimal quantum circuits for general two-qubit gates." Physical Review A 69.3 (2004): 032315.
[16]:
import qiskit.tools.jupyter

%qiskit_version_table
%qiskit_copyright
Version Information
| Software | Version |
|---|---|
qiskit | 1.0.0.dev0+737f21b |
qiskit_algorithms | 0.3.0 |
qiskit_machine_learning | 0.8.0 |
| System information | |
| Python version | 3.9.7 |
| Python compiler | GCC 7.5.0 |
| Python build | default, Sep 16 2021 13:09:58 |
| OS | Linux |
| CPUs | 2 |
| Memory (Gb) | 5.792198181152344 |
| Thu Dec 14 13:53:25 2023 EST | |
This code is a part of Qiskit
© Copyright IBM 2017, 2023.
This code is licensed under the Apache License, Version 2.0. You may
obtain a copy of this license in the LICENSE.txt file in the root directory
of this source tree or at http://www.apache.org/licenses/LICENSE-2.0.
Any modifications or derivative works of this code must retain this
copyright notice, and modified files need to carry a notice indicating
that they have been altered from the originals.